Spring and warmer weather is upon us and we couldn’t be more excited! With the warmer weather comes bright colors, light dresses and the need to update our pedicure routine. Let’s face it, nobody has perfectly pedicured feet during the winter because no one can see them! Well, besides us obviously.
It’s almost sandal season and we think it’s time to take our pedicure on the next level. Agree? Treat yourself (and your toes) with some of these beautiful pedicure designs today! Remember – the shinier, the better!
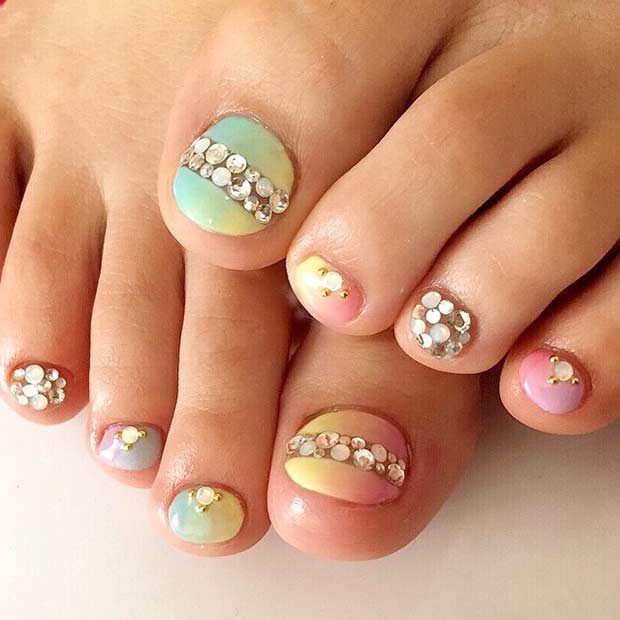
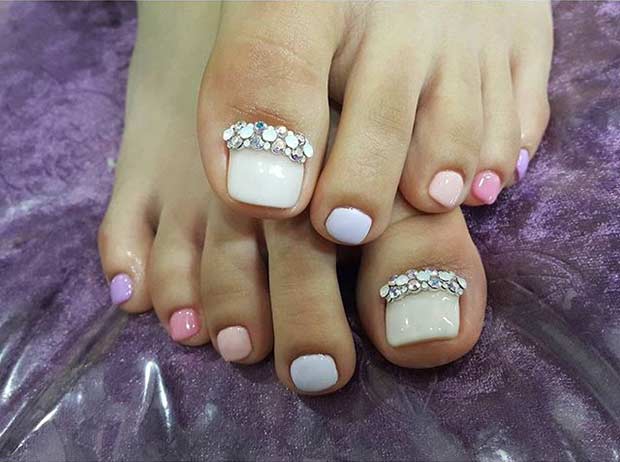
1. Pastel Hues & Rhinestones
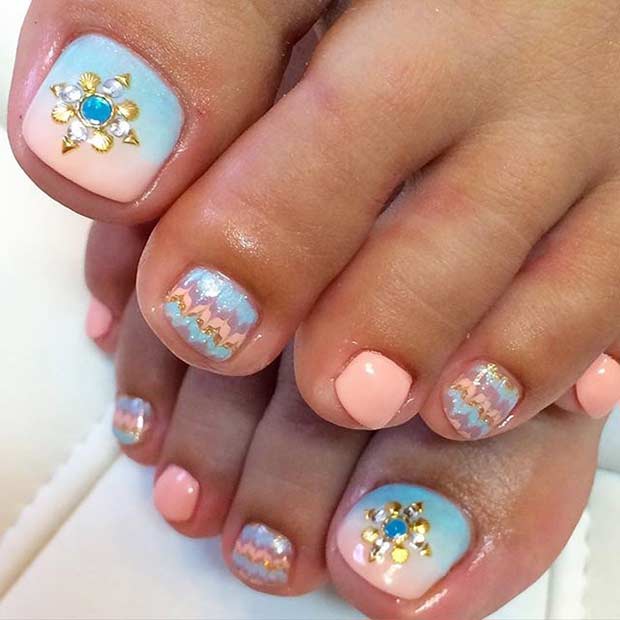
Source: @cottonail
Pretty and feminine toe nails are always in trend! Pastel pink and blue combo is sure to draw attention to your feet, especially if you spice it up with some added bling.
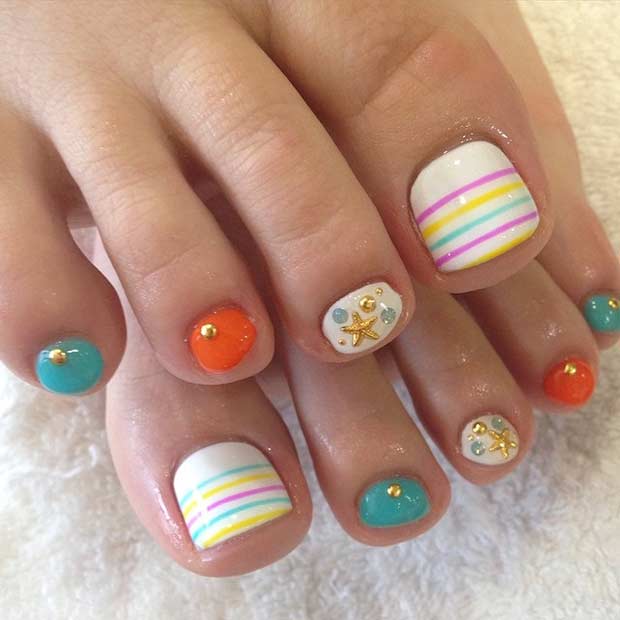
2. Cute Watermelon Design
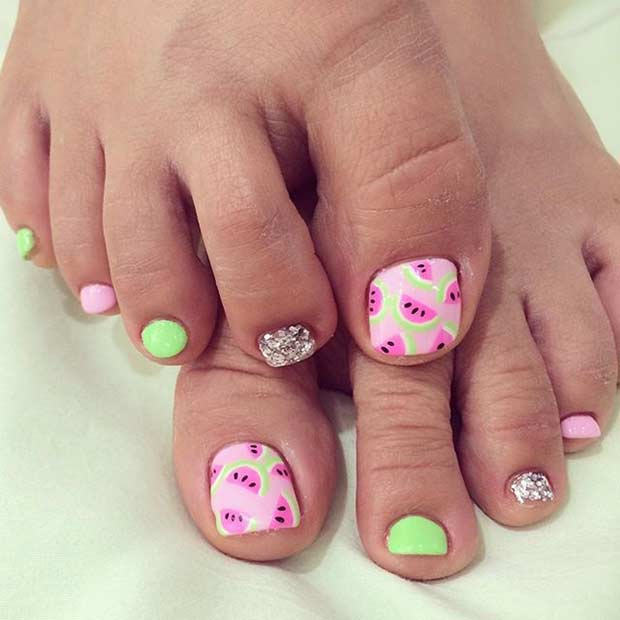
Source: @imvelynail
This spring make sure your toes are cute, bright and ready for the sunlight! Pastels + watermelons = spring and summer nail perfection.
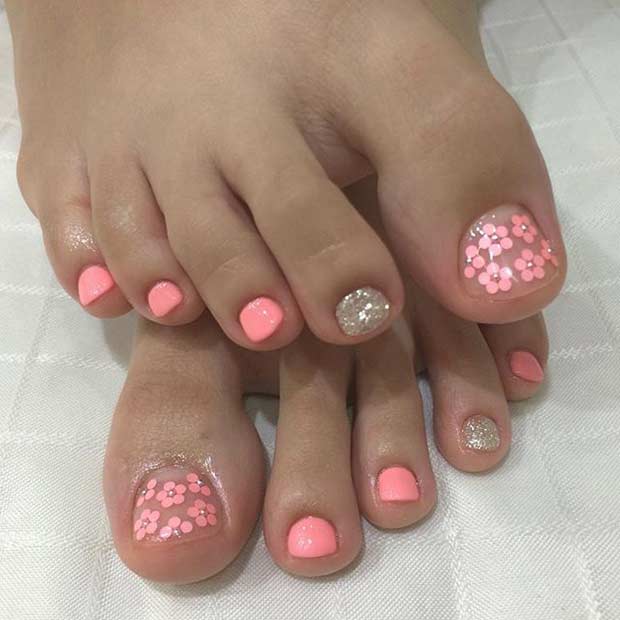
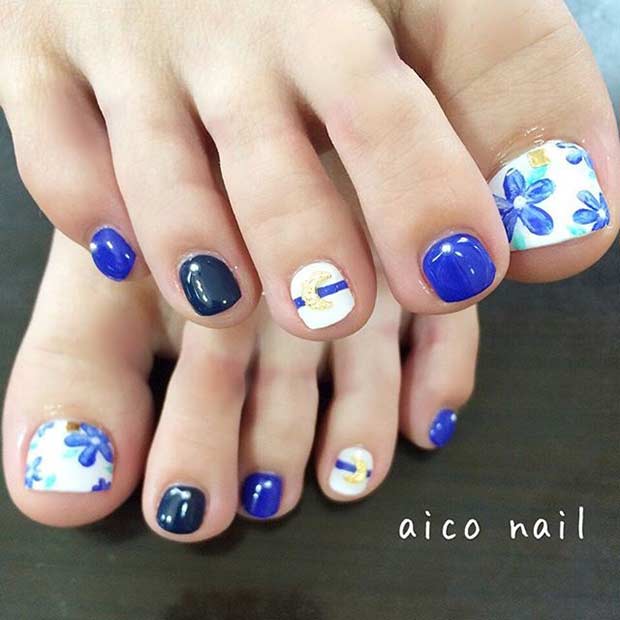
3. Bright Floral Design
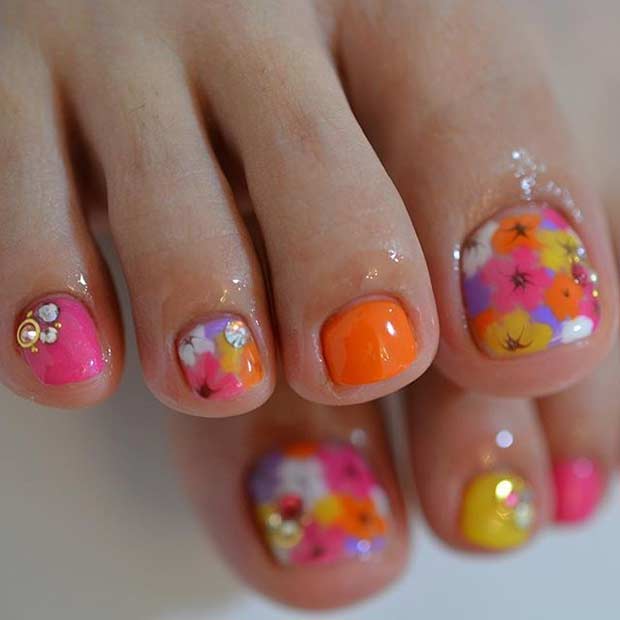
Source: @nail.elf
This flower pedicure design is sure to make your toes stand out.
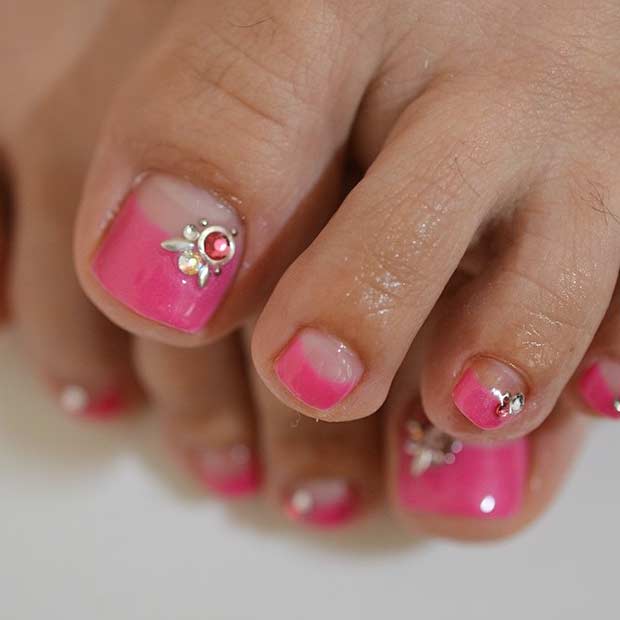
4. Pink Toes + Pearl Rhinestones
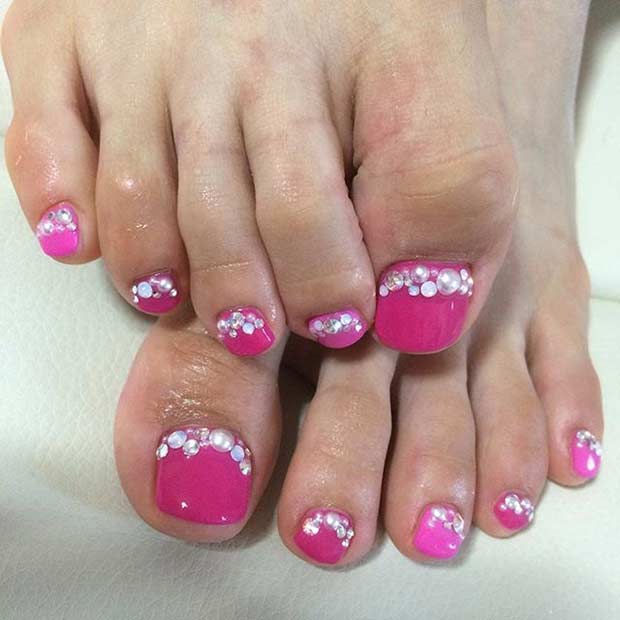
Source: @kaorin47
Sparkly beads and rhinestones have ability to turn a simple pink pedicure into a master piece. These white pearl beads look amazing against the pink background, right?
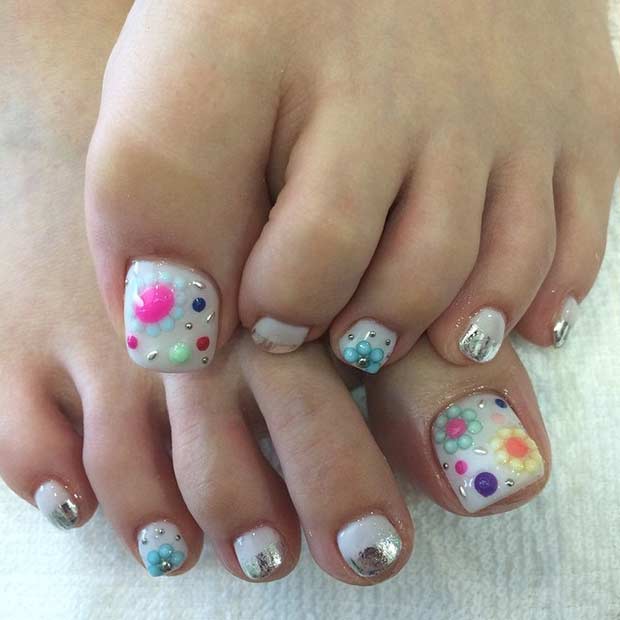
5. Pink, Neon Flowers
Source: @imvelynail
We love this cute flower design – it’s clean and simple but also eye-catching. The cute pink flowers can be easily made using a dotting tool (or a toothpick)!
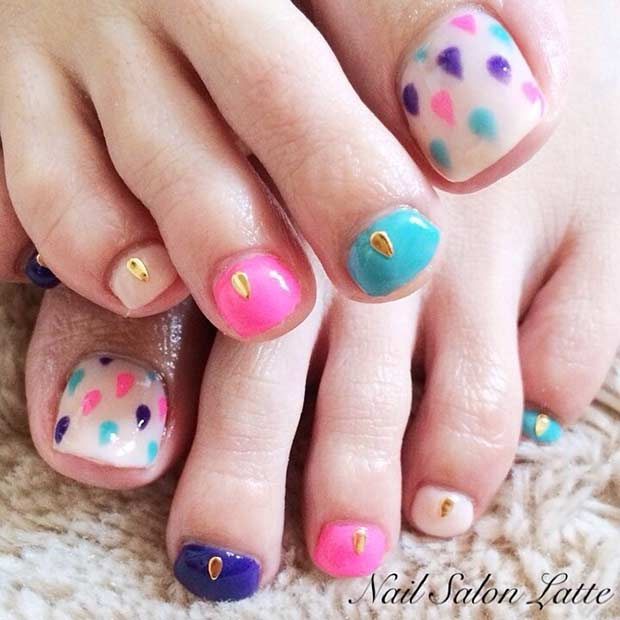
6. Colorful Toes + Rhinestones
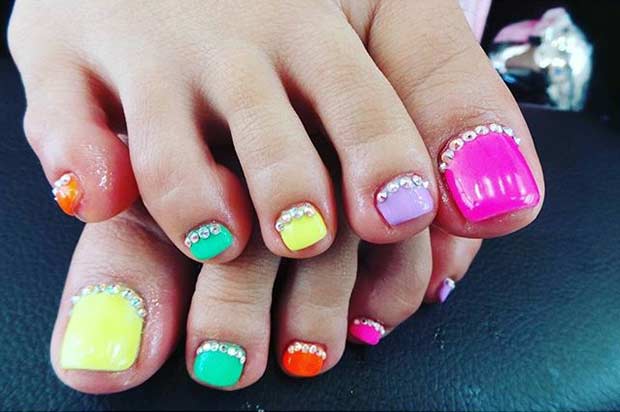
Source: @woomsnail
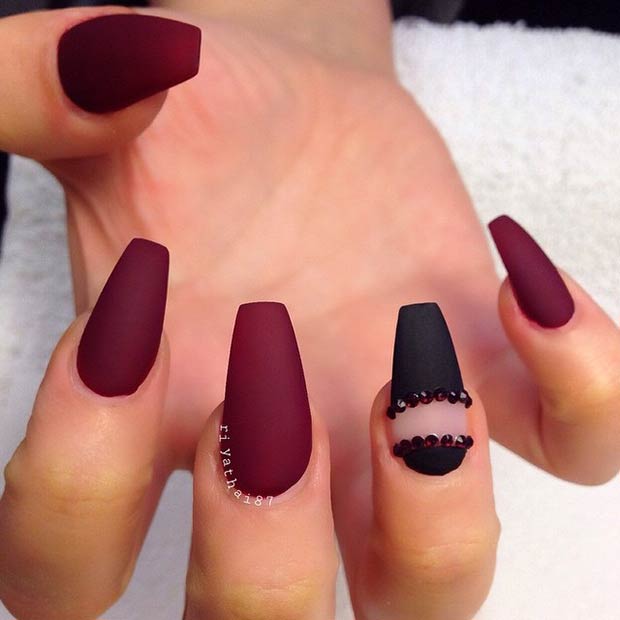
Can’t make up your mind between a few colors? Don’t. Try them all at once! Spring calls for bright and colorful hues, so why not give this pedi a try?
7. Sparkly Golden Design
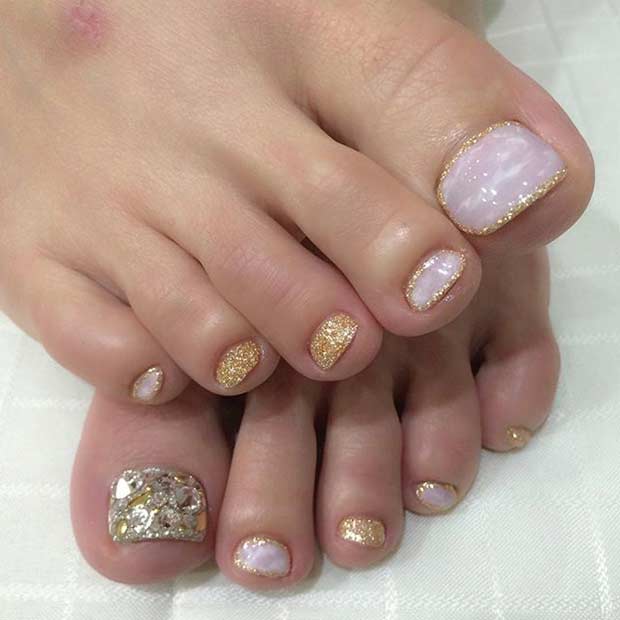
Source: @imvelynail
We love how simple yet detailed this pedicure design is. Shades of gold and nude pink are big this spring.
8. Polka Dot Design
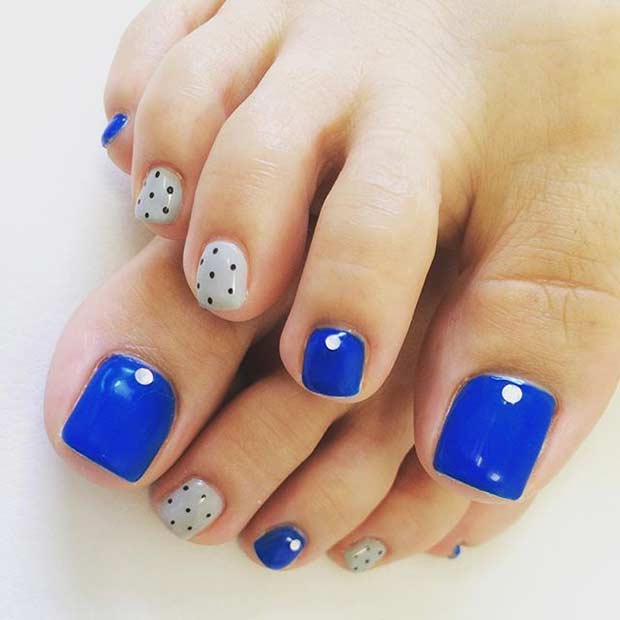
Source: @hc_angie_nail
This grey and navy design is so fresh and fun, plus it’s super easy to copy! Polka dots will always be in style. Create them using a dotting tool, toothpick or bobby pin.
9. Vibrant Green & Pink Design
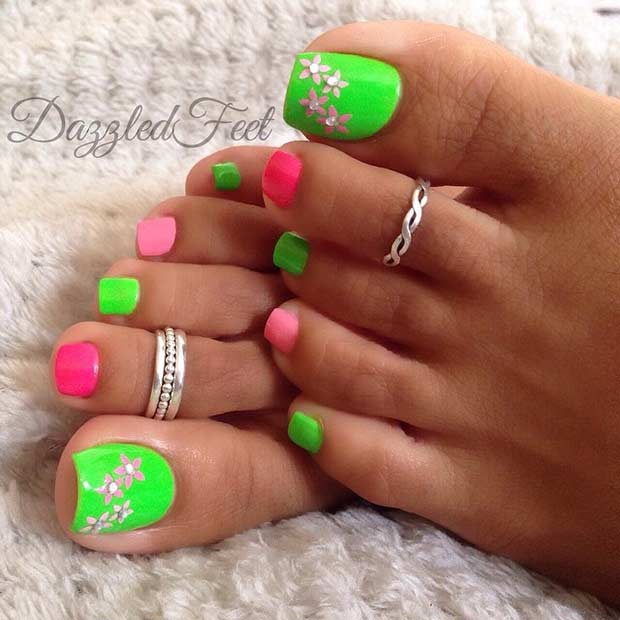
Source: @dazzledfeet
If you’re in the mood for something fun and bright, give this green and pink pedicure a try! What an easy way to spice up your toes, right?
10. Pink Glitter Design

Source: @cottonail
We’re obsessed with this simple yet breathtaking pedicure! This color combo is sure to make your toenails pop.
11. Matching Pastel Pedicure & Manicure
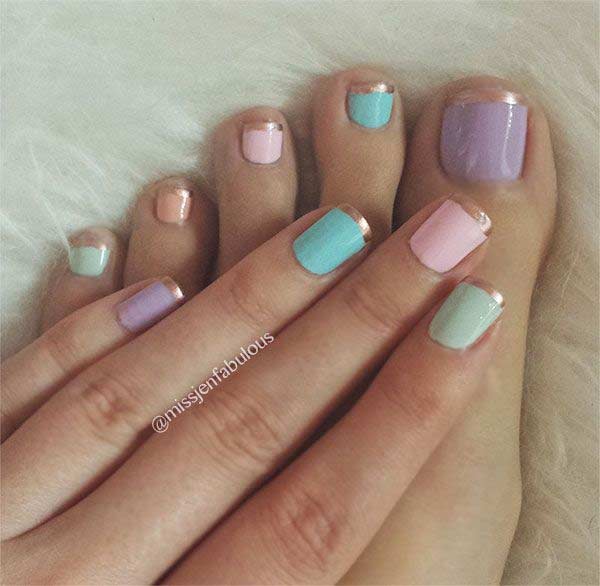
Source: @jennyclairefox
For spring, we’re feeling a French pedicure with a twist! Pastel colors are so fun, especially if you pair them with gold. Gold tips make the pastel colors stand out even more.
12. Red Pedicure with Rhinestones
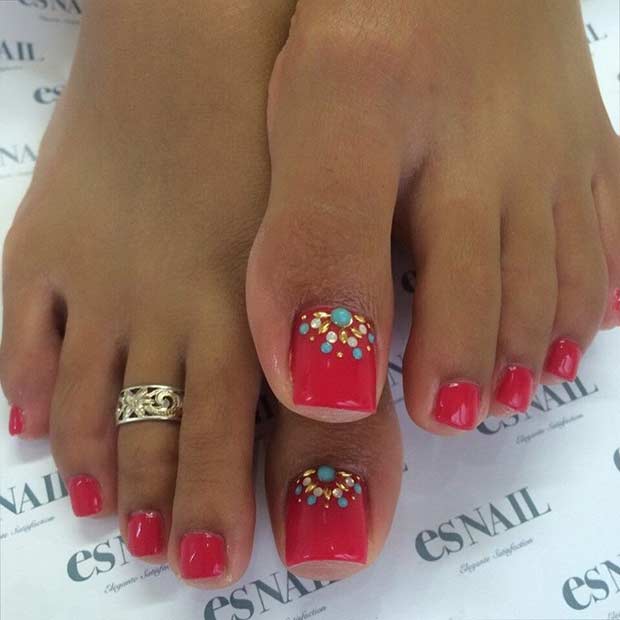
Source: @esnail_japan
One of the best ways to accent your spring outfit is with an elegant and feminine pedicure. Just don’t get carried away with your nail art rhinestones and beads – sometimes, less is more.
13. Skinny French Pedicure
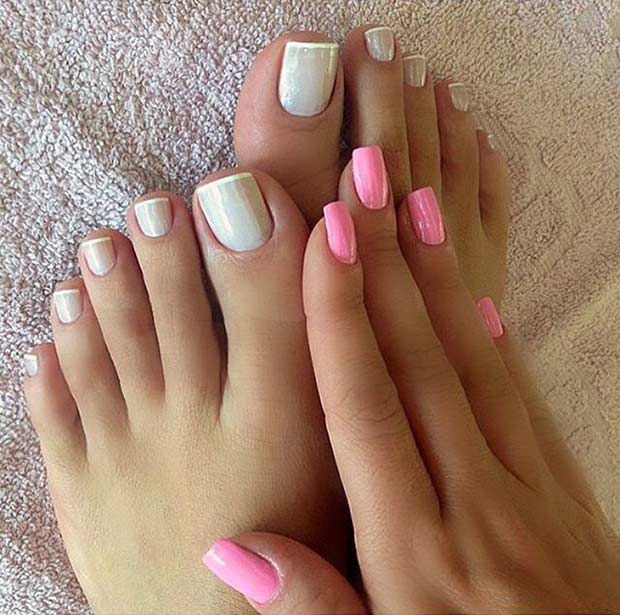
Source: @pedicuress
A classic French pedi will never go out of style. Make sure to give this look a try.
14. Easy, Simple and Beautiful

Source: @cottonail
This simple pedicure design is one of the easiest and best to start with for spring 2016. Simply paint four toenails in a white shade, two in a light blue, and the last four in a sparkly silver shade. If this pedi is too simple for your taste, you can always add some rhinestones or other nail art embellishments. Be creative!
15. White Pedicure with Colorful Rhinestones
Source: @quinaileyelash
Colorful rhinestones and silver details create a trendy and unique pedicure design against white background. We love everything about this look!
16. Elegant Gray Pedicure

Source: @ina__life
If you want something elegant with a tasteful dose of bling, this gray and silver pedicure is the perfect design for you! For this pedi, you’ll need a shimmery gray nail polish, nail art glue, and some rhinestones and silver stripes. Easy-peasy!
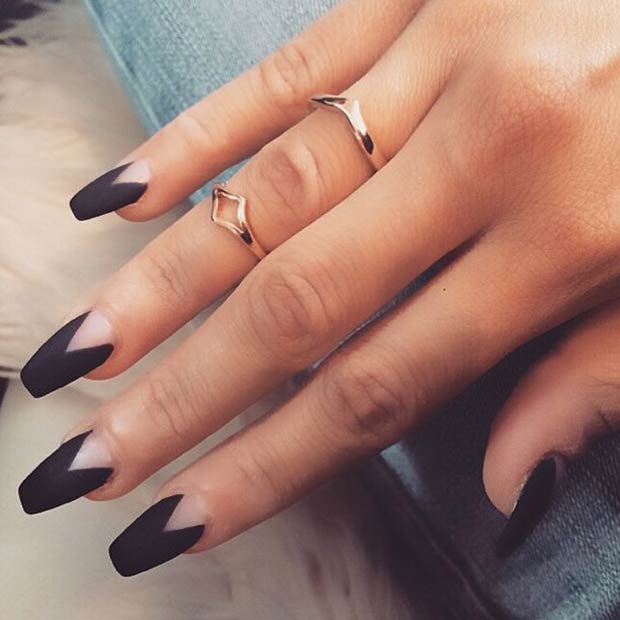
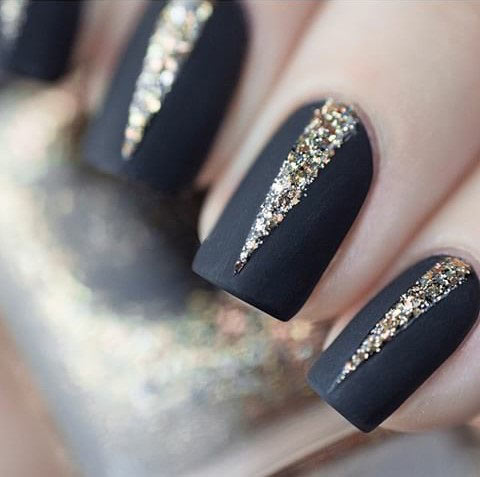
17. Black Broken Glass Design

Source: @nailcooker
Broken or shattered glass nails are the latest, and one of the baddest nail art trends for spring 2016. If you’re feeling this trend, check out our other article (31 Jaw-Dropping Broken-Glass Nail Designs) for more inspiration.
18. Burgundy & Gold Design
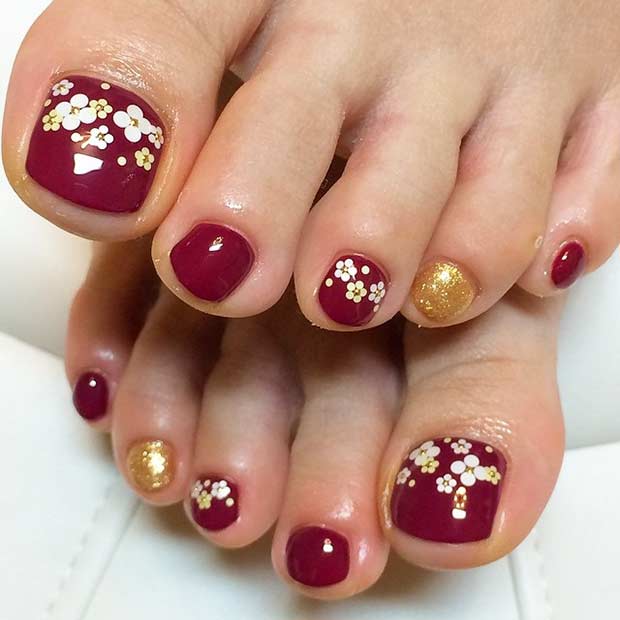
Source: @cottonail
How cute are these daises against the burgundy background? In spring, you can never go wrong with a flower pedicure.
19. Simple Pastel Design
Source: @kumilatte
Don’t want to commit to just one color? Paint your toenails in a variety of pastel colors and accent them with gold studs.
20. Green & Yellow Flower Design
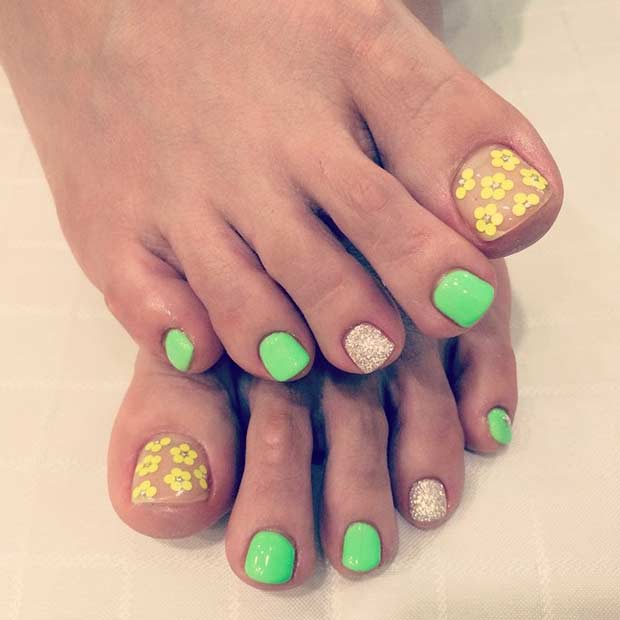
Source: @imvelynail
We love this combo of green, yellow and gold glitter – perfect for warmer weather. That flower accent toenail is to die for!
21. Simple Pedi with Rhinestones
Source: @ittan912
Want your toe nails to get noticed? Adorn them with rhinestones!
22. Stripes + Golden Rhinestones
Source: @quinaileyelash
In spring and summer, boring nail designs and hues are a big no-no. Make your pedicure pop with some tiny gold studs.
23. Blue Flower Design
Source: @aico_1220
Flower accent nails are fun and easy for spring. Plus, you can’t go wrong with flowers during this warm and sunny season. By only painting the flowers on one toenail rather than all of them, you’re making your life easier.
24. Pastel Purple Design

Source: @quinaileyelash
One of the hottest accessories for spring 2016 are: bright, cute, and well-kept toenails. Sunny days are the perfect time to break out all your favorite pastel and neon polishes.
25. Pink, Half Moon Pedicure
Source: @nail.elf
If you’re looking to dress up your toe nails, why not try a trendy half-moon design?
26. Colorful Design with Golden Beads

Source: @satokojo
In spring, colorful pastel toenails make you instantly fashionable!
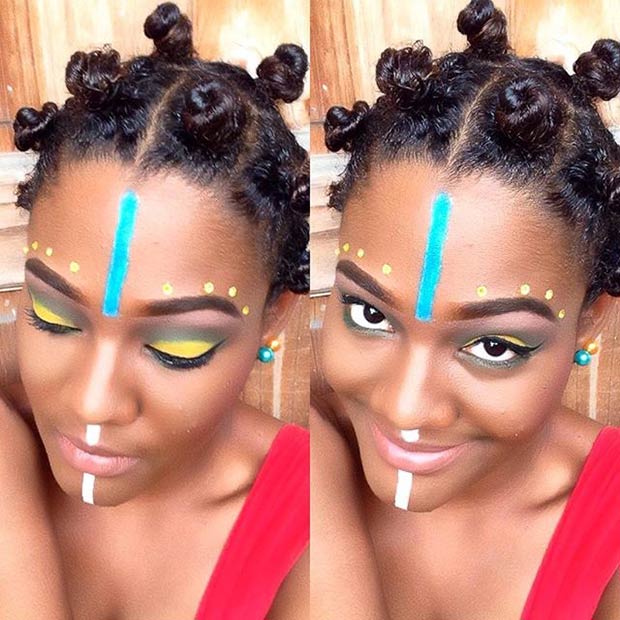
27. Tribal Pedicure Design

Source: @kumilatte
Turn heads with this amazing tribal-inspired pedicure. This one will surely find its place on our to-do list this spring.
28. Simple Pedicure with Rhinestones
Source: @nailcooker
Clean, perfectly pedicured pastel nails are a must-try look for spring. Jazz them up with an eye-catching, rhinestone embellishment for that extra va-va-voom.
29. Pink Pedicure with Rhinestones

Source: @quinaileyelash
Gold glitter accent nails are a fun and easy way to add some subtle sparkle to your mani/pedi. Simply paint each toenail in a hot pink shade and apply two rows of rhinestones on your big toes. Yes, it’s that simple!
30. Sparkly Flower Design

Source: @quinaileyelash
This cute flower pedicure design will have everyone asking where you got your nails done. If they only knew…
31. Mint and Golden Pedicure Design

Source: @cottonail
Is there a better color combination for the spring? We certainly don’t think so. To re-create this design, simply pair your favorite mint polish with some strategically placed rhinestones and golden nail art jewelry.
Every woman loves to splash on makeup products. Unfortunately, makeup can be a pretty expensive hobby. If you’re spending too much on high-end makeup and want to save some money, you’re gonna love our dupe list with 35 amazing (and expensive) makeup products and their duplicates (dupes). It will change your world and save you up to $480! You can thank us later.
Reminder: Just because a makeup product is cheaper, doesn’t mean it’s worse!
1. The Balm “Adoring” Dupe

Source: @iam_marie3
These two shades look exactly the same!
The Balm “Adoring”: $17
ColourPop “Avenue”: $6
Saved → $11
2. Lime Crime “Faded” Dupe
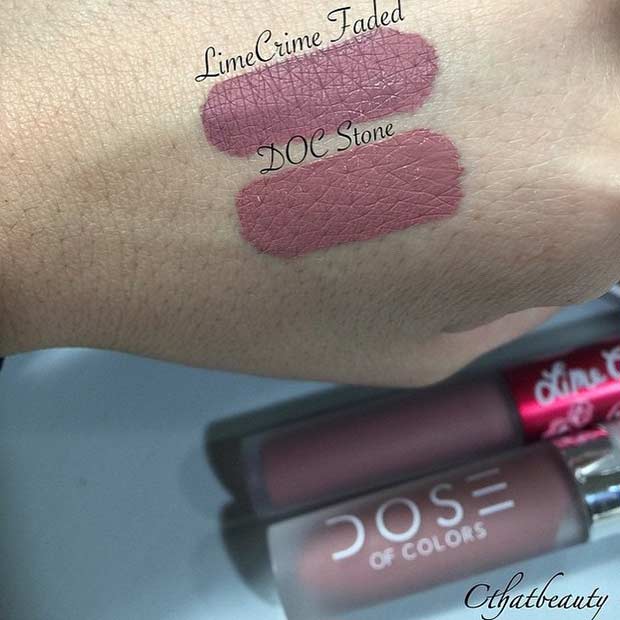
Source: @cthatbeauty
Every woman should own at least one mauve lipstick! This shade is perfect for just about every occasion.
Lime Crime “Faded” = $20
Dose of Colors “Stone” = $18
Saved → $2 (The price difference isn’t big, but many people are boycotting Lime Crime because of THAT credit card fraud in 2015).
3. Kat Von D “Lolita” Dupe
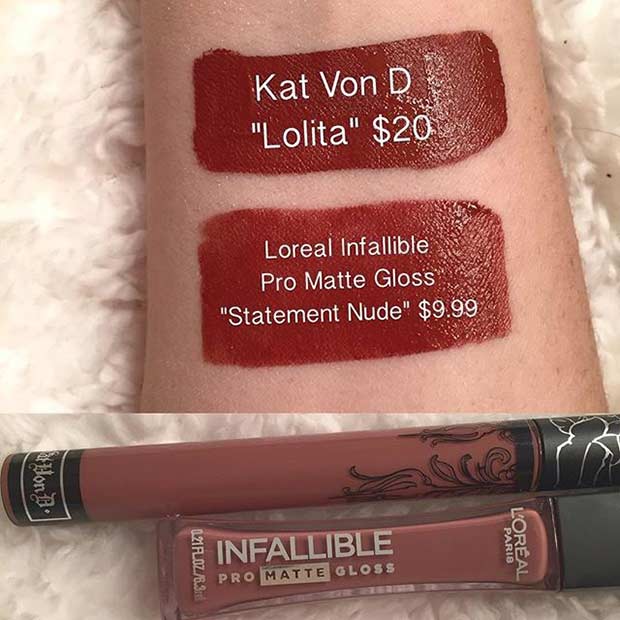
Source: @_makeupmistress_
Instead of spending $20 on Kat Von D’s Lolita lipstick, spend less than $10 on L’Oreal’s dupe.
Kat Von D “Lolita” = $20
L’Oreal Infallible Pro Matte Gloss “Statement Nude” = $9.99
Saved → $10
4. Kylie Jenner Lip Kit Dupes
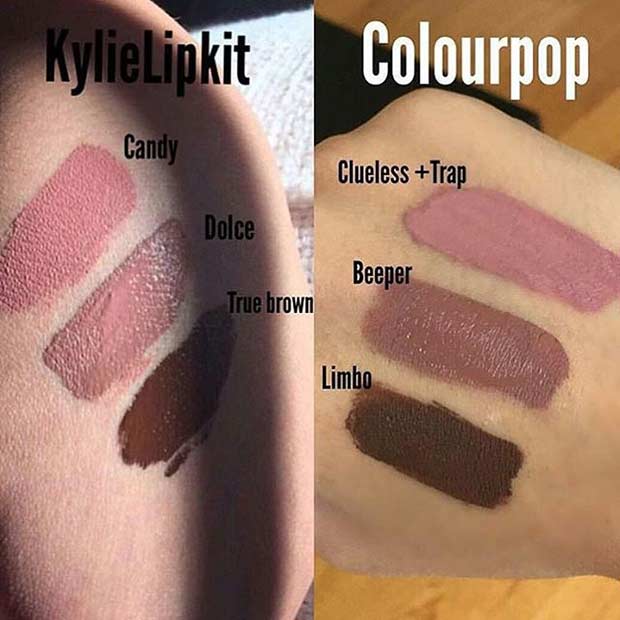
Source: @gulfbeauty
ColourPop lipsticks “Clueless+Trap”, “Beeper” and “Limbo” are nearly identical to Kylie Jenner’s shades “Candy K”, “Dolce K” and “True Brown”.
Kylie Lip Kit (lipstick + lipliner) = $29
ColourPop lipstick = $6
Saved → $23
5. YSL “Beige Tribute” Dupe
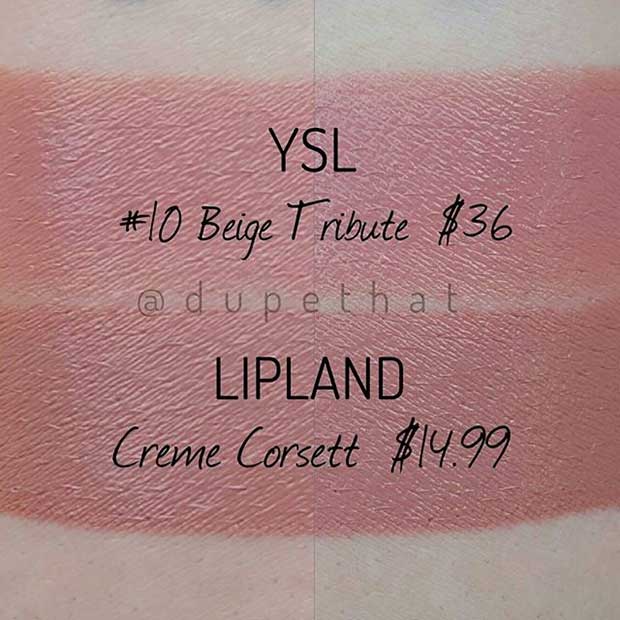
Source: @dupethat
Let’s face it, YSL lipsticks are super beautiful and luxurious but also super expensive. Luckily for your bank account, we found a dupe that will save you $21!
YSL “Beige Tribute” = $36
Lipland “Creme Corsett” = $14.99
Saved → $21
6. Kat Von D “Vampira” Dupe
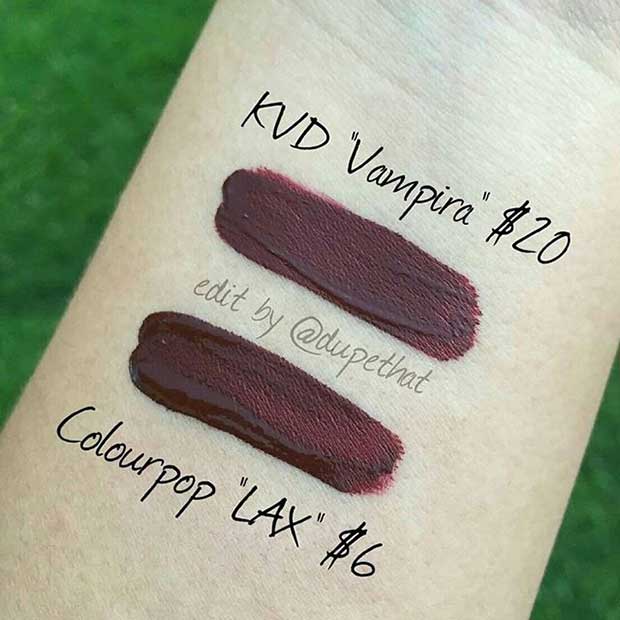
Source: @22alejandra
Instead of Kat Von D’s lipstick in shade “Vampira”, buy ColourPop’s cheaper version in shade “Lax” and save $14!
KVD “Vampira” = $20
ColourPop “Lax” = $6
Saved →$14
7. MAC “Rebel” Dupe
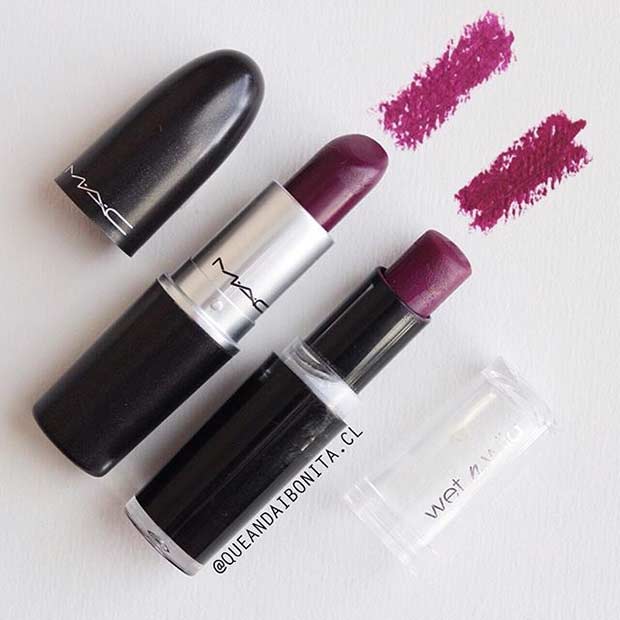
Source: @queandaibonita.cl
Love MAC but don’t love the prices? Swap MAC’s “Rebel” with Wet n Wild’s “Sugar Plum Fairy” and save BIG. Wet n Wild lipsticks are long lasting and ridiculously cheap .
MAC “Rebel” = $17
Wet n Wild “Sugar Plum Fairy” = $1.99
Saved → $15
8. Stila “Fiery” Dupe
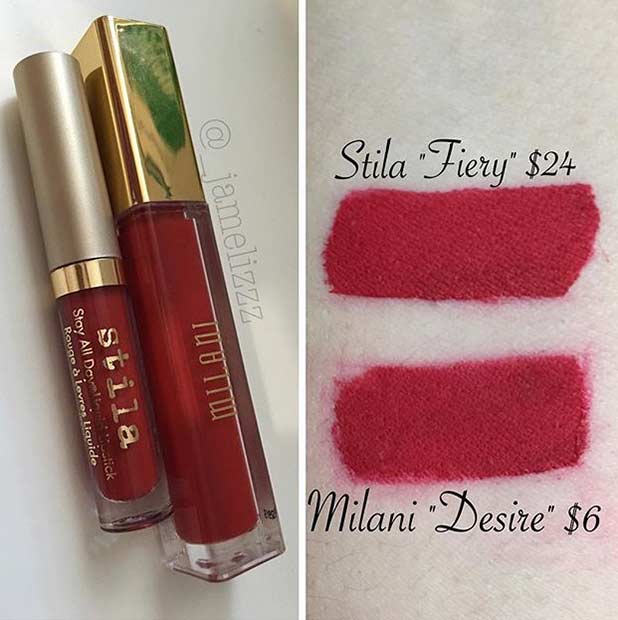
Source: @_jamelizzz
Who wouldn’t want to color their lips with this gorgeous, matte red shade?
Stila “Fiery” = $24
Milani “Desire” = $6
Saved → $18
9. Lime Crime “Wicked” Dupe
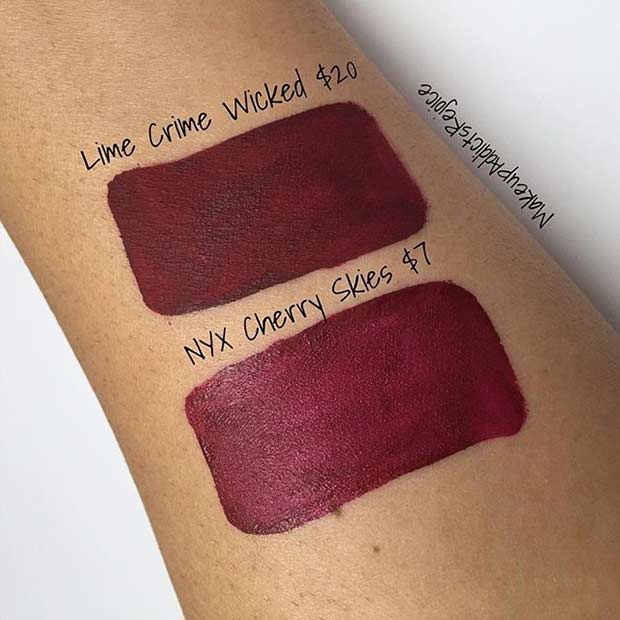
Source: @lifebynoosha
NYX has some insanely pigmented and affordable lipsticks, and “Cherry Skies” is one of them.
Lime Crime “Wicked” = $20
NYX “Cherry Skies” = $7
Saved → $13
10. Kylie Jenner Lip Kit “Dolce K” Dupe
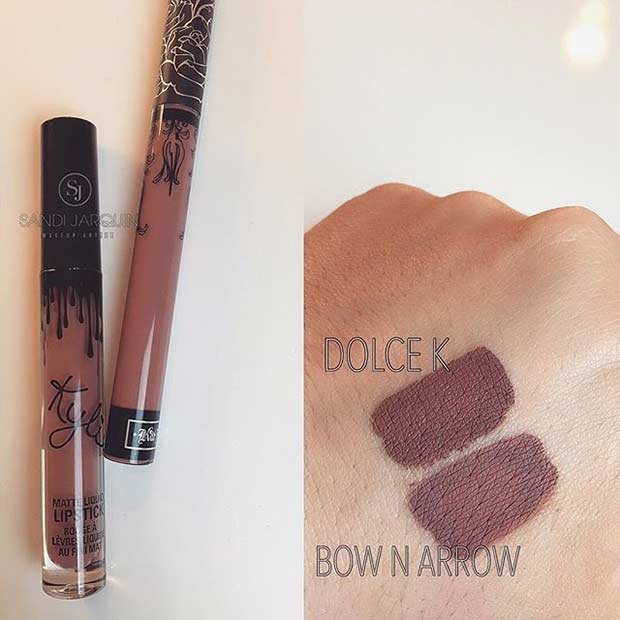
Source: @sandijarquin
Didn’t get your hands on one of the Kylie Jenner’s Lip Kits? Kat Von D’s “Bow n Arrow” is a perfect dupe for Kylie’s “Dolce K”.
Kylie “Dolce K” = $29
Kat Von D “Bon n Arrow” = $20
Saved → $9
11. Kat Von D “Lolita II” Dupe

Source: @iam_marie3
The newest version of Kat Von D’s Lolita has much more pinky rose undertones and looks almost the same as The Balm Cosmetics’ liquid lipstick in shade “Committed”.
Kat Von D “Lolita II” = $20
The Balm Cosmetics “Committed” = $17
Saved → $3
12. Lime Crime “Faded” Dupe

Source: @melpopbeauty
You can find Essence makeup online at Ulta’s website. It’s really cheap!
Lime Crime “Faded” = $20
Essence “Satin Mauve” = $1.99
Saved → $18
13. Anastasia Beverly Hills “Craft” Dupe
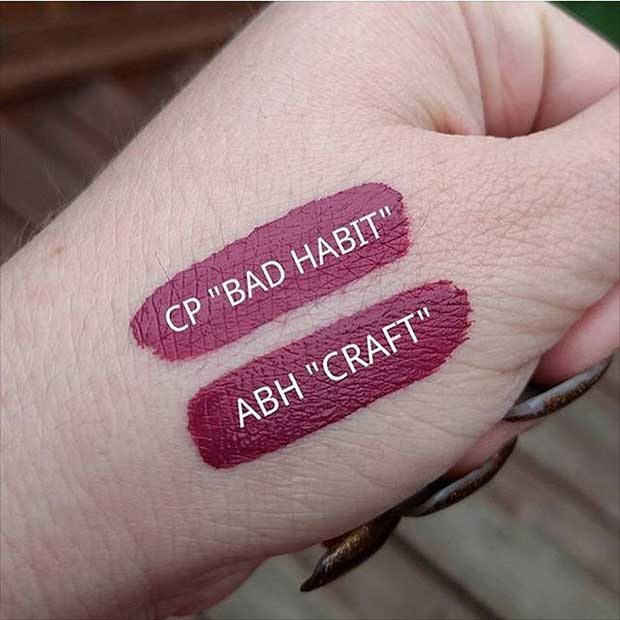
Source: @colourpopcult
Instead of the ABH’s liquid lipstick in “Craft”, buy ColourPop’s cheaper version.
Anastasia Beverly Hills “Craft” = $20
ColourPop “Bad Habit” = $6
Saved → $14
14. NARS “Orgasm” Dupe
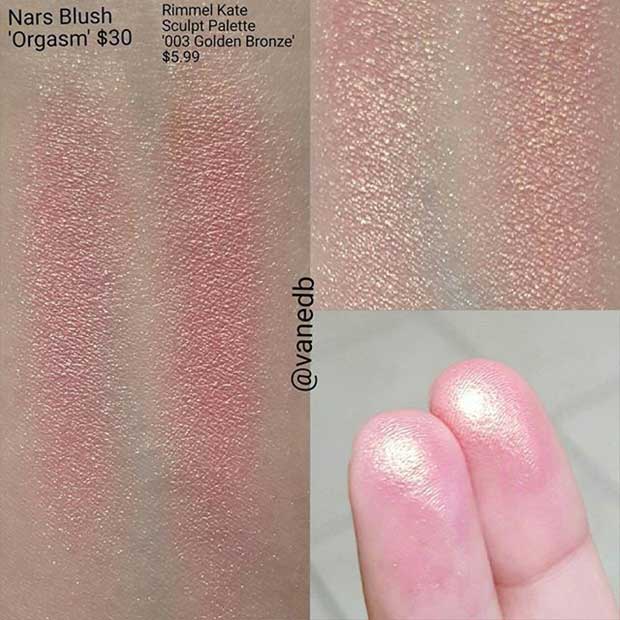
Source: @vanedb
Very identical we must say!
NARS Blush “Orgasm” = $30
Rimmel Kate Sculpt Palette “003 Golden Bronze” = $5.99
Saved → $24
15. Jeffree Star “Androgyny” Dupe
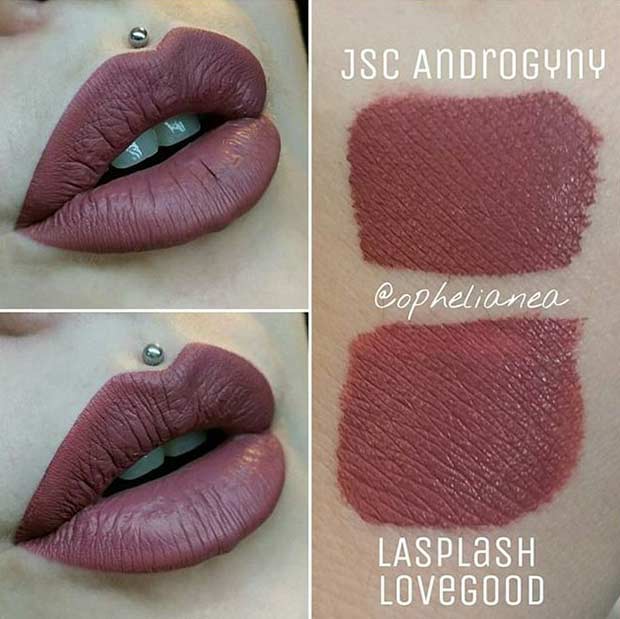
Source: @ophelianea
LASplash’s Lovegood (later renamed as Lovestruck) is bottled magic!
Jeffree Star “Androgyny” = $18 (Out of Stock)
LASplash “Lovestruck” = $16
Saved → $2
16. Lime Crime “Utopia” Dupe
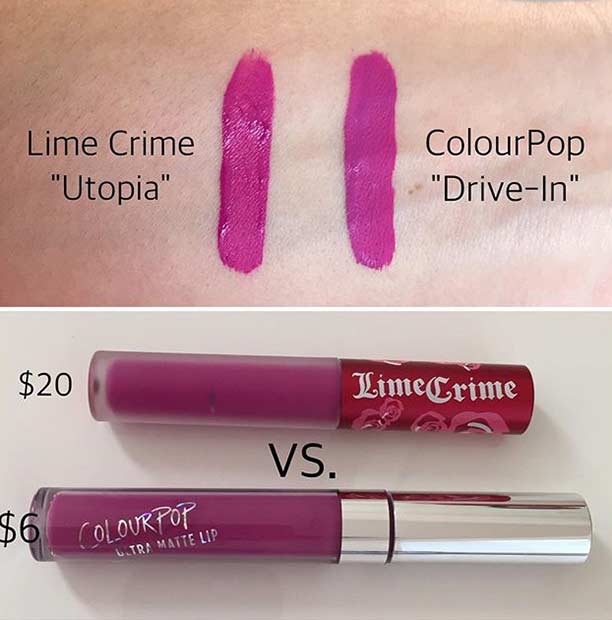
Source: @teciaemerald
Go outside your comfort zone and add some pop to your lips with a bright, pink lipstick!
Lime Crime “Utopia” = $20
ColourPop “Drive-In” = $6
Saved → $14
17. Naked 2 Palette Dupe
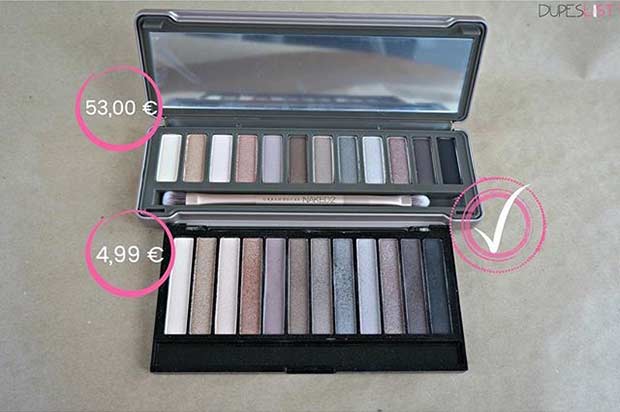
Source: @dupeslist
Can’t afford a Naked palette? Don’t worry! This beaut by Makeup Revolution is almost as good as Urban Decay’s Naked 2 palette.
Naked 2 = $54
Makeup Revolution “Iconic 2” = $6.14
Saved → $47.86
18. Kylie Lip Kit “Candy K” Dupe

Source: @dupethat
Here’s another amazing dupe for Kylie’s lipstick in shade “Candy K”.
Kylie “Candy K” = $29
Lonely Planet “Concrete Jungle” = $15
Saved → $14
19. Stila “Aria” Dupe
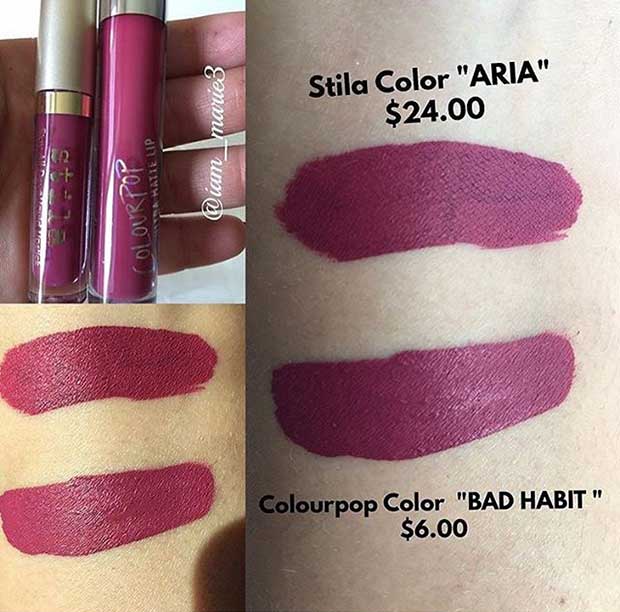
Source: @colourpopcult
Save $18 on lipstick by going from Stila to ColourPop.
Stila “Aria” = $24
ColourPop “Bad Habit” = $6
Saved → $18
20. MAC “Ruby Woo” Dupe

Source: @colourpopcult
For only $5, you can have beautiful, matte red lips!
MAC “Ruby Woo” = $17
ColourPop “Trust Me” = $5
Saved → $12
21. Anastasia Beverly Hills “Pure Hollywood” Dupe
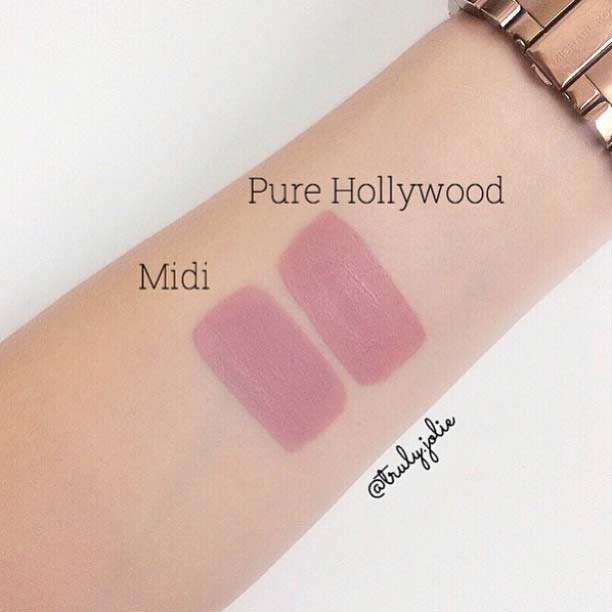
Source: @truly.jolie
Who doesn’t love a good bargain? This ColourPop lipstick in shade “Midi” works just as well as the ABH “Pure Hollywood”.
Anastasia Beverly Hills “Pure Hollywood” = $20
ColourPop “Midi” = $6
Saved → $14
22. Amrezy Lipstick Dupe
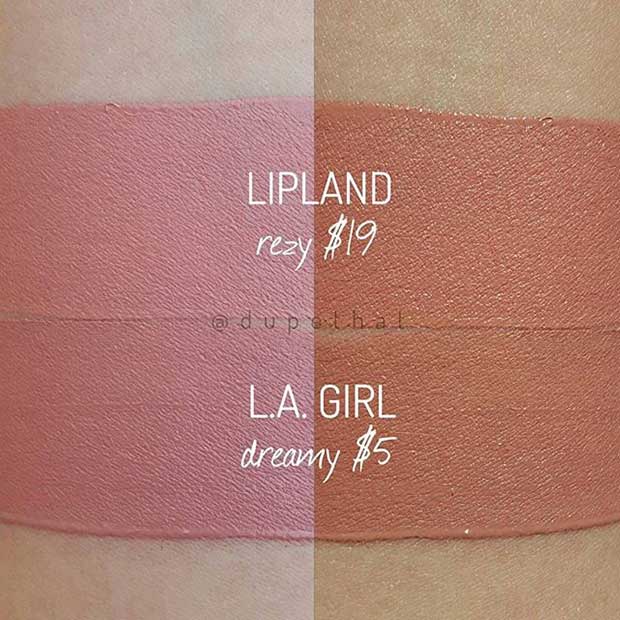
Source: @dupethat
Amra Olevic, better known as Amrezy or Glamrezy to her 4 million followers on Instagram, is a Montenegrin makeup goddess based in LA. Recently she partnered with LipLand Cosmetics to create her own collection of matte liquid lipsticks. Her collection features three shades – Brooklyn, Montenegro, and Rezy.
LipLand Cosmetics “Rezy” = $19
L.A. Girl “Dreamy” = $5
Saved → $14
23. LA Splash “Latte Confession” Dupes
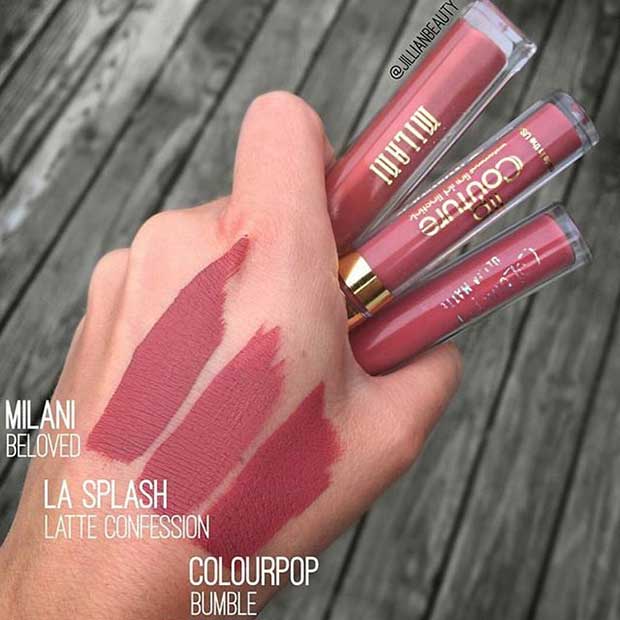
Source: @jillianbeauty
You must own at least one lipstick in this gorgeous shade! Here are three options:
Milani “Beloved” = $8.99
LA Splash “Latte Confession” = $14
ColourPop “Bumble” = $6
Save up to → $8
24. Anastasia Beverly Hills “Sepia” Dupe
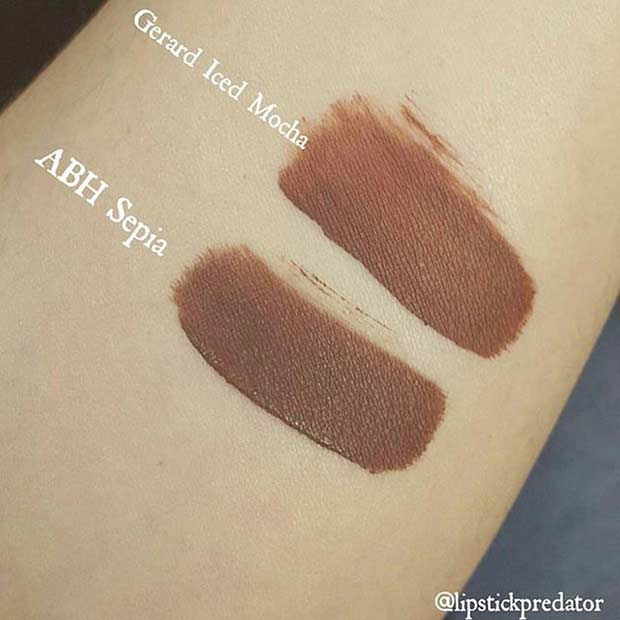
Source: @lipstickpredator
These two liquid lipsticks are similar but Gerard Cosmetics “Iced Mocha” has less grey in it. Both of these lipsticks are priced at $20.
25. MAC “Smoked Purple” Dupe

Source: @thedupedepartment
Beauty gurus swear by this drugstore swap!
MAC “Smoked Purple” = $16
Wet n Wild “Vamp it Up” = $2
Saved → $14
26. Lime Crime “Cashmere” Dupe
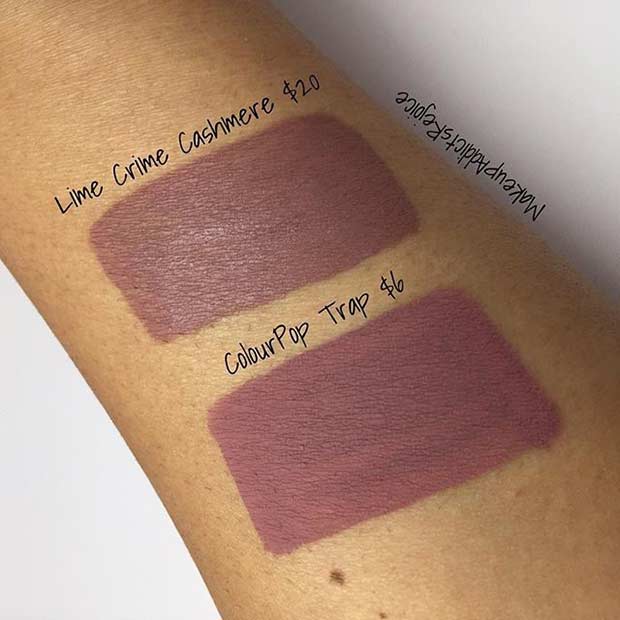
Source: @lifebynoosha
The Lime Crime “Cashmere” is priced at $20, while the ColourPop “Trap” is priced at $6. Amazing price difference!
Lime Crime “Cashmere” = $20
ColourPop “Trap” = $6
Saved → $14
27. Lime Crime “Rave” Dupe

Source: @dupethat
If you’re looking for a lipstick that is very close to the shade of Lime Crime’s “Rave”, the closest thing you can buy is ColourPop’s “Koala”. The color and finish are almost identical!
Lime Crime “Rave” = $20
ColourPop “Koala” = $6
Saved → $14
28. Kat Von D “Lolita” Dupe
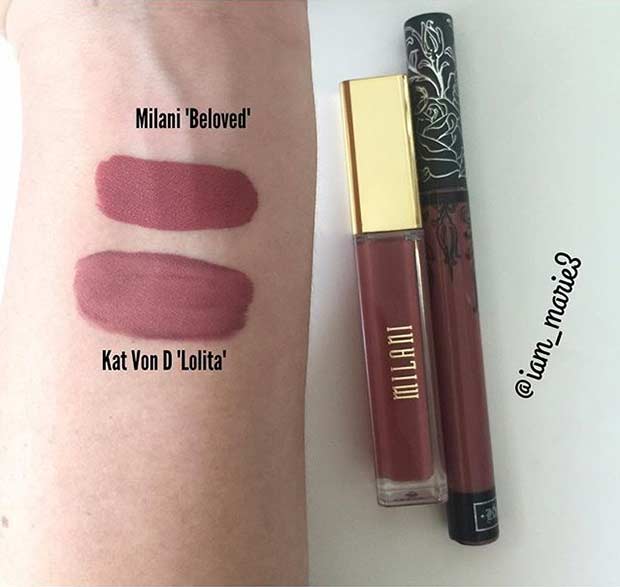
Source: @iam_marie3
This dupe is just too good not to share!
Kat Von D “Lolita” = $20
Milani “Beloved” = $8.99
Saved → $11
29. Anastasia Beverly Hills “Veronica” Dupe

Source: @rbfsays
Looking for a cheaper alternative to ABH’s “Veronica”? Don’t worry! ColourPop’s got your back.
Anastasia Beverly Hills “Veronica” = $20
ColourPop “Chilly Chill” = $6
Saved → $14
30. Three Different Lipsticks with the Same Shade

Source: @veganbeautyaddict
We love this cool toned brown/greige color!
Makeup Monsters “Wolfsbane” = $15.95
Coloured Raine “Soul” = $17
ColourPop “Kapow” = $6
Save up to → $11
31. Stila “Aria” Dupe

Source: @iam_marie3
As you can see, the L.A. Girl lipstick in “Rebel” is nearly the same exact color as the Stila’s “Aria”.
Stila “Aria” = $24
L.A. Girl “Rebel”= $5
Saved → $19
32. Lime Crime “Bleached” Dupe
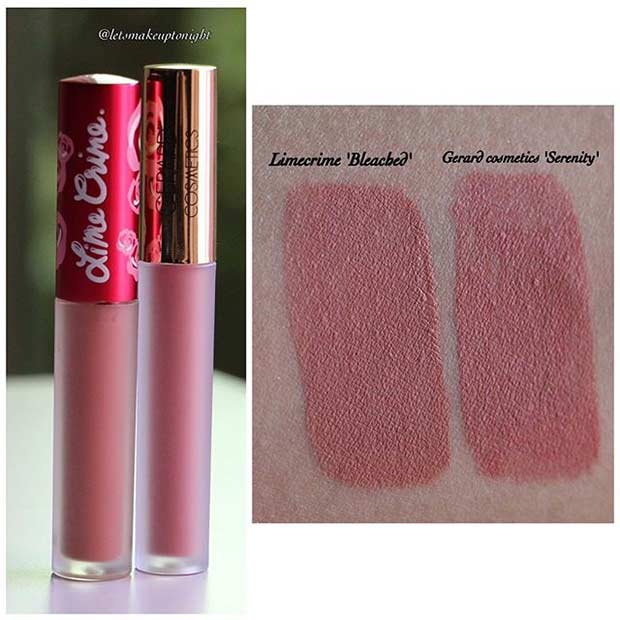
Source: @letsmakeuptonight
Why pay $20 for a lipstick when you can have the same look for as low as $13, right?
Lime Crime “Bleached” = $20
Gerard Cosmetics “Serenity” = $13.10
Saved → $6.9
33. Milani “Beloved” Dupe
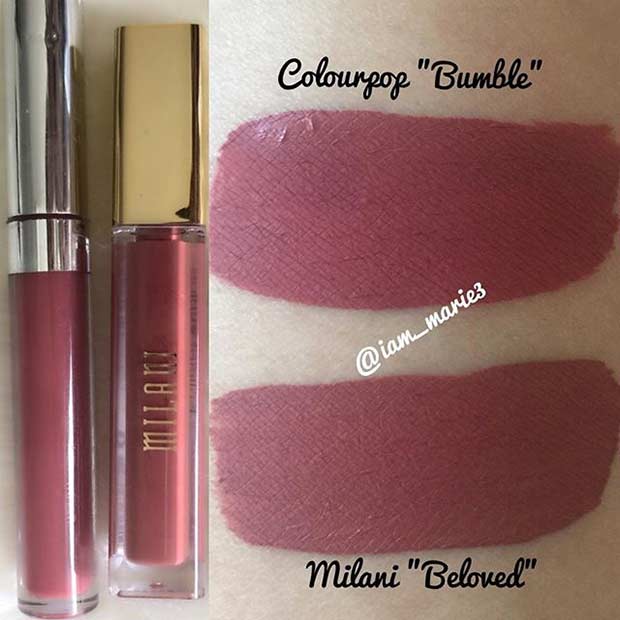
Source: @iam_marie3
Such a gorgeous lipstick shade!
Milani “Beloved” =$8.99
ColourPop “Bumble” = $6
Saved → $3
34. Kat Von D “Lolita”

Source: @vanedb
Who doesn’t love a $2 dupe?
Kat Von D “Lolita” = $20
Wet n Wild “Mocha-licious” = $1.97
Saved → $18
35. Lime Crime “Riot” Dupe

Source: @lifebynoosha
Lime Crime “Riot” = $20
ColourPop “Bumble” = $6
Saved → $14
36. Kylie Jenner “Koko K” Lipstick Dupe

Source: @rhondacalifornia
Kylie Jenner “Koko K” = $29
Jordana “Crème Brulée” = $5
Saved → $24
37. Lime Crime “Utopia” & “Suedeberry” Dupes

Source: @butter_cakes
Jordana lipsticks are on the top, and Lime Crime lipsticks are on the bottom.
Lime Crime ” Utopia” = $20
Jordana “Mango Sorbet” = $5
Lime Crime “Suedeberry” = $20
Jordana “Mixed Berry Souffle” = $5
Saved → $15
Jordana lipsticks can be found at Walgreen’s for $5 or K-mart for $3.
38. Kylie Jenner Lip Kit “Dolce K” Dupe

Source: @imeltformakeup
Kylie Jenner “Dolce K” = $29
ColourPop “Chi” = $6
Saved → $23
39. Kylie Cosmetics Lip Kit Dupes
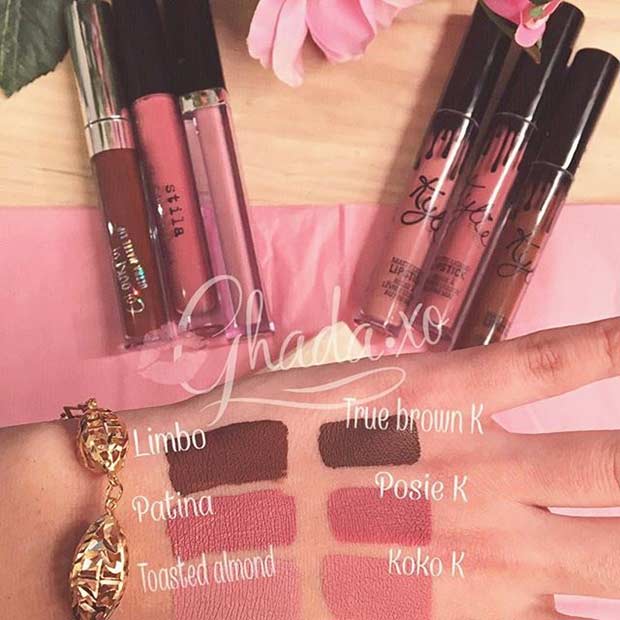
Source: @ghada.xo
Kylie Jenner “True Brown K” = $29
ColourPop “Limbo” = $6
Saved → $23
Kylie Jenner “Posie K” = $29
Stila “Patina” = $24
Saved → $5
Kylie Jenner “Koko K” = $29
L’Oreal Paris “Toasted Almond” = $6.71
Saved → $22.2
40. “Dolce K”, “Candy K” and “Mary Jo K” Dupes
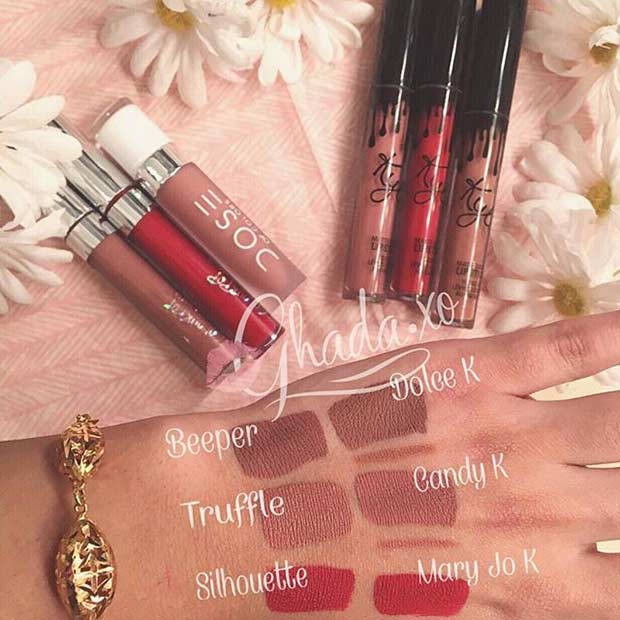
Source: @ghada.xo
Kylie Jenner “Dolce K” = $29
ColourPop “Beeper” = $6
Saved → $23
Kylie Jenner “Candy K” = $29
Dose of Colors “Truffle” = $18
Saved → $11
Kylie Jenner “Mary Jo K” = $29
ColourPop “Silhouette” = $6
Saved → $23
What are some of your favorite makeup dupes? Let us know in the comments below!
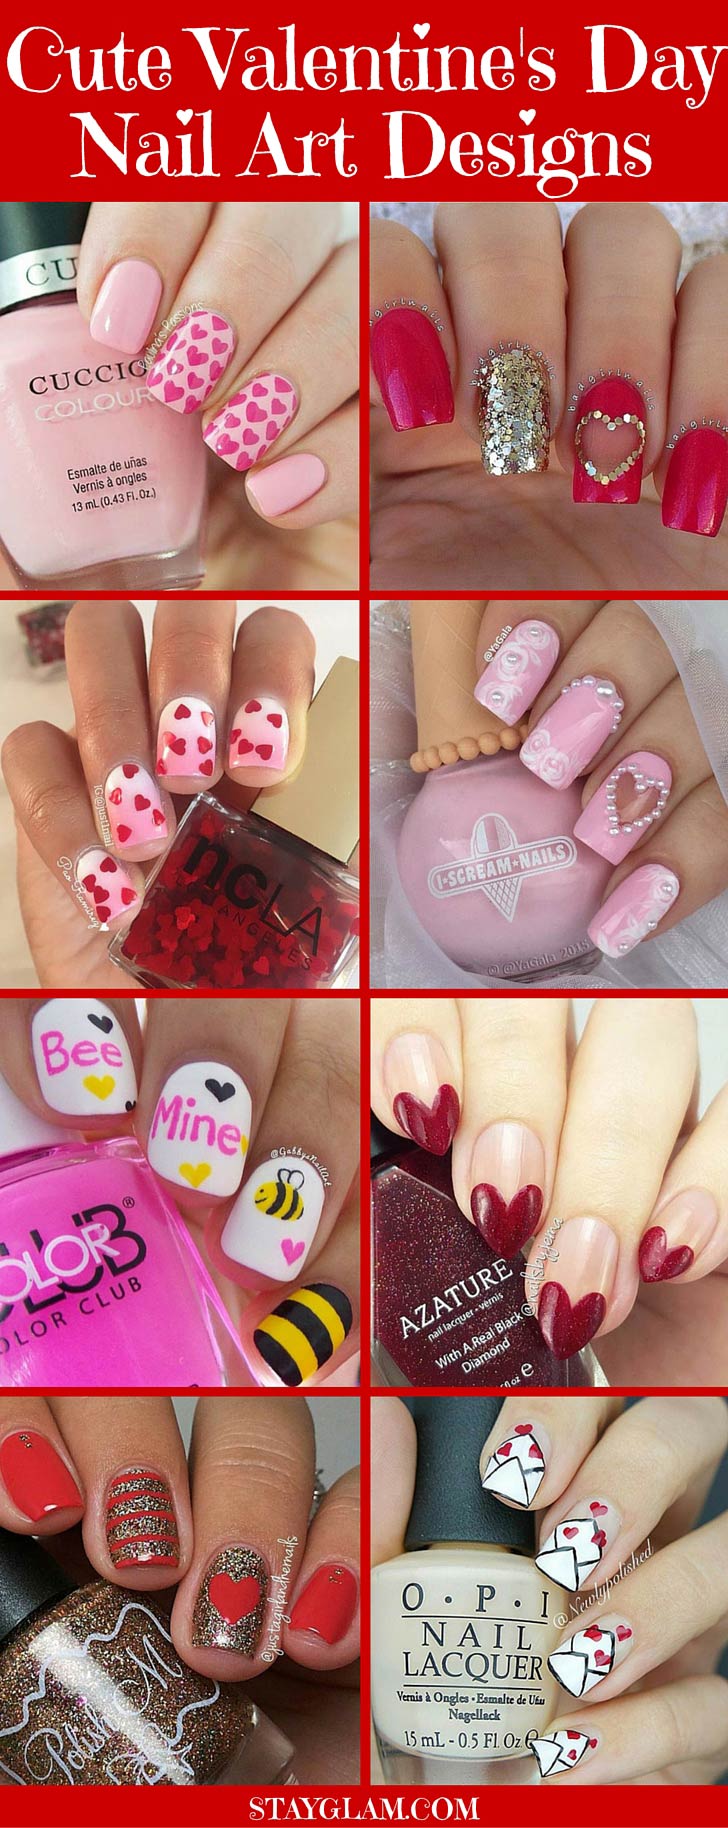
This Valentine’s Day impress your partner with some cute festival nail art. Whether you’re going out for a romantic dinner, cozying up on a sofa and watching Netflix, or just spending the night with friends, make sure your mani and pedi are on point!
We’ve found 35 adorable nail design ideas for you to try before February 14. These designs are going to make you even more excited for the festival. For some of them, we’ve even included the exact polish shades. Enjoy!
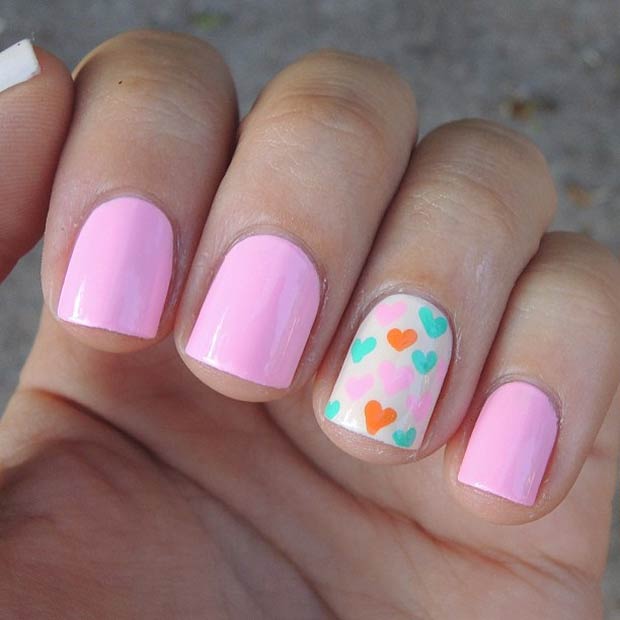
1. Pink Ombre Nails with Black Hearts
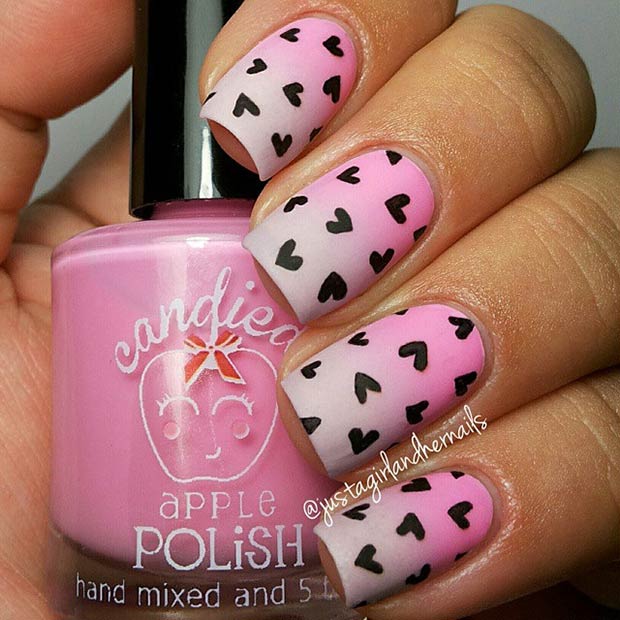
Source: @justagirlandhernails
Get into the Valentine’s Day spirit with this absolutely adorable manicure. The color combination is perfect. The hearts were drawn with a fine point sharpie. Products used: Candied Apple Polish ‘Vintage Romance’ & ‘Bubblicious Nettie’, and OPI Matte Top Coat.
2. Red Heart Tip Nails

Source: @nailsbyjema
Valentine’s day” quite like beautiful red hearts. This manicure is so easy to do and looks awesome! Obviously, the design looks the best on almond or stiletto shaped nails. Products used: Azature ‘Azature Red’ and Seche Vite ‘Dry Fast Top Coat
3. Pink & Gold Glitter Design
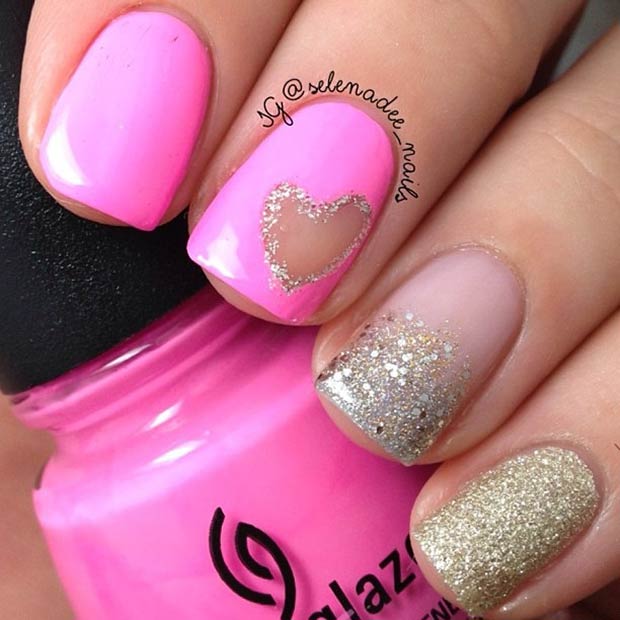
Source: @selenadee_nails
This simple pink and gold glitter design will have everyone asking where you got your nails done. Products used: Essie ‘Sugar Daddy’, China Glaze ‘Bottoms Up’ and Zoya PixieDust in ‘Tomoko’.
4. Matte Pink Hearts
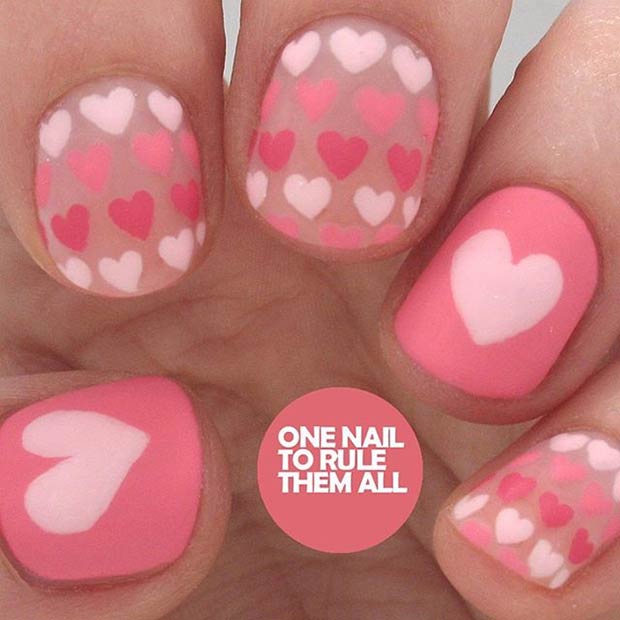
Source: @onenailtorulethemall
What’s better than hearts painted on your nails for Valentine’s Day? A matte hearts. If you want your manicure to be matte, just top it off with a matte top coat. We recommend matte top coats by OPI and Essie.
5. Gold & Red Design

Source: @badgirlnails
Update basic red with a pop of gold. The design is perfect for a last minute manicure.
6. White and Gold Valentines Nails
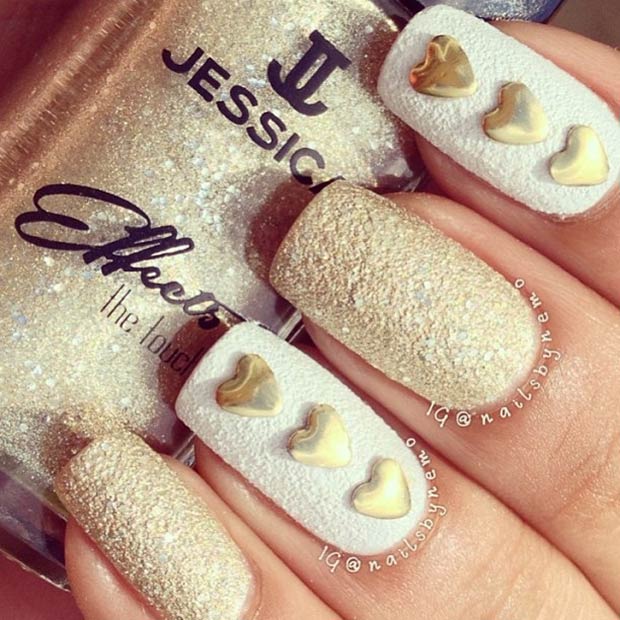
Source: @nailsbynemo
If you’re looking to keep things a little more simple for your Valentine’s Day manicure, give this design a try.
Products used: The Touch Collection by Jessica in shades ‘Touch it’ and ‘White Hot’.
7. Some Bunny Loves You!
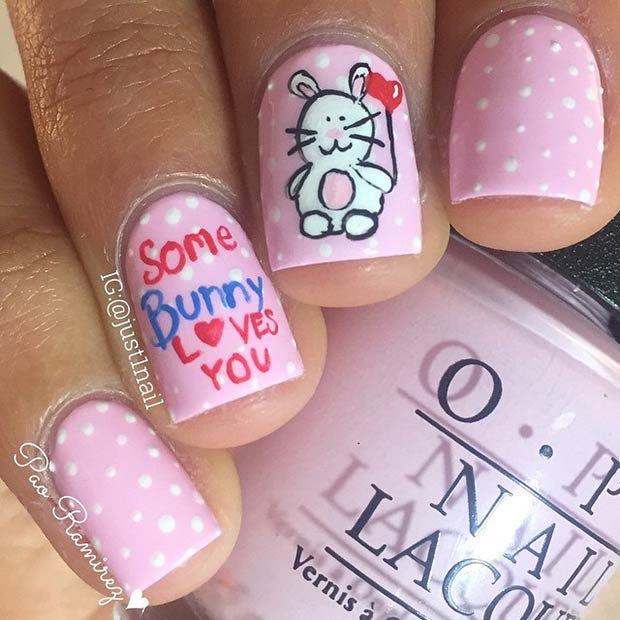
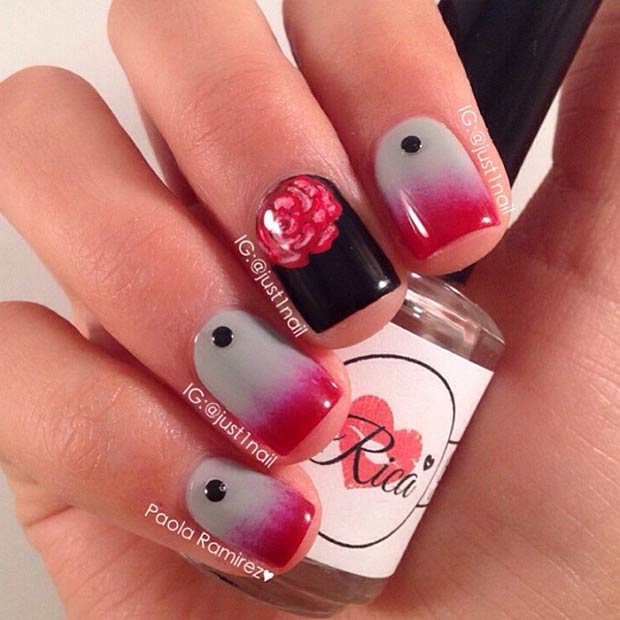
Source: @just1nail
Who says all Valentine’s day nails have to be all about the hearts? Show your softer side with a cute white bunny and ‘Some Bunny Loves You’ quote.
8. White & Pink Design
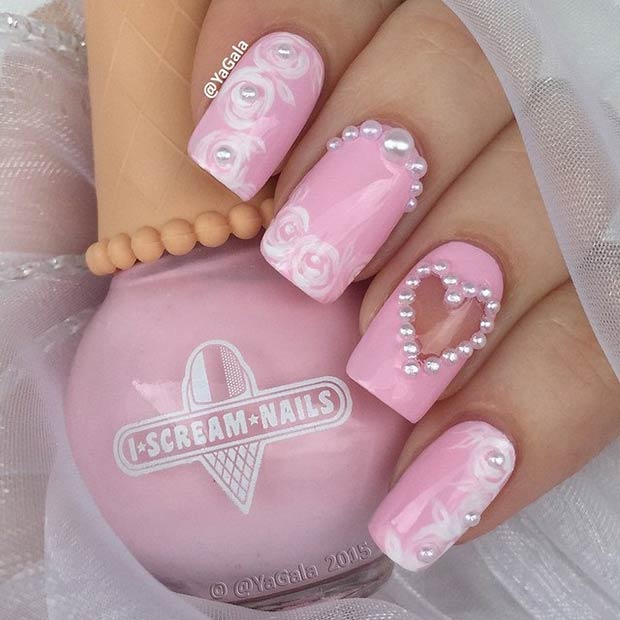
Source: @yagala
A few strategically placed pearl beads transform this simple nail design to a trendy one.
Products used: I Scream Nails ‘Vovolicious’ and Glisten & Glow ‘Top Coat’.
9. Valentines Day Matching Pedicure & Manicure
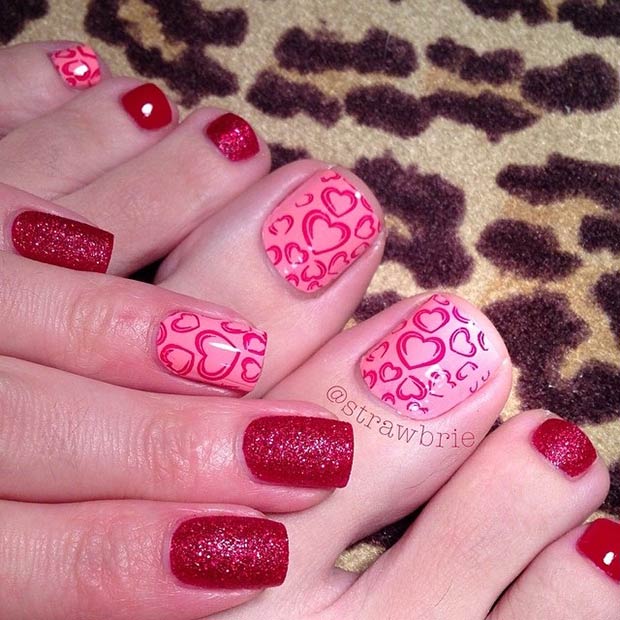
Source: @strawbrie
This Valentine’s Day, don’t forget to dress up your toenails too!
10. Love Letters Design

Source: @newlypolished
Feeling girly? Transform your nails into love letters!
Products used: OPI ‘Alpine Snow’, ‘Lady in Black’, ‘Kennebunk-Port’ and ‘Glints of Glinda’.
11. White Negative Space Design
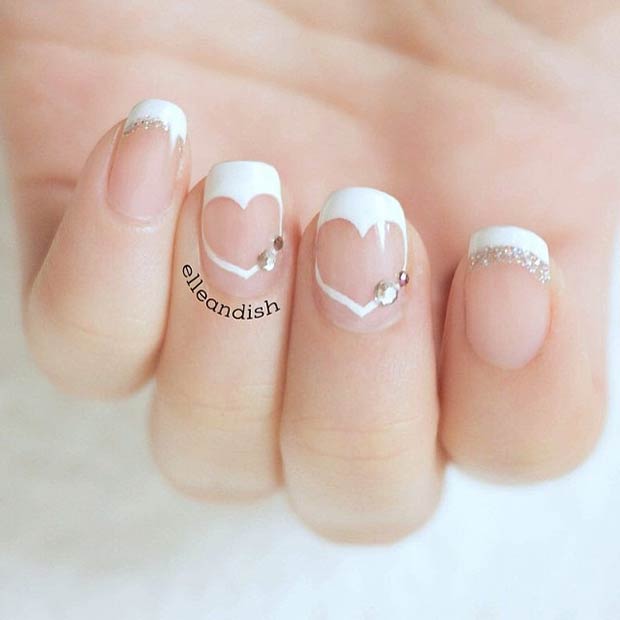
Source: @elleandish
Add a little twist to the classic French manicure with negative space hearts. To make the design a bit fancier, adorn it with a few rhinestones. This design could be so lovely as a wedding manicure, right? Subtle but statement-making.
Products used: Formula X ‘Base Coat’, Formula X ‘White Matter’, Julep Joelle ‘Glitter’ and Seche Vite ‘Dry Fast Top Coat’.
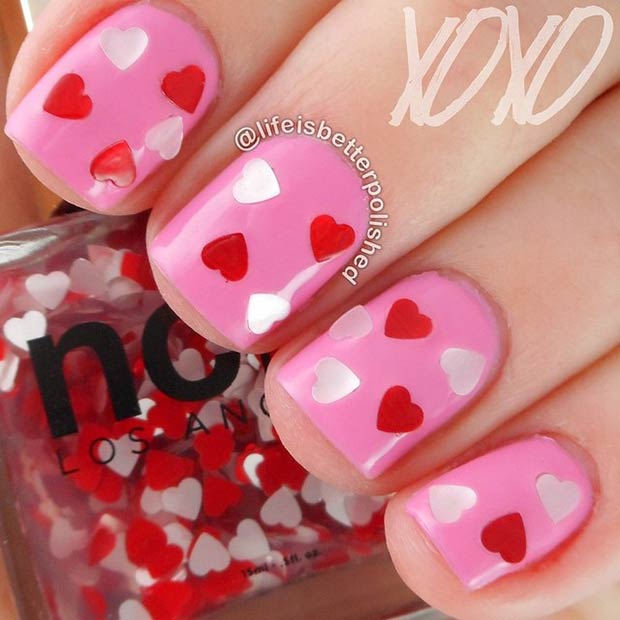
12. Pink & White Ombre Nails with Red Hearts
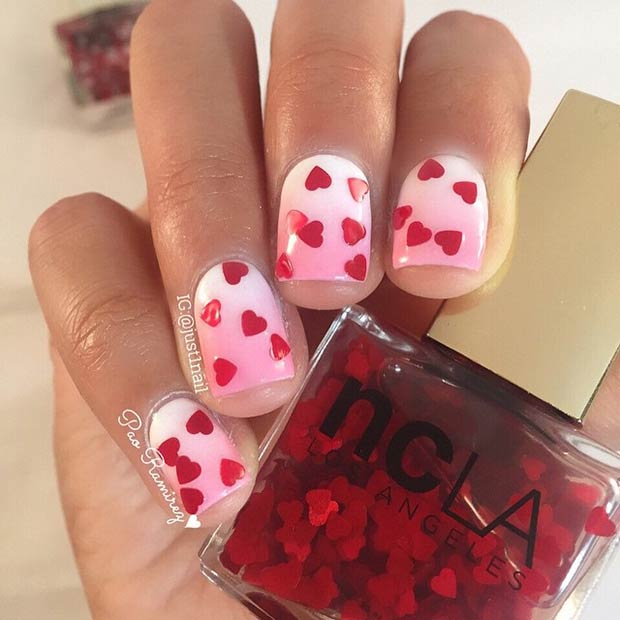
Source: @just1nail
Best and one of the easiest Valentine’s Day nails we’ve seen! The best part? The design works on all nail shapes and lengths!
Products used: ncLA heart glitter nail polish in shade ‘Love Me’.
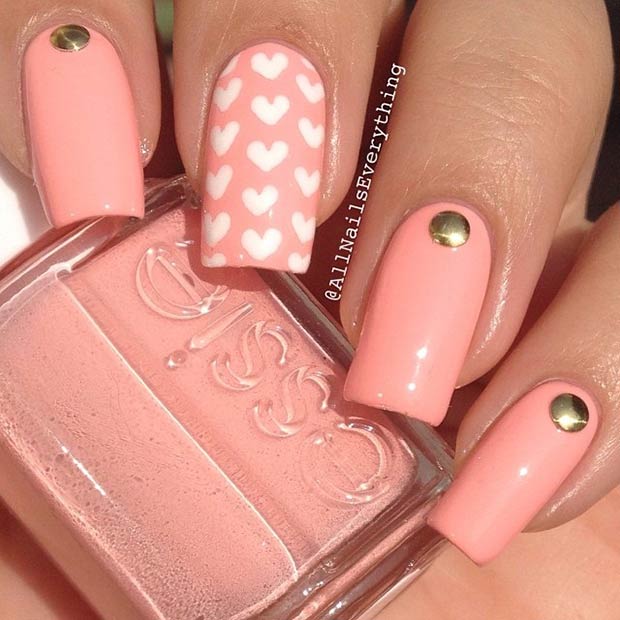
13. Simple Pink & Silver Design
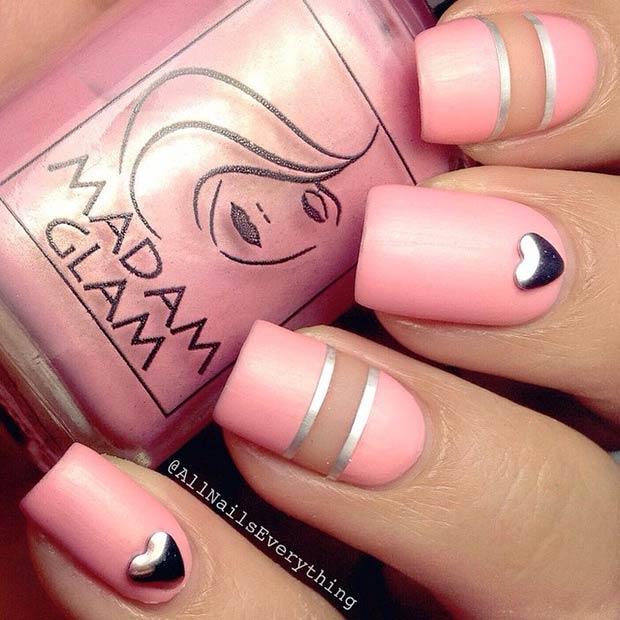
Source: @allnailseverything
This pink and silver design is definitely on our list of designs to copy this Valentine’s Day. Whenever you pair pink and silver together, you know that you’ll end up with a beautiful look.
Products used: Madam Glam ‘Like a Princess’
14. Pink & Gold + Colorful Hearts
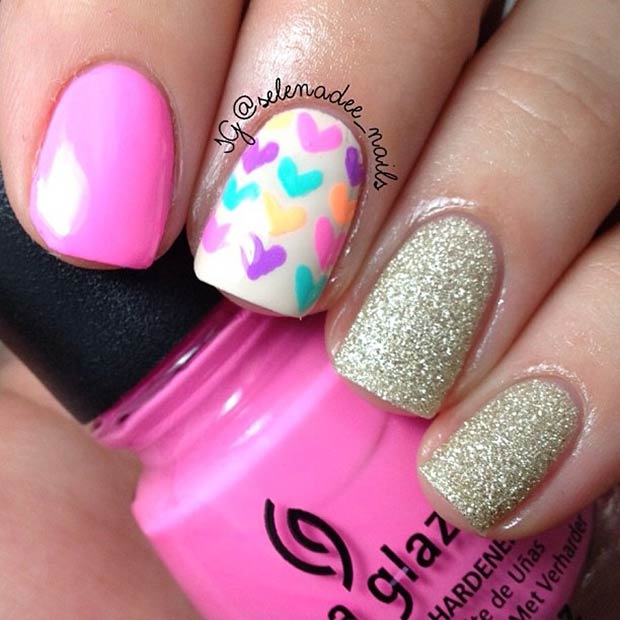
Source: @selena.dee
Whether or not you’re in the Valentine’s Day spirit, this colorful and super-cute manicure is sure to brighten up your day!
Products used: China Glaze ‘Sunsational Cremes’ and Zoya PixieDust ‘Tomoko’.
15. Cute ‘Bee Mine’ Design

Source: @gabbysnailart
Creative and cute proof that not every Valentine’s Day manicure needs to be all about the hearts.
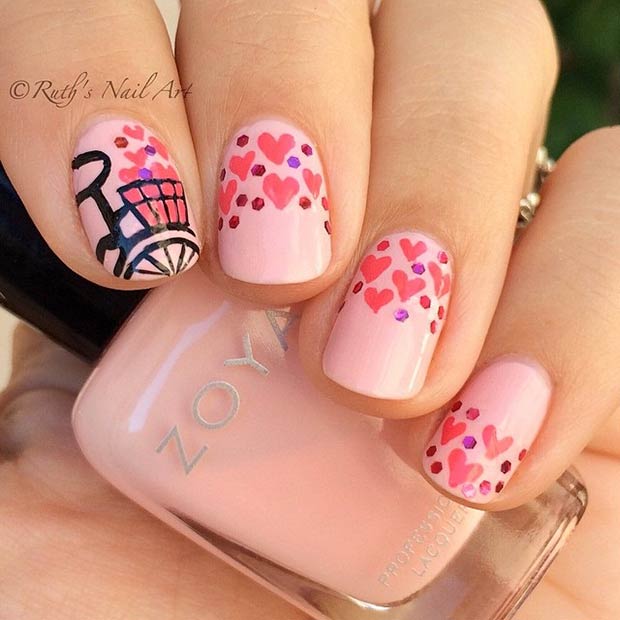
16. Love Arrow Design
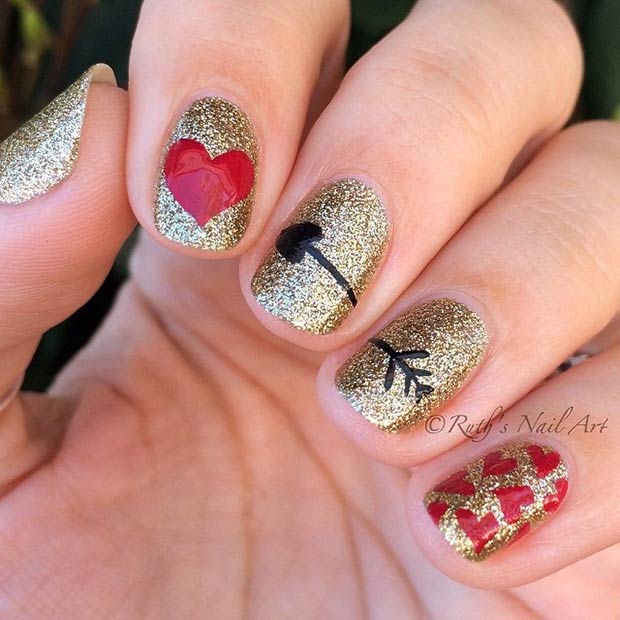
Source: @ruthsnailart
Why not include a love arrow on your nails this Valentine’s Day? The design is super easy to do and requires only three nail polish shades – gold, red and black.
Products used: OPI “All Sparkly and Gold”.
17. Stripes & Polka Dots Pedi
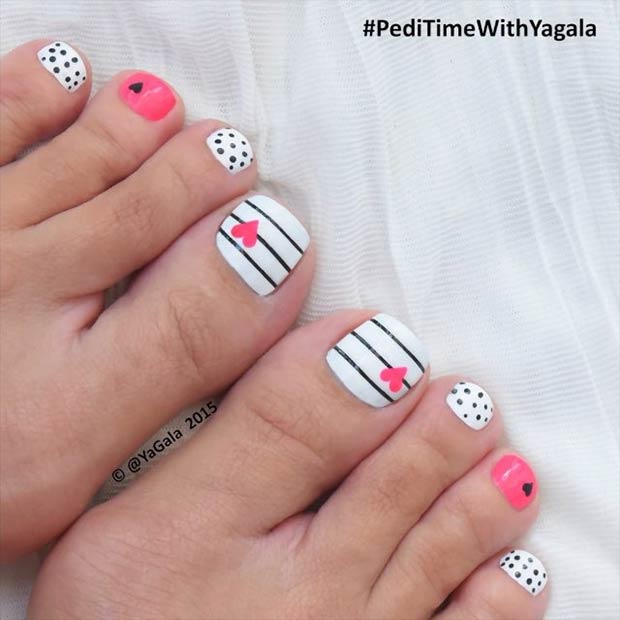
Source: @yagala
This Valentine’s Day let your toenails do the talking!
18. Simple Heart Design
Source: @allnailseverything
Easy, soft and romantic! The base color of the nails is simply beautiful. The design looks great on short nails, too.
Products used: Essie ‘Blanc’ and ‘Van D’Go’.
19. Neon pink Design
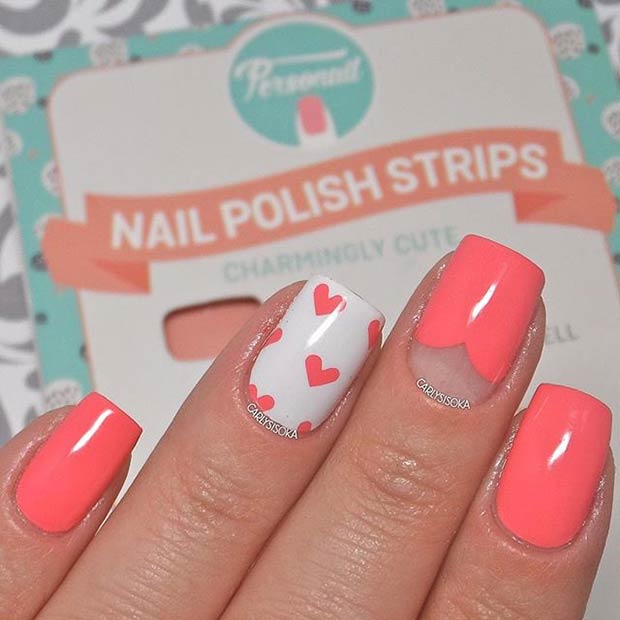
Source: @carlysisoka
For a more simple take on festival nail art, paint your accent nail in white shade and other nails in a bright pink shade. Let them dry. Draw pink hearts on the accent nail using a dotting tool. Finish the look with a top coat.
20. You’re Dinomite.
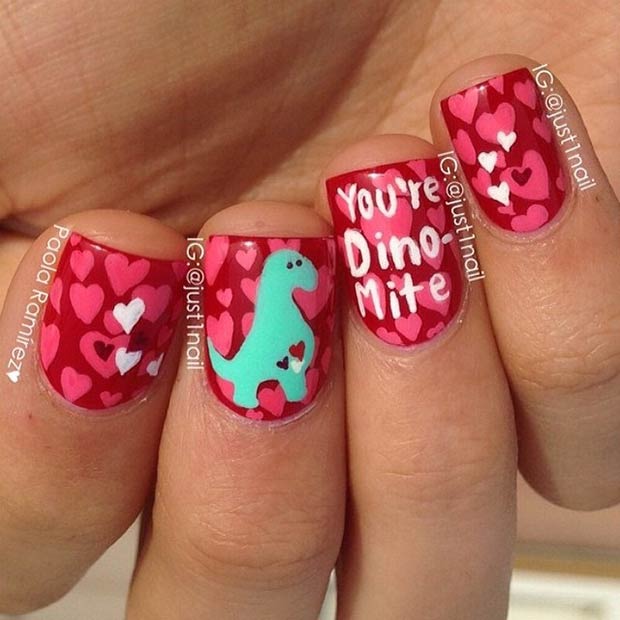
Source: @just1nail
You’re Dino-Mite! Red is the perfect base for this cute and colorful design.
21. Red & Gold Look
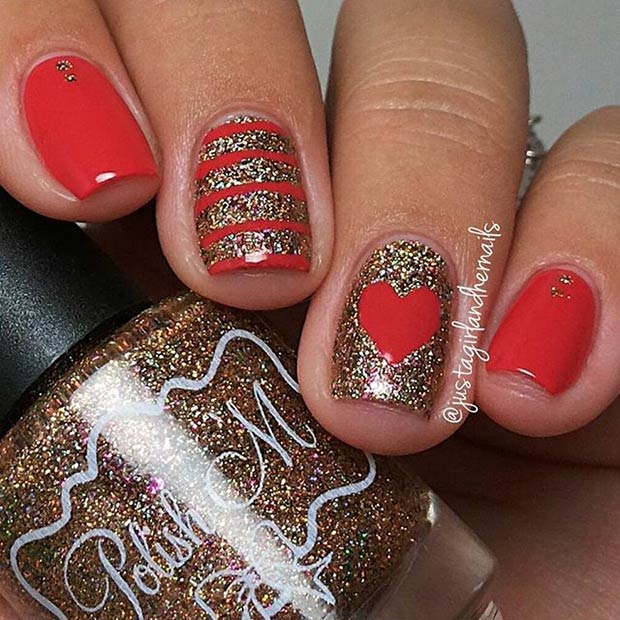
Source: @justagirlandhernails
This nail design is sure to make you swoon! Red and gold are classic Valentine’s Day colors.
Products used: Polish M ‘Autumn’s Palette’ and OPI ‘Paint My Moji-toes Red’.
22. Negative Space Nails
Source: @manal
Keep things simple and subtle with this light pink mani.
Products used: Tuesday in Love ‘Cotton Candy’ + Top Coat.
23. Easy & Cute Design
Source: @manal
The negative space heart is a beautiful and subtle touch. Make your pink mani pop with a touch of sparkly silver.
Products used: Kiara Sky ‘Rag Doll’ and ‘Sterling’.
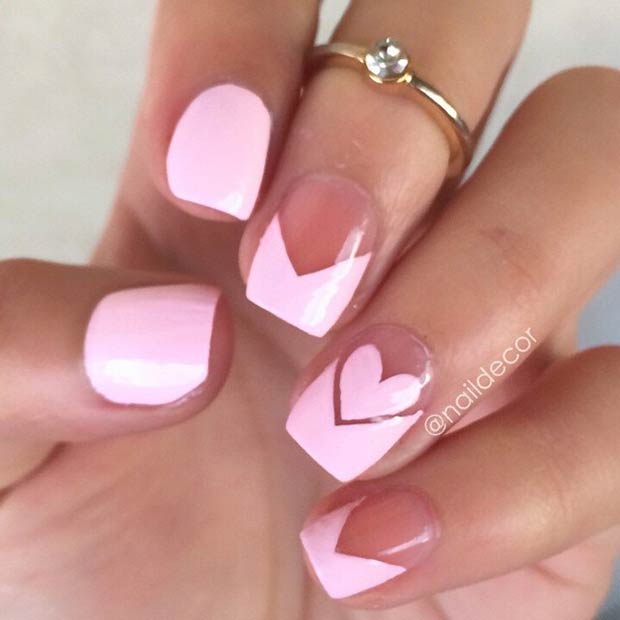
24. Pink, Grey & White Design
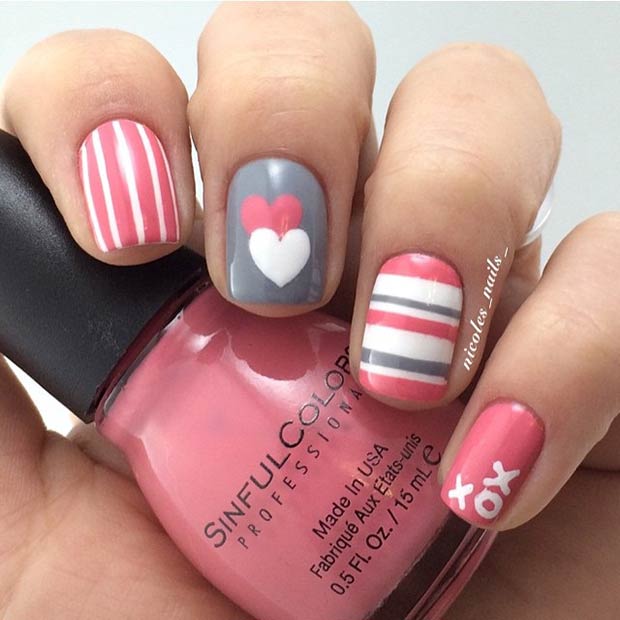
Source: @nicoles_nails_
We absolutely love the variety that’s going on each nail here. The stripes, the hearts, the simple XOX nail – they all combine to make the perfect mani for Valentine’s Day.
Products used: Barielle ‘U-Concrete-Me’ and Sinful Colors ‘Soul Matte’.
25. Sparkly & Colorful Nails

Source: @onenailtorulethemall
Apply two coats of light pink polish for a cute background and let it dry. Top it off with a glittery shade. Paint on colorful hearts using a thin brush and -voilà!
26. Adorable & Easy
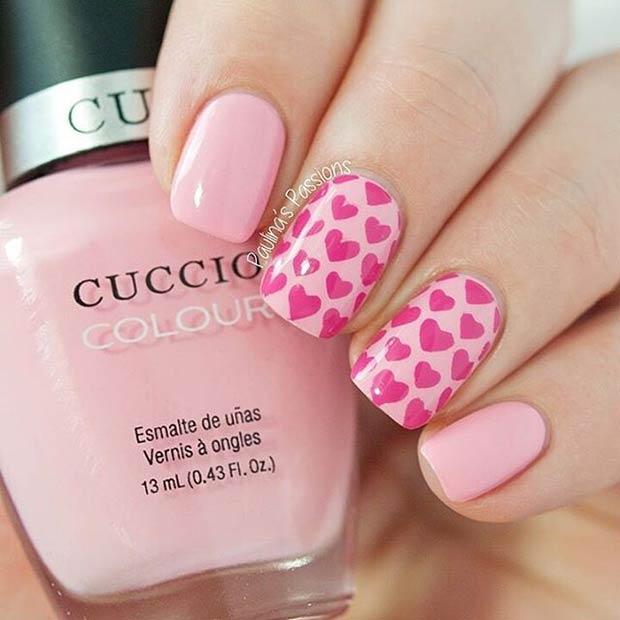
Source: @paulinaspassions
In hurry? Add hearts to a couple of fingers instead of all five. The light pink shade is Cuccio Colour ‘Pinky Swear’.
27. Colorful Hearts Accent Nail
Source: @PolishCandies
Colorful hearts – you could put them on every nail, just a few, or only on one (accent) nail. Either way, it will look super cute on Valentine’s Day.
Products used: Lime Crime ‘Parfait Day’.
28. Cute Heart Design
Source: @ruthsnailart
Paint your nails baby pink and let the polish totally dry. Draw hearts using a thin brush and dark pink polish, and bicycle using a black polish or acrylic paint. Top the hearts with one coat of a sequin nail polish.
Products used: Zoya ‘Dot’ + acrylic paint
29. Bright Ombre Heart Nails

Source: @thenailtrail
You don’t have to go to a nail salon to get this gorgeous look!
30. Easy Heart Nail Design
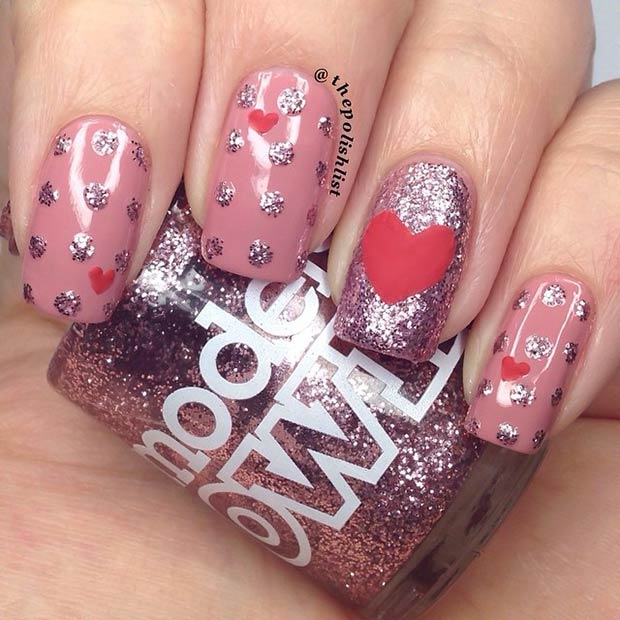
Source: @thepolishlist
To get this cute manicure, paint two coats of dark nude polish and let it dry. Add sparkly polka dots using a dotting tool. Next, draw a big red heart on the accent nail and few small ones on the other nails to make the design Valentine’s Day appropriate.
Products used: Models Own ‘Pink Fizz’ and ‘Vintage Pink’.
31. Fun & Colorful
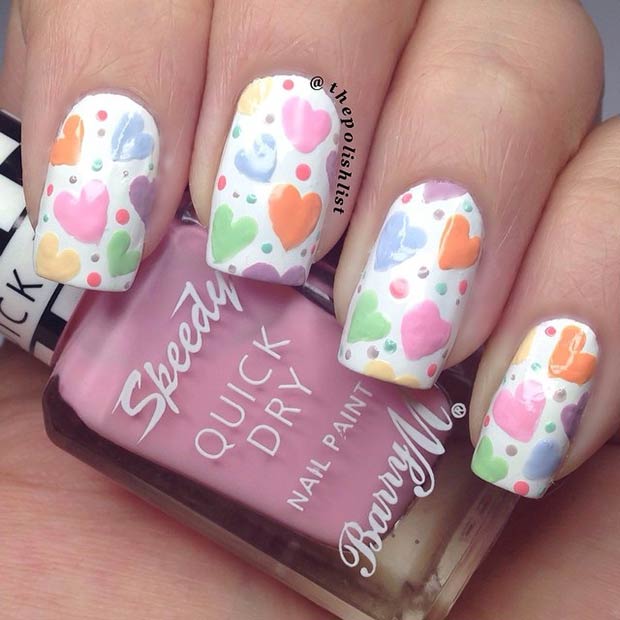
Source: @thepolishlist
Paint your nails white and let them dry. Using a thin brush, paint green, blue, orange, pink, yellow and purple hearts and dots.
Products used: Barry M ‘Cotton + Speedy Quick Dry Nail Paint (for the colorful hearts).
32. Simple Red Nail Design
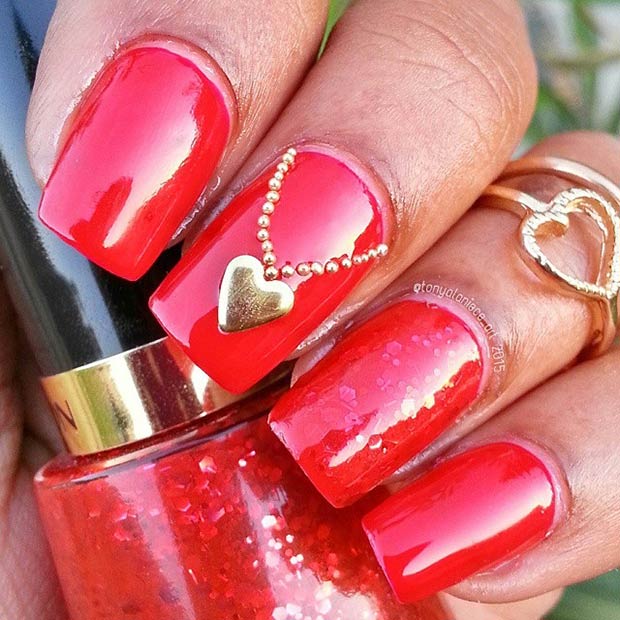
Source: @tonyalaniece_art
All you have to do is paint your nails red and place a gold heart necklace on your middle finger nail. We are in love with this simple design!
Products used: Sinful Colors ‘Gogo Girl’ and Revlon ‘Confident’.
33. Cute Design for Short Nails
Source: @karissabianco
Apply two coats of your favorite pink polish and let it dry. Top your pink nails with the ncLA ‘Heart Attack’ nail polish. Yes, it’s that simple!
34. Dark Design
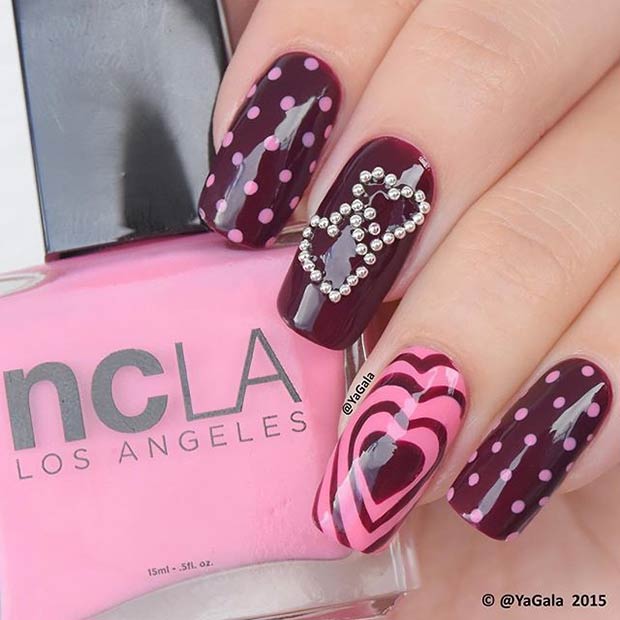
Source: @yagala
Polka dots make everything more fun so you definitely can’t go wrong with adding a few for your Valentine’s Day nails. If you don’t like the dark shade, you could also do white or nude color.
35. Red & Silver Heart Toe Design
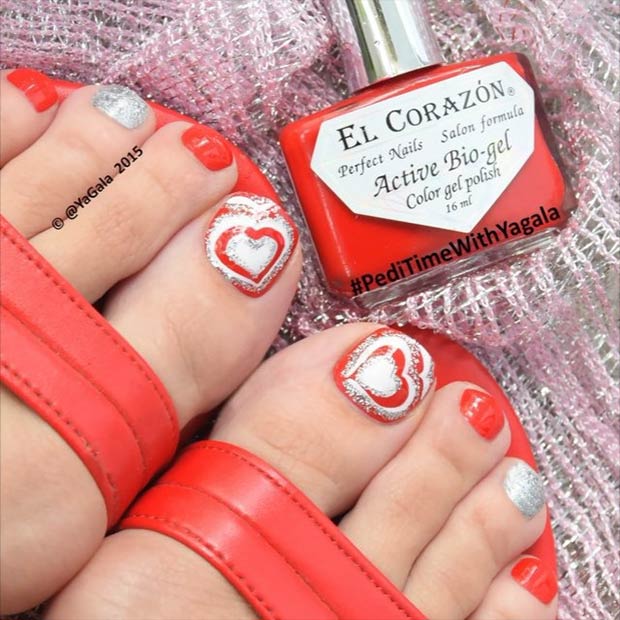
Source: @yagala
Celebrate the season of love with this cute Valentine’s Day toe nail design.
Clouds are big, fluffy masses that can take on so many different and interesting shapes. Have you ever lain in the grass on a warm summer’s day and just watched the clouds go by? Cloud watching can be super relaxing and entertaining, especially during the warmer months. There is just something about them that makes us peaceful and calm. If you’ve ever experienced that feeling then you know why more and more people are getting cloud tattoos.
Meaning: Cloud tattoos can mean different things for different people. They can symbolize inner peace, positivity, freedom, hope, dreaming and mystery.
If you’re thinking about getting a cloud tattoo, here is the collection of 23 super cute designs for your inspiration:
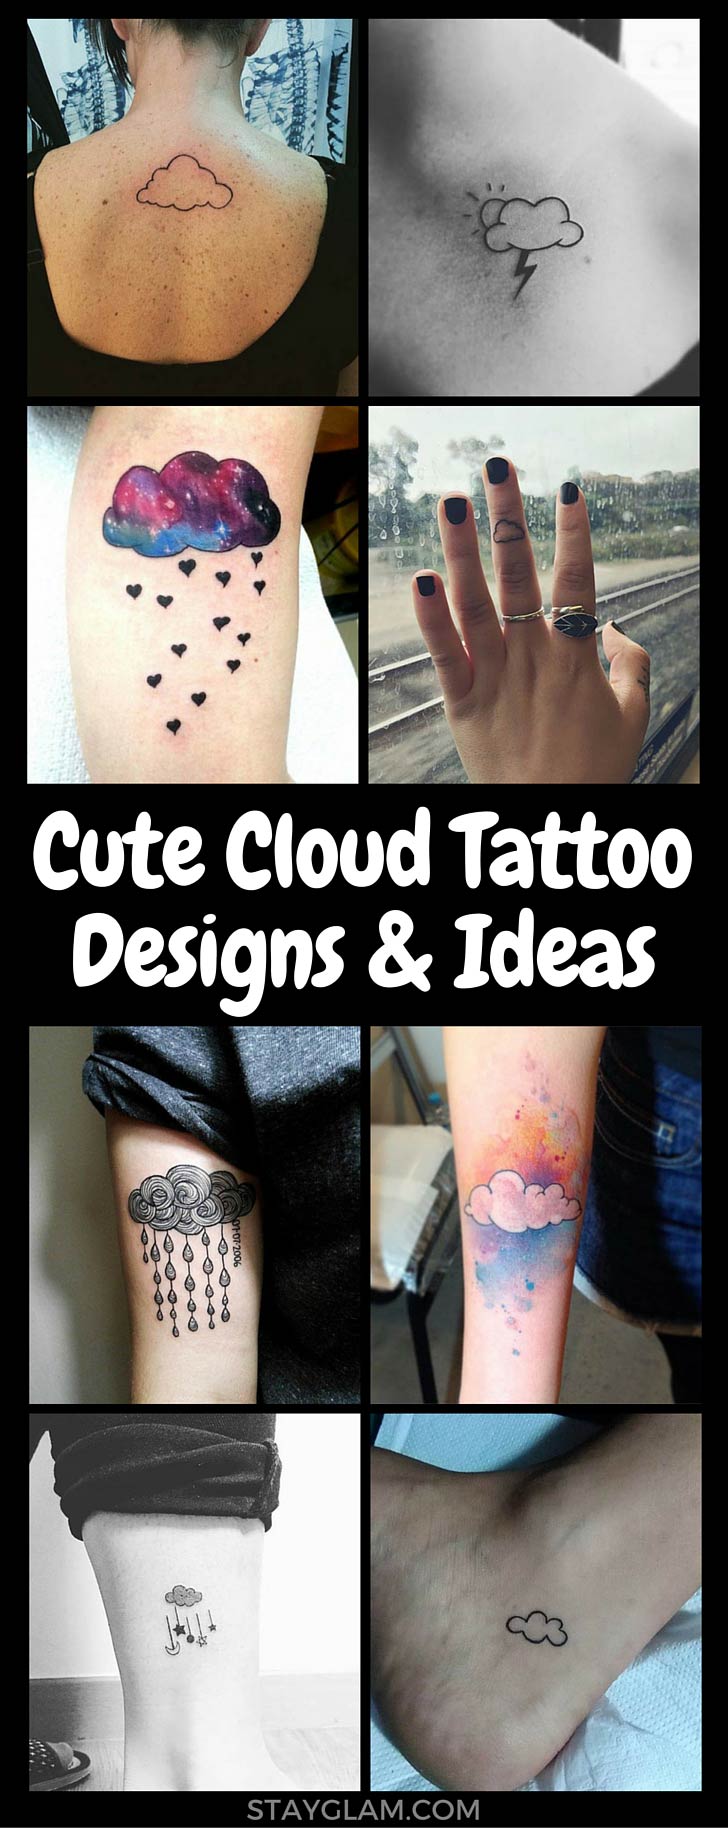
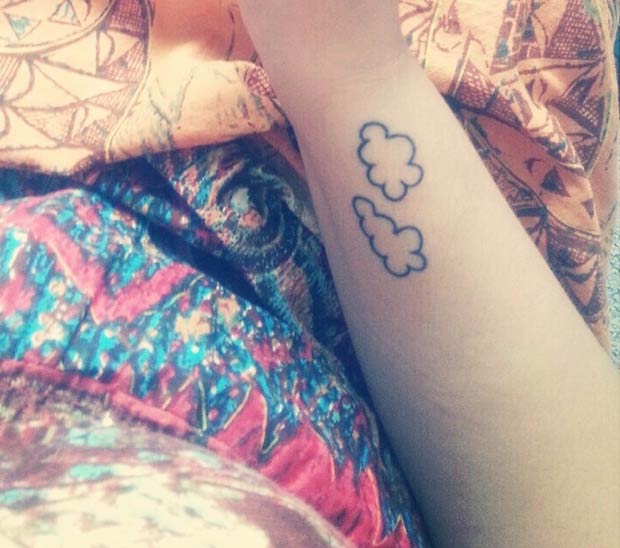
1. Small Cloud Finger Tattoo
Source: tumblr.com
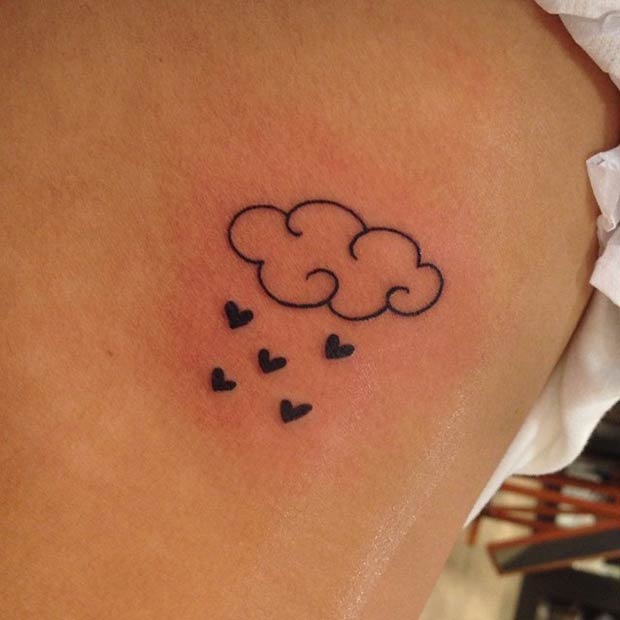
2. Cloud + Heart Rain
Source: @serione
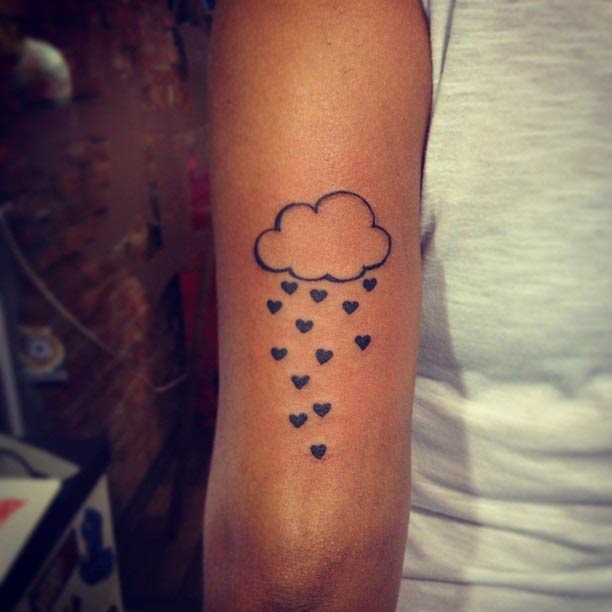
3. Simple Cloud Design on the Back
Source: @raanbob
4. Cute Cartoon Cloud Wrist Tattoo
Source: weheartit.com
5. Cosmic Cloud + Love Rain

Source: @milky_tattoodles
6. Unique & Interesting Design
Source: @oggysxm
7. Cute Upper Thigh Tattoos
Source: @amosriley
8. Matching BFF Cloud Tattoos
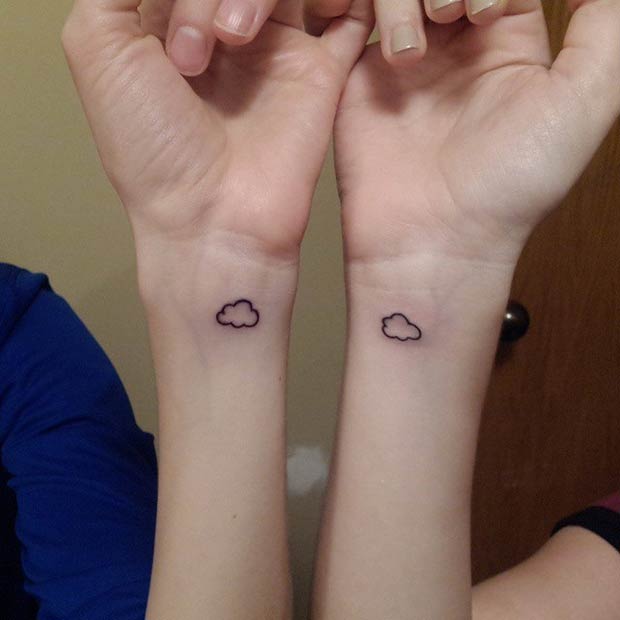
Source: @sailorsaratattoo
9. Line Cloud
Source: @hipmaruda
10. Matching Tattoo Idea for Couples
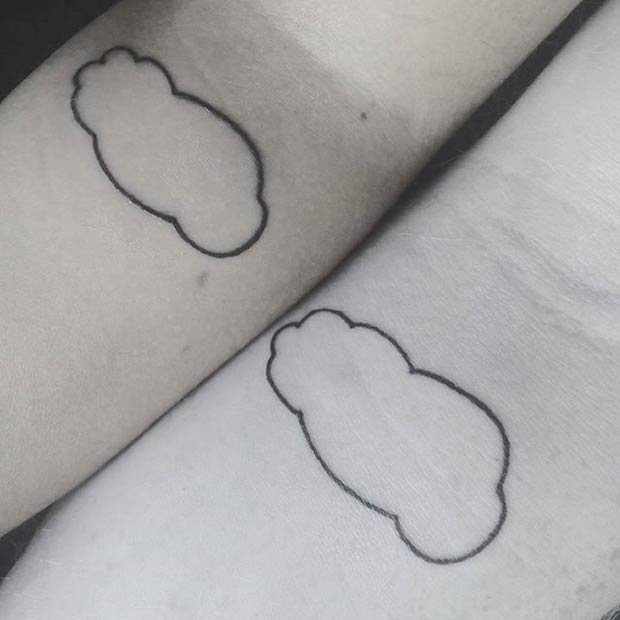
Source: @melmelanymiel
11. Tiny Cloud Foot Tattoo
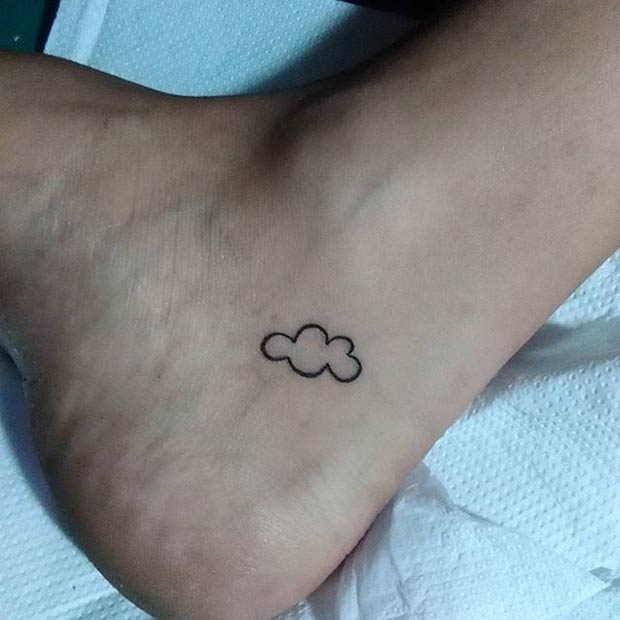
Source: @dazbote
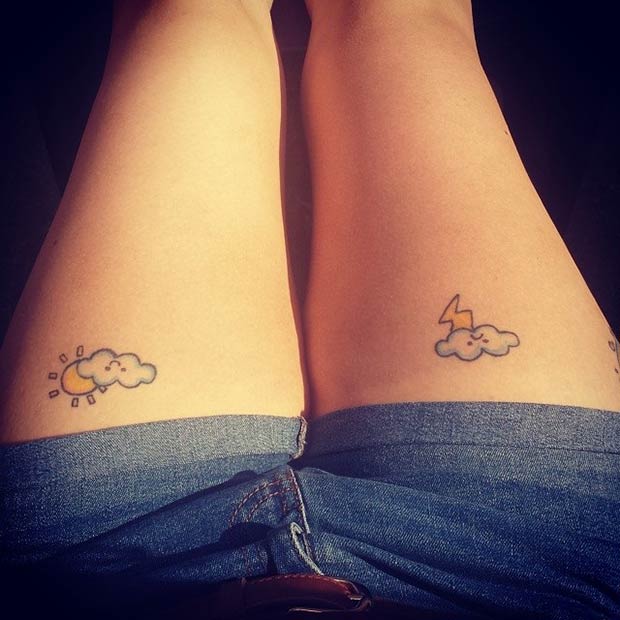
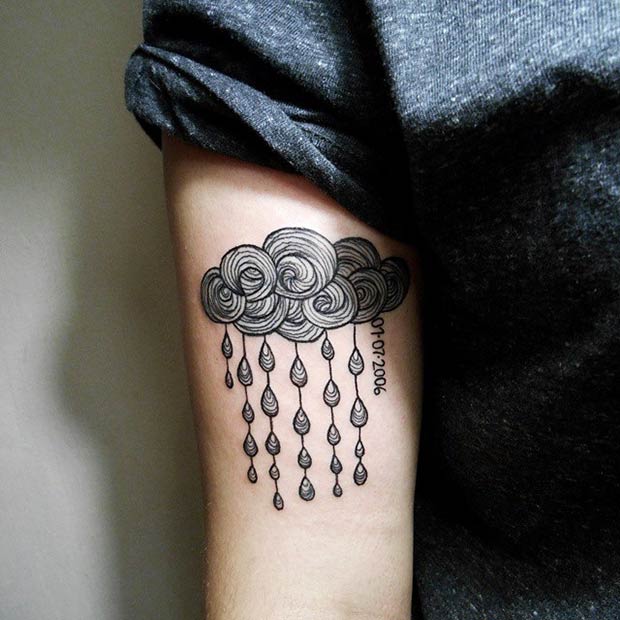
12. Sun & Lightning Cloud Tattoo
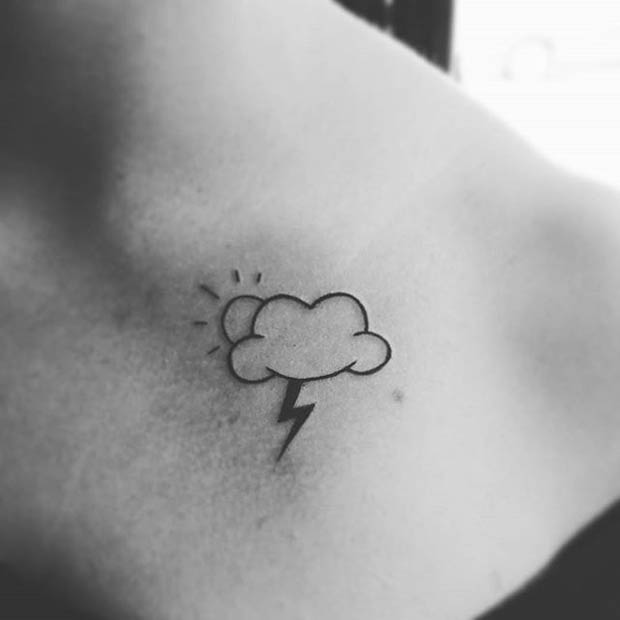
Source: @patpat.tattoo
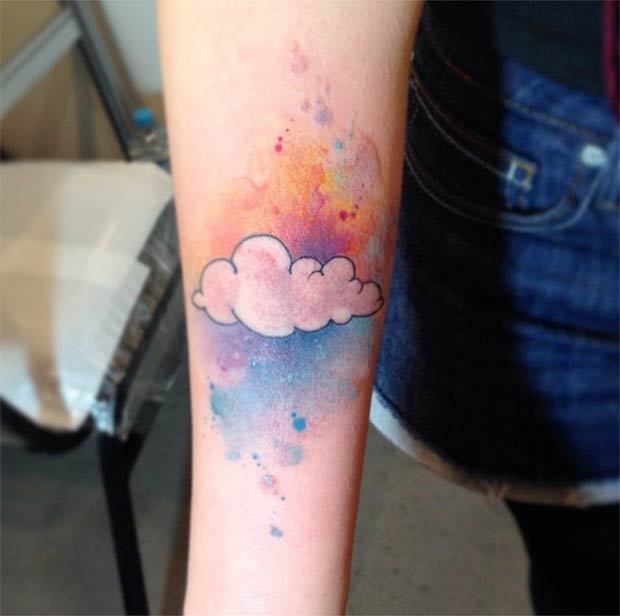
13. Watercolor Cloud Tattoo

Source: @nina_heineken
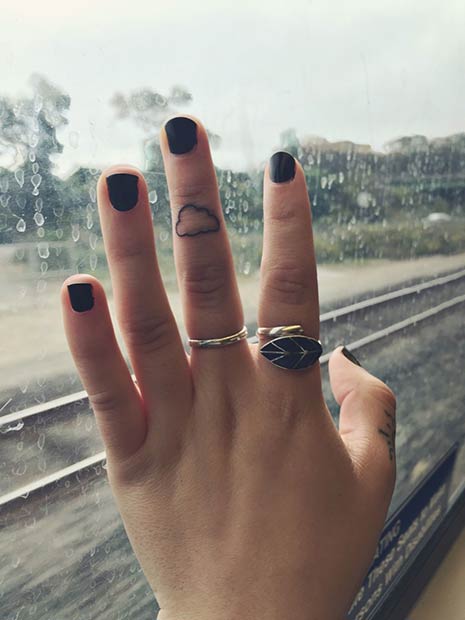
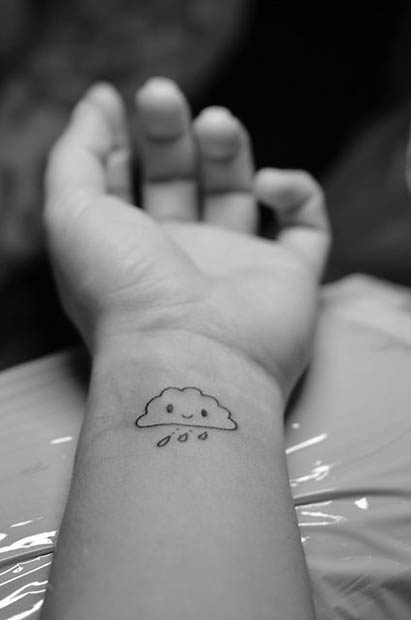
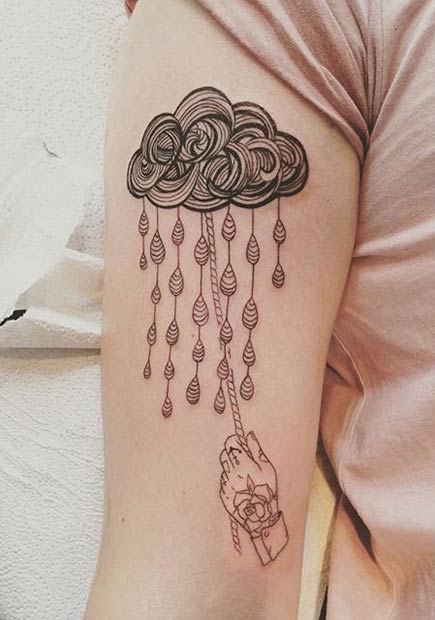
14. Small Cloud Raining Hearts Tattoo
Source: @camilo_nunes
15. Cloud Raining Stars Design
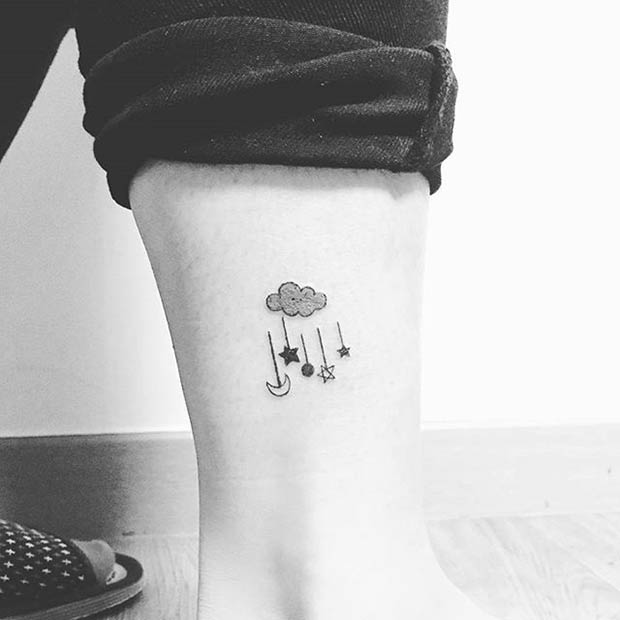
Source: @yktattoo1
16. Tiny Storm Cloud
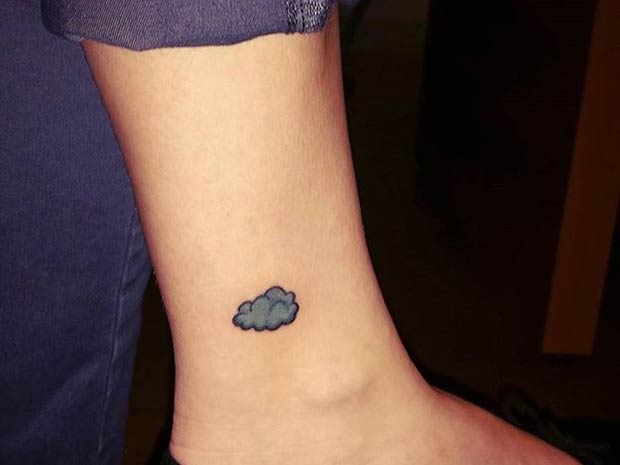
Source: @_sarajohnston
17. Cute Cloud Tattoo with Mustaches
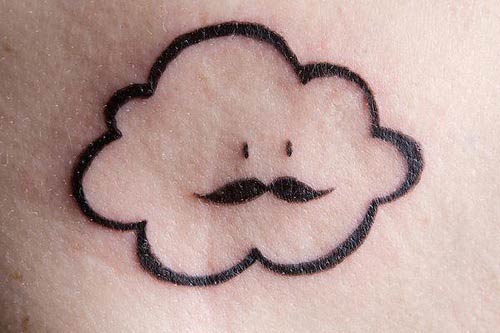
Source: weheartit.com
18. Two Clouds Tattoo
Source: tumblr.com
19. Word/Quote into Cloud
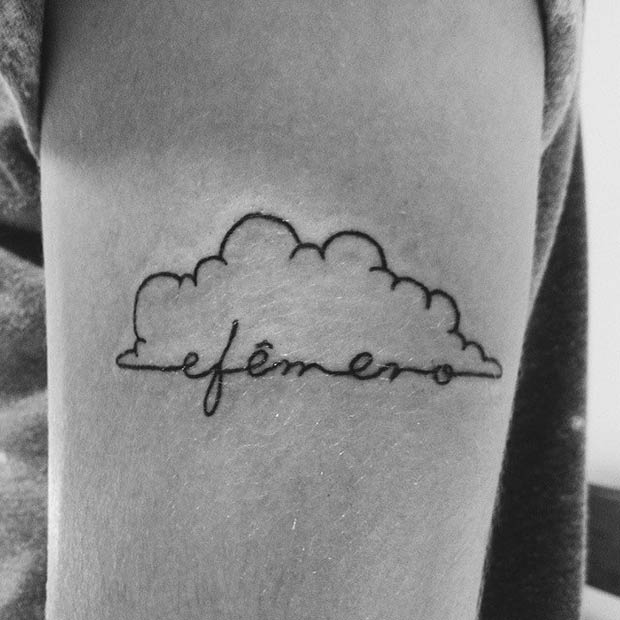
Source: @dayisis
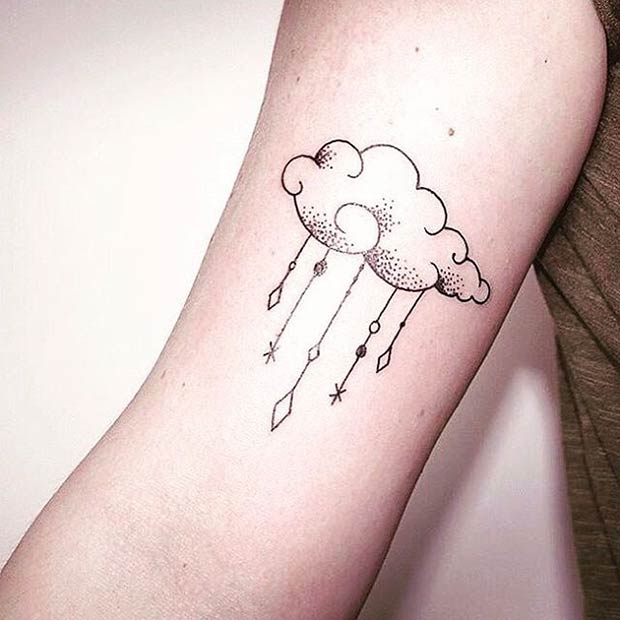
20. Line Cloud & Rain Design
Source: @purandy
21. Heart Rain Design

Source: weheartit.com
22. Line Cloud Tattoo on the Back

Source: adorn-studio.co.uk
23. Splash of Color Cloud Tattoo
Source: followthecolours.com.br
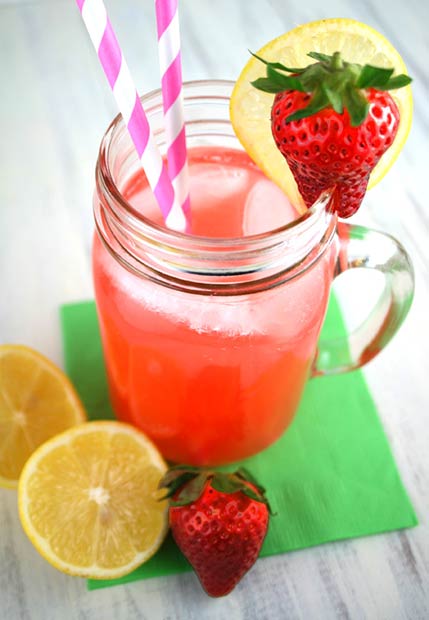
Looking for a way to escape the summer heat? You’ve come to the right place! Recently we’ve discovered an amazing girly alcoholic drink that tastes as good as it looks – Hippie Juice.
Hippie juice is an alcoholic, summer drink that is super easy to make. The main ingredients are: watermelon vodka, pink lemonade, Malibu, Triple sec and fruit. You can’t go wrong with these ingredients, right?
This is the perfect drink for a hot summer gathering or a night pool party. The cocktail has a beautiful light pink color to it — perfect for an Instagram picture. Garnish it with fresh strawberries, lemons, or raspberries and you’ll end up with the prettiest cocktail ever. Here’s how to make it:
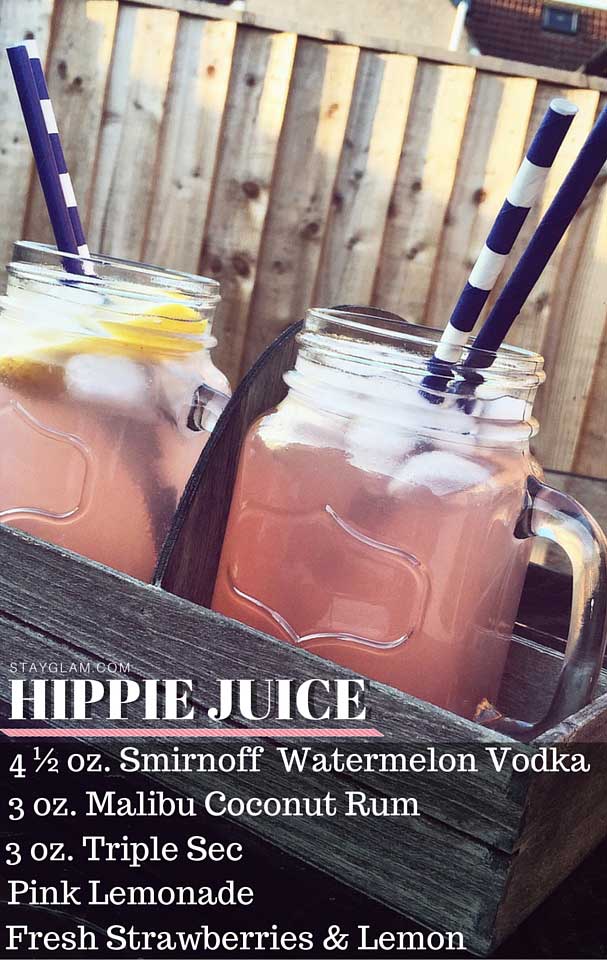
Recipe #1
- 4 ½ oz. (135 ml) Smirnoff Watermelon Vodka
- 3 oz. (90 ml) Malibu Coconut Rum
- 3 oz. (90 ml) Triple Sec
- Fruit: strawberries, raspberries and lemon pieces
- Top off with pink lemonade
Recipe #2
- 1 cup Smirnoff Watermelon Vodka
- ¹⁄³ cup Malibu Coconut Rum
- ¹⁄³ cup Triple Sec
- 4 Scoops Country Time Pink Lemonade Mix
- 4 Cups Water
- Fruit: strawberries, blueberries and lemon
Recipe #3
- 2 oz. Fresh Watermelon Juice
- 1 oz. Vodka
- 2 oz. Fresh Lemonade
- ½ oz. Malibu Coconut Rum
- ½ oz. Triple Sec
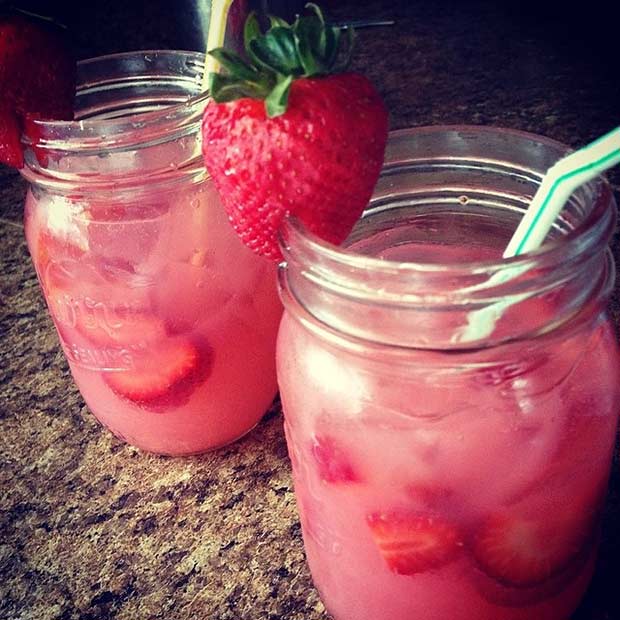
10 Ideas for Serving:
1. Perfect drink (and serving) for a pool party.
Source: tumblr.com
2. Looks so yummy, right?

Source: @blackfridaymty
3. Garnish your cocktails with fresh strawberries…
Source: tumblr.com
4. … or lemons.
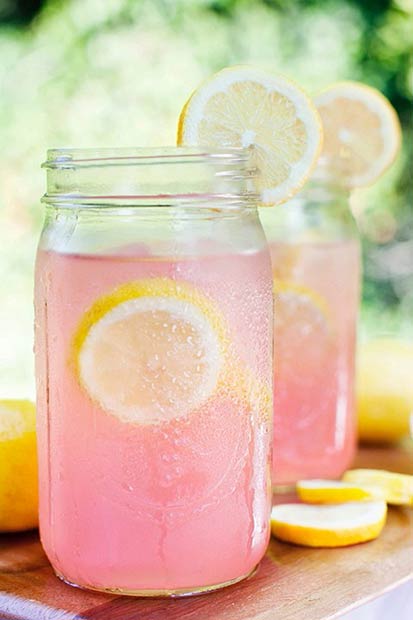
Source: tumblr.com
5. This cocktail will be a hit with your girl crew!
Source: @louisay89
6. Yummy!
Source: tumblr.com
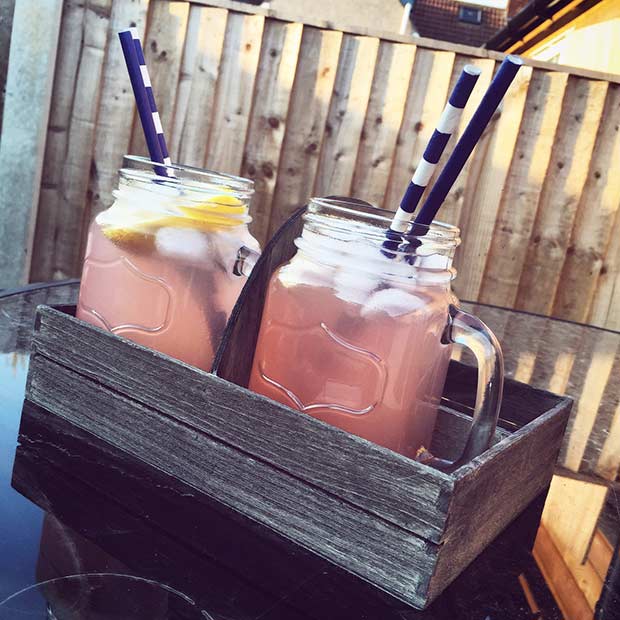
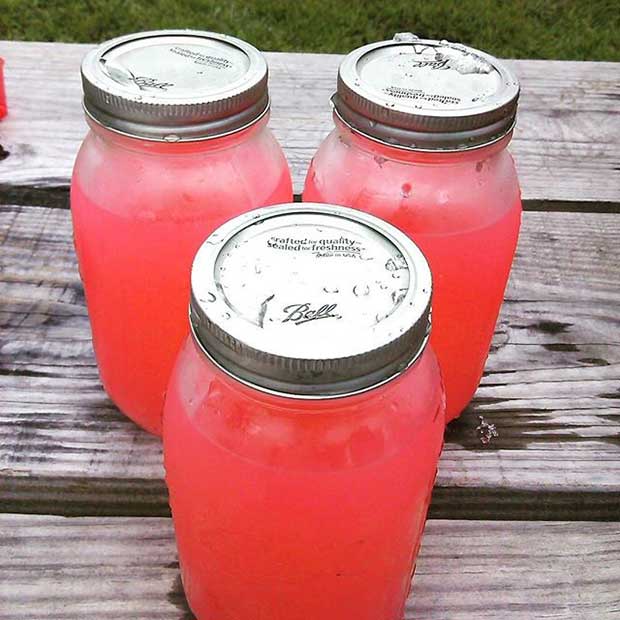
7. Make sure you have plenty of mason jars.
Source: @c_ss_ndr__
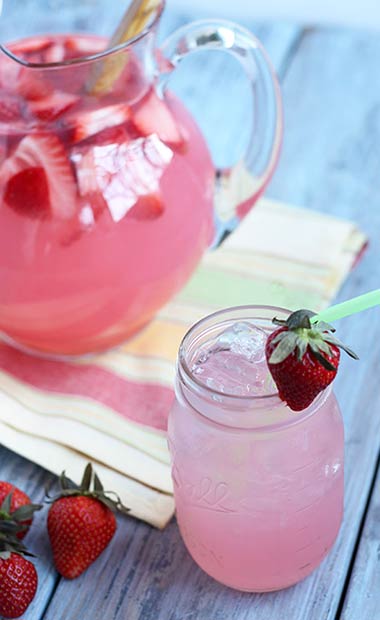
8. Or simply serve it in a pitcher.

Source: @lolinhaalbuquerque
9. Making this right now!
Source: weheartit.com
10. Perfect drink for a hot summer night.

Source: @pandaah
Recently we’ve officially entered Party Season. This time of the year not only brings cold, snow, and Santa Claus, but it also brings family dinners, company parties, and gatherings with friends. Wherever you’re heading to this December, your makeup needs to be on point, right? From shimmery lids to vampy lips, we’ve found a holiday makeup look for you.
Get inspired and learn how to achieve some of these 25 gorgeous looks. They will definitely get you in the Christmassy mood. Enjoy!
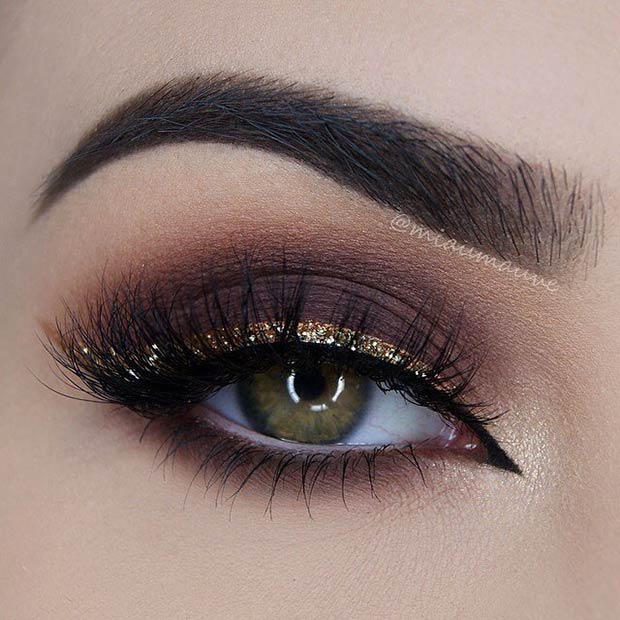
1. Purple Smokey Eye with a Pop of Glitter

Source: @miaumauve
This purple smokey eye with a pop of shimmering glitter is the ideal look for any festive occasion. Shades of brown and purple look flattering on just about everyone, so make sure to give this look a try!
December is the perfect time to pop a little bit of glitter onto your eyes, right? Not only will it brighten up your whole face, but also make your eyes pop. As you can see, you don’t have to go crazy with it – less is more in this case.
2. Golden Smokey Eye and Red Lips
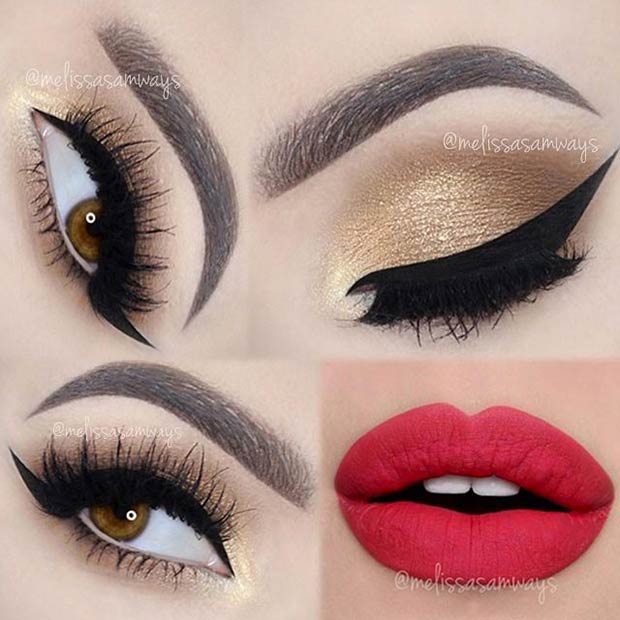
Source: @melissasamways
Nothing says “holiday makeup” quite like golden smokey eye and red lips. The look is perfect for a last minute holiday event.
Step 1: Start by applying an eyeshadow primer or concealer and let it dry.
Step 2: Next apply a neutral base eyeshadow all over your eyelid (this step will make the blending easier). Dip the tip of your favorite blending brush into a dark chocolate, matte eyeshadow and apply it to the outer corner of the eye in a “V” shape. Blend!
Step 3: Using a tapping motion, apply a dark gold eyeshadow (ABH;Amber) on your eyelid. Top it with a baked gold eyeshadow (ABH;Peach Sorbet).
Step 4: Highlight the inner corner of the eye with a shimmery champagne shade. Smoke out the lower lash line using the chocolate shade from the step #2.
Step 5: Complete the look with a black liner, false lashes and red matte lipstick.
3. Grey Smokey Eye with Glitter Liner
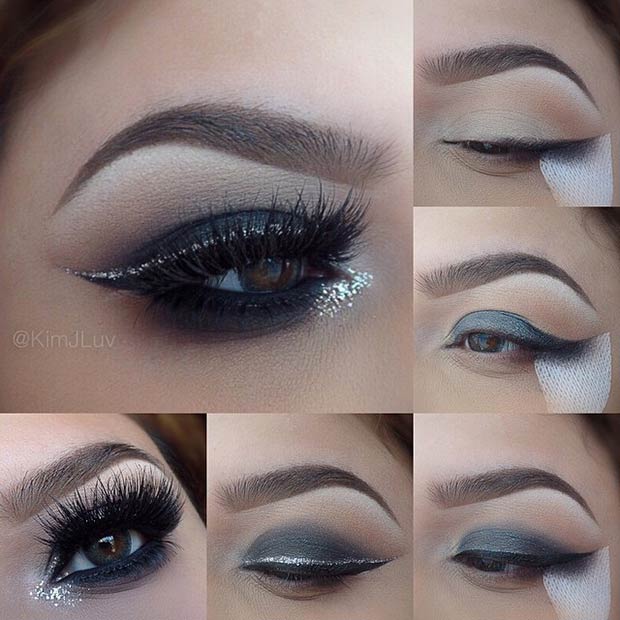
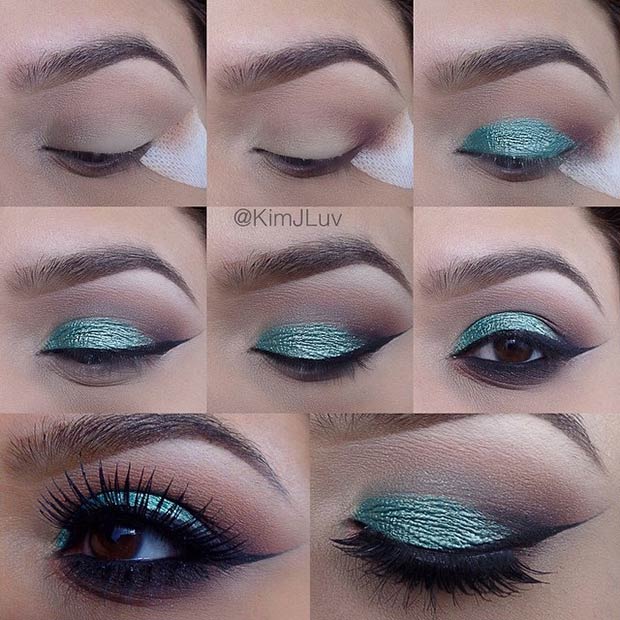
Source: @kimjluv
Step 1: Prime your eyelids with an eye primer or concealer. Trick for a smooth bottom edge: Take a piece of Scotch tape, press it to your hand a few times to make it less sticky and place it as pictured. Apply a transition color (a peachy/orange shade) to the crease. With a black matte shade, smoke out the top lash line.
Step 2: Apply a dark grey eyeshadow all over your eyelid.
Step 3: Blend with a clean blending brush until there are no harsh lines.
Step 4: Apply a gel liner along the upper lash line.
Step 5: Next apply a silver glitter liner above the black gel liner.
Step 6: Highlight the inner corner of the eye with a silver glitter. Use black liner and black and brown eyeshadows to smoke out the bottom lash line. Apply false lashes.
4. Green and Gold Glitter Look
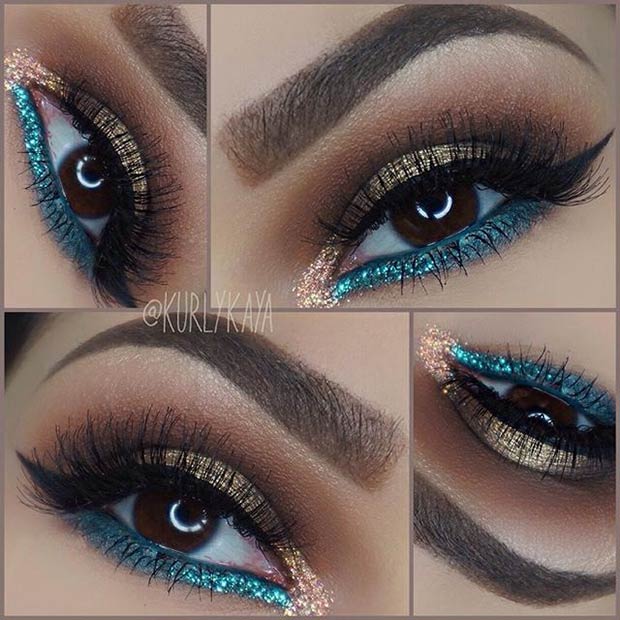
Source: @kurlykaya
If a grey smokey eye feels too much for you, try rocking this gorgeous gold and green eye makeup look. Sparkly and glittery shadows like these will add an instant festive feeling to your look. If you have brown eyes, opt for gold, copper, green , and blue shades. Peach, bronze, purple and chocolate brown will make blue eyes pop, while burgundy, plum, pink and cranberry shades will enhance green eyes.
5. Smokey Cut Crease
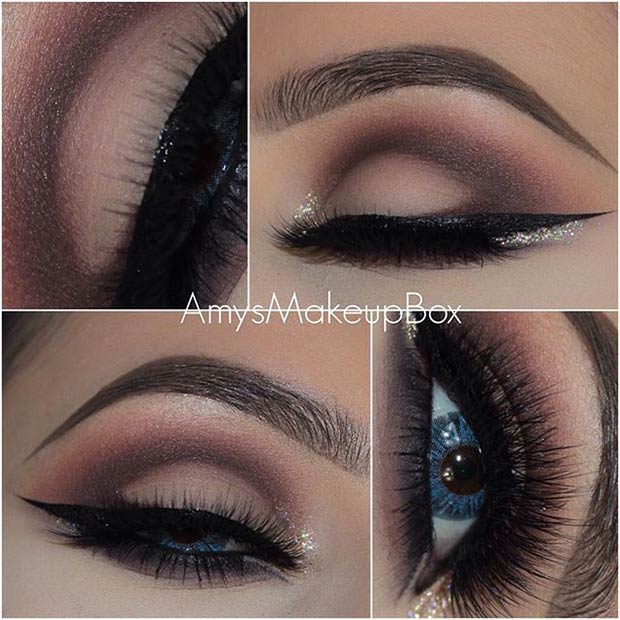
Source: @amysmakeupbox
Holidays are the perfect time to glam-up your beauty routine. A smokey cut crease is always a good option. This makeup technique will make your eyes look bigger and, of course, sexier.
6. Brown Matte Cut Crease
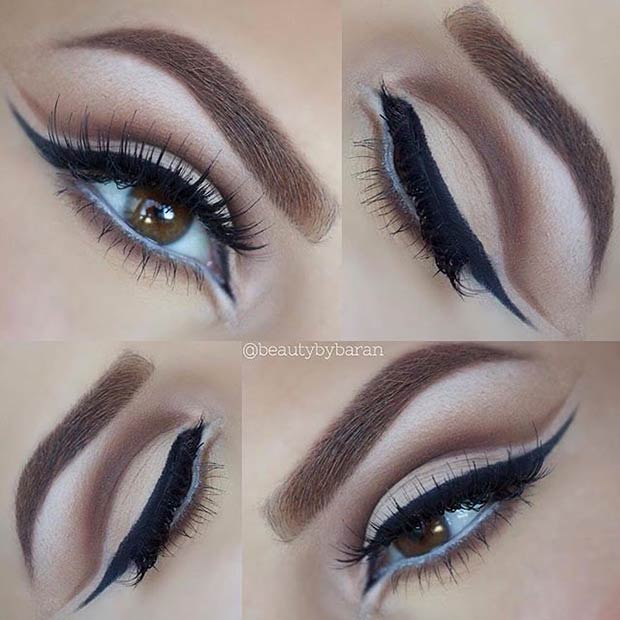
Source: @beautybybaran
A cut crease doesn’t have to be dramatic – you can create it using soft, brown matte shades as showed above. Pair it with red lips and you’re ready for a family dinner or a holiday party. The look was created using the Too Faced “Chocolate Bar” palette.
7. Brown Smokey Eye + Gold Glitter Liner
Source: @miaumauve
Before holidays, make sure to have at least one glitter liner in your makeup kit. You can use it to create endless makeup looks, plus it’s a fun (and easy) way to add a pop of glitter to your look. Put it along your upper lash line or lower lash line for an instant glam.
8. Green Metallic Look
Source: @kimjluv
Step 1: Fill in your brows and add a transition color.
Step 2: Apply a dark brown eyeshadow to the outer corner of the eye in a “V” shape. Blend until there are no harsh lines.
Step 3: Apply a metallic green eyeshadow or pigment over the lid.
Step 4: Then apply black gel liner along your upper lash line and blend the dark brown shade from the step #2 to the crease.
Step 5: Deep out the outer corner of the eye using a smaller brush and black matte eyeshadow.
Step 6: Apply black gel liner to your bottom lash line and smoke it out with black and brown eyeshadows. Finish the look by applying your favorite false lashes.
9. Smokey Bronze Eyes + Dark Lips
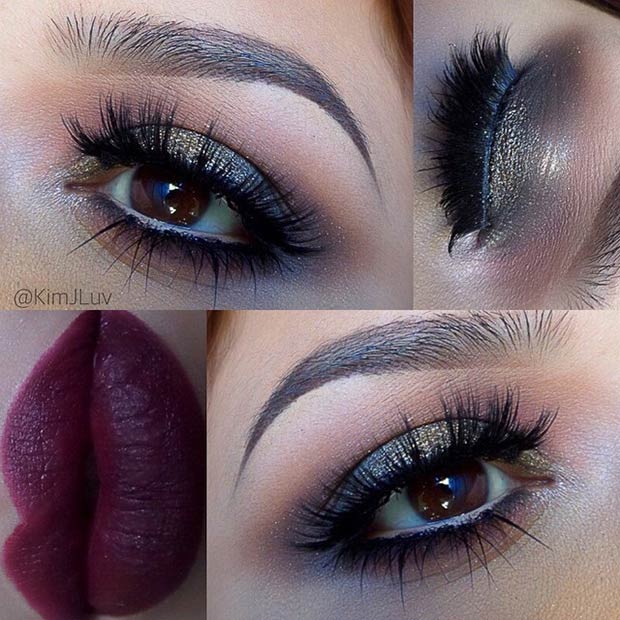
Source: @kimjluv
During cooler months, you might find yourself reaching for your darker lipsticks more often. You’re not alone. Moody reds and purples are our favorite shades during fall and winter. This holiday season, pair your berry lips with a black and dark gold smokey eye for a vampy and sexy look.
10. Gold Glitter Eye
Source: @makeupbymaci
We’re obsessed with this gold glitter look. So, how to make your eyes sparkle like this? You will need two products – eye glitter glue & loose glitter. If you are a glitter lover like us, this type of glue is a MUST in your makeup bag. The product is designed to keep the glitter on the eyes all night long (or until you take it off). Crazy!
When people think Thanksgiving, they think family, celebration, turkey…us? We think seasonal nail art. Pretty, festive nail designs are our favorite way to get into the holiday spirit.
There are so many beautiful and festive ways to do your nails for Thanksgiving. We’ve searched Instagram for the best nail art ideas so you don’t have to, and found 21 amazing looks that will help you get in the mood for one of the most popular holidays of the year.

1. Pink Nails + Colorful Turkey
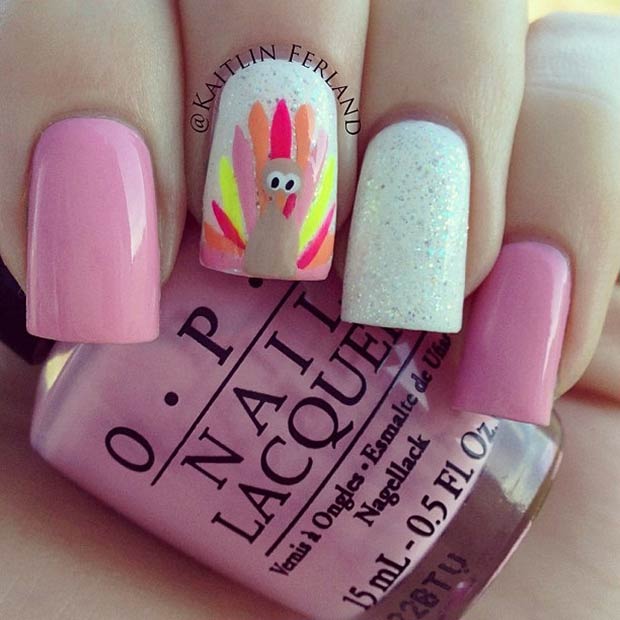
Source: @KaitlinFerland
Looking for a cute and girly Thanksgiving manicure? This super-adorable Turkey-inspired nail design is sure to brighten up your day.
Products used: OPI “Pink Friday”, Essie “Blanc”, and Wet’n’Wild “Hallucinate”.
2. Pumpkins + Glitter
Source: @justagirlandhernails
Add a little sparkle to your holiday nails by painting one nail with gold glitter. A sparkly accent nail will instantly transform your simple manicure to a snazzy one.
Products used: L’Oreal “I Like it Chunky”, OPI “Matte Top Coat” and Noodles Nail Polish “Pumpkin Spice”.
3. Turkey Accent Nail
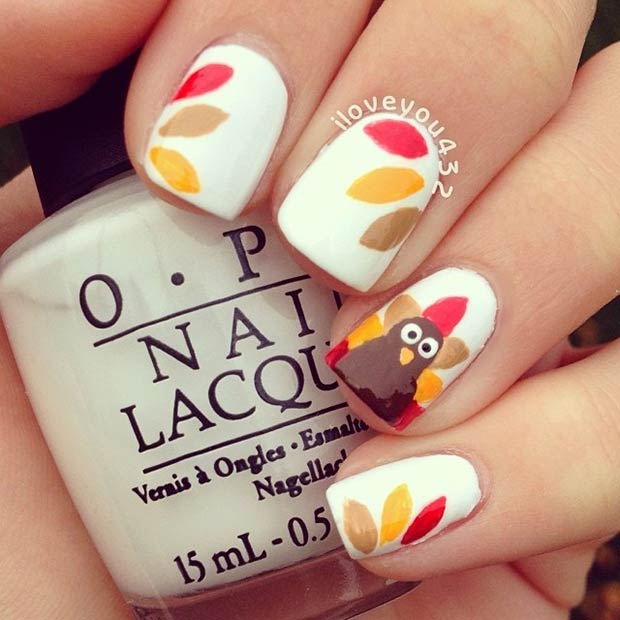
Source: @Iloveyou432
We absolutely love when women get festive with their nails, especially when they create one of the cutest turkey nail arts we’ve ever seen. The design is perfect for beginners in the nail art world. The white nail polish is OPI “Alpine Snow”.
4. Turkey Tutorial
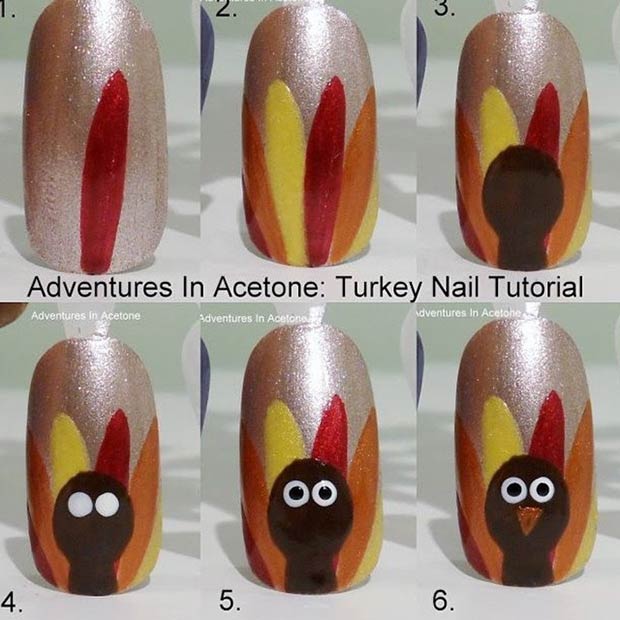
Source: @adventuresinacetone
Turkeys and feathers are one of the most popular Thanksgiving motifs, and with the help of this simple nail tutorial, you can easily have them painted on your nails. Painting a turkey on your nails doesn’t seem difficult anymore, right?
5. Candy Corn Ombre Design
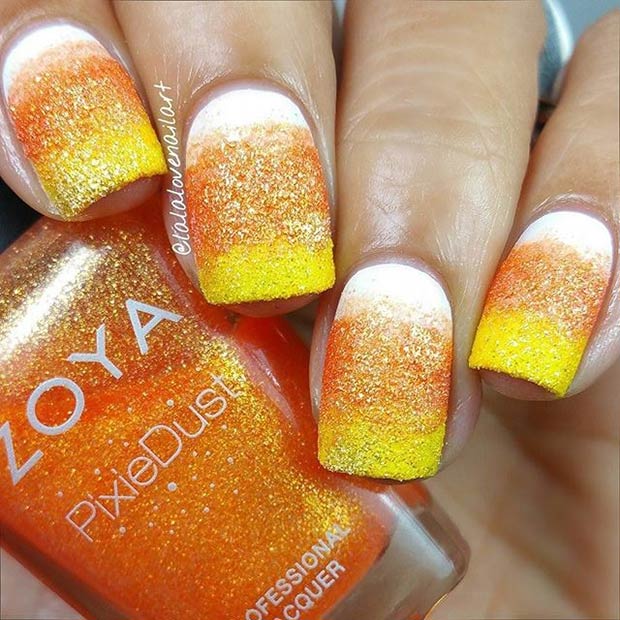
Source: @lalalovenailart
This candy corn ombré design can last you from Halloween all the way to Thanksgiving. The best part about this festive look? It has zero calories.
Products used: Zoya “Snow White”, “Beatrix” and “Solange”.
6. Falling Leaves
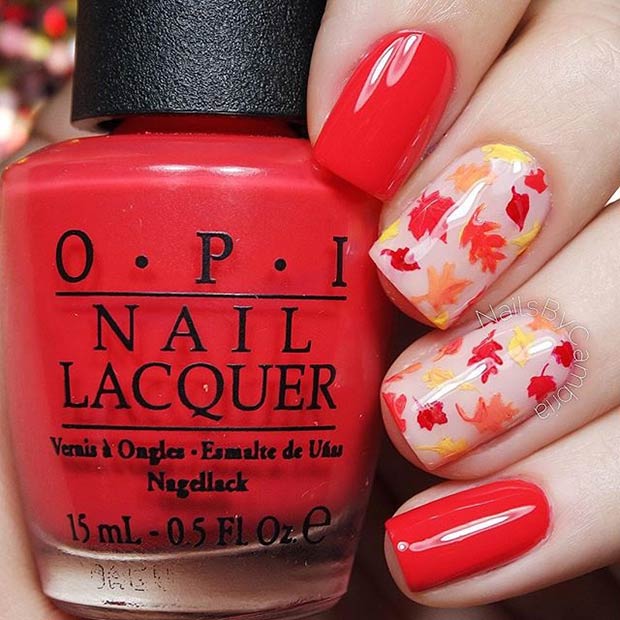
Source: @nailsbycambria
While definitely not suited for a nail art newbie, this design is sure to bring you compliments at the Thanksgiving table. The design is perfect for those who aren’t into turkeys, feathers, and pumpkins.
Products used: OPI “I Just Can’t Copa-cabana”, “Where Did Suzi’s Man go”, “Cajun Shrimp”, “Big Apple Red” and “Bubble Bath”.
7. Ombré Sequin Fade
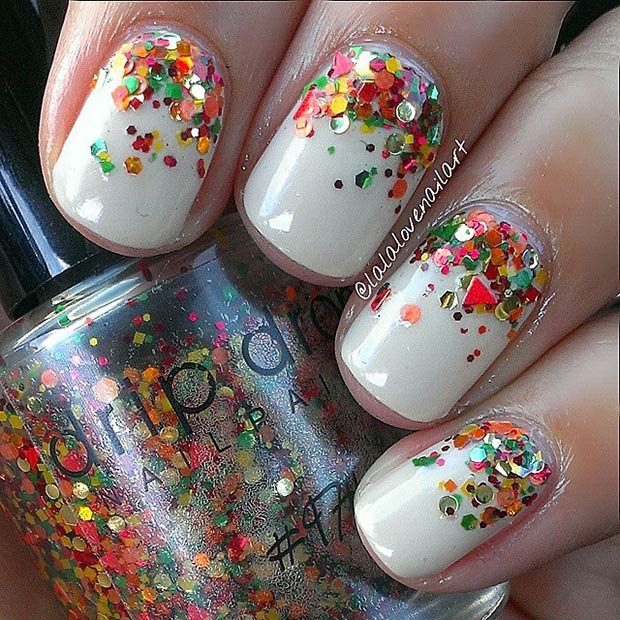
Source: @lalalovenailart
You’re bound to have the prettiest nails at the table with this cute and sparkly design. This sequin nail polish by Drip Drop Nail Paint is like autumn in a bottle. Agree?
8. Cute Pumpkins
Source: @kellimarissa
Bring cuteness to Thanksgiving with this lovely design! We love that the base color is nude because it makes the orange pumpkins really pop. We think a matte top coat would finish the look off perfectly.
Products used: OPI “Chromatic Orange”, “Is Mai Tai Crooked” and “Be There is a Prosecco”.
9. Black & Gold Design
Source: @nailstorming
Whenever you pair black and gold together, you know that you’ll end up with a fabulous manicure. This black and gold glitter design with a floral accent nail is the perfect match for a pretty cocktail dress. Give it a try!
Products used: OPI “Black Onyx”, Painted Polish by Lexi “#PSL”, and acrylic paint.
10. Gold Leaves + Studs
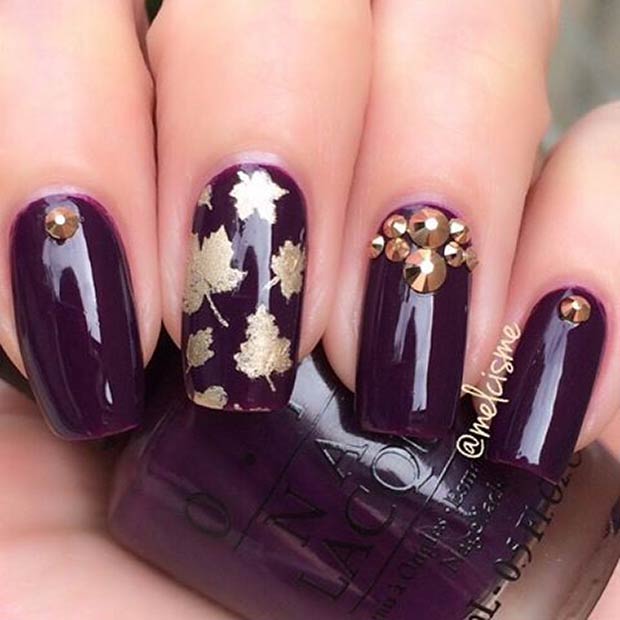
Source: @melcisme
How could you not love this simple yet gorgeous fall manicure? It’s the perfect choice for those looking for a different, non-traditional take on holiday nail art. Dark purple is the perfect base for these gold falling leaves and studs.
Products used: OPI “O Suzi Mio” and Essie “Good as Gold”.
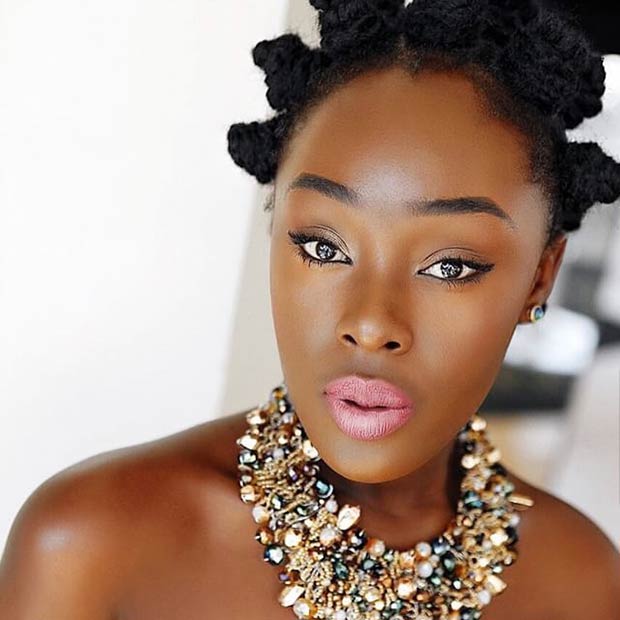
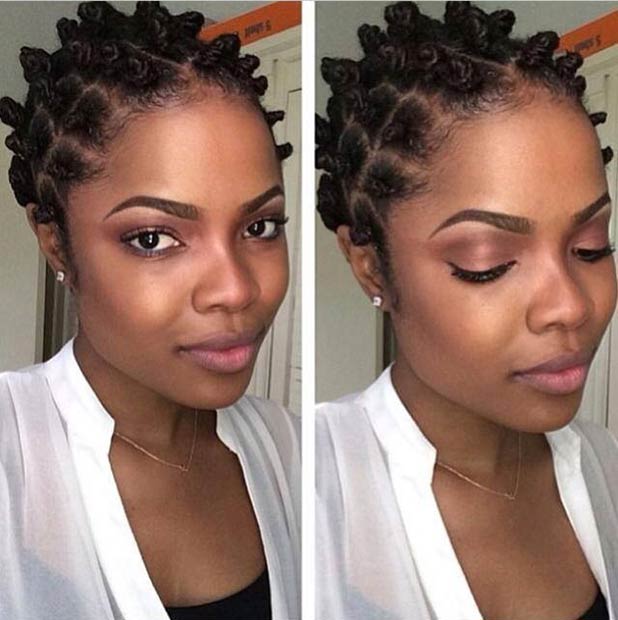
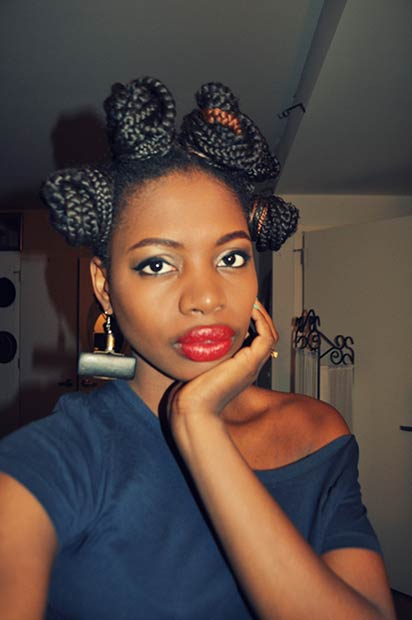
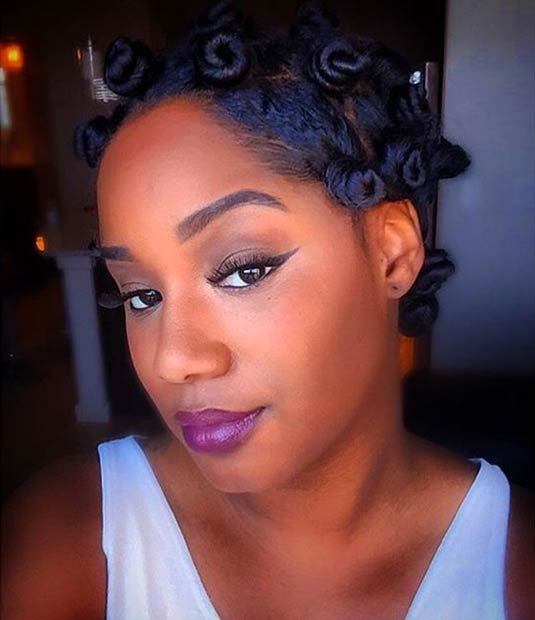
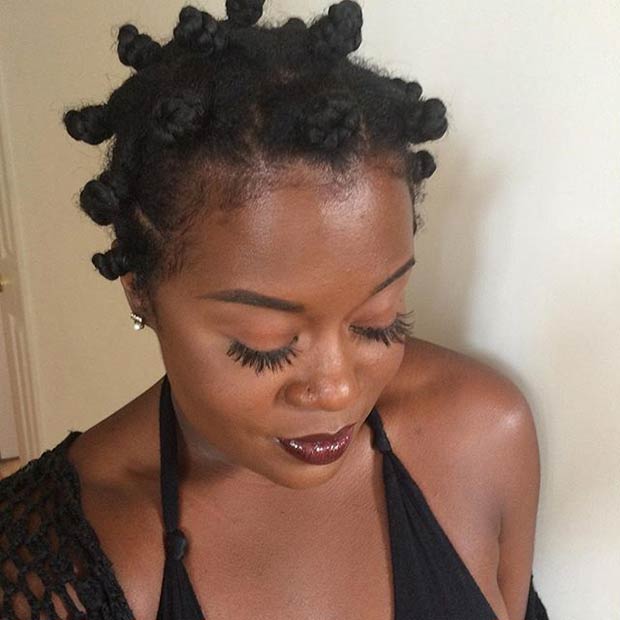
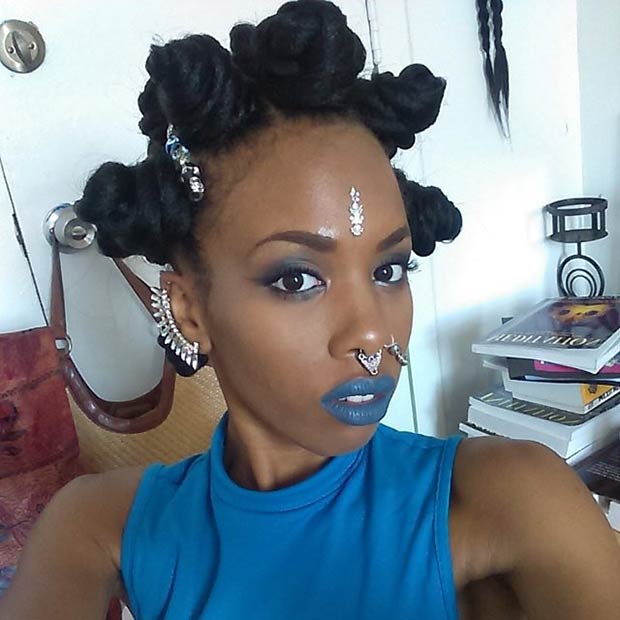
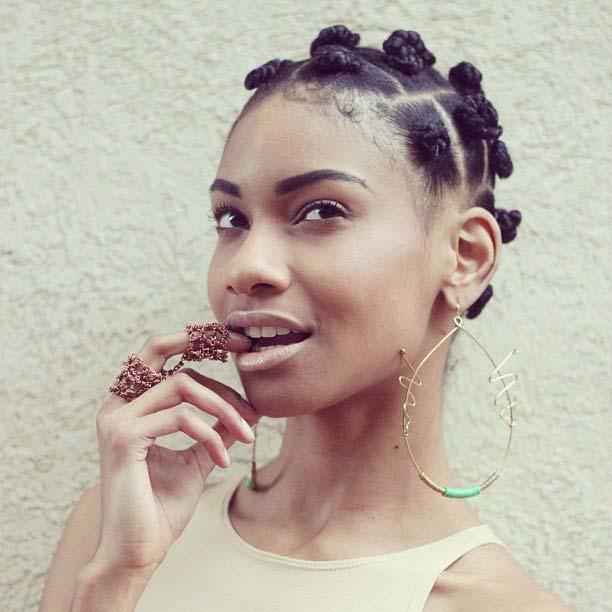
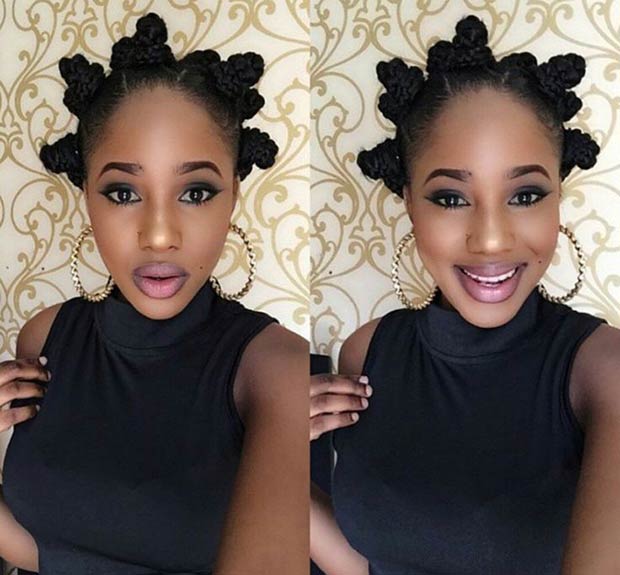
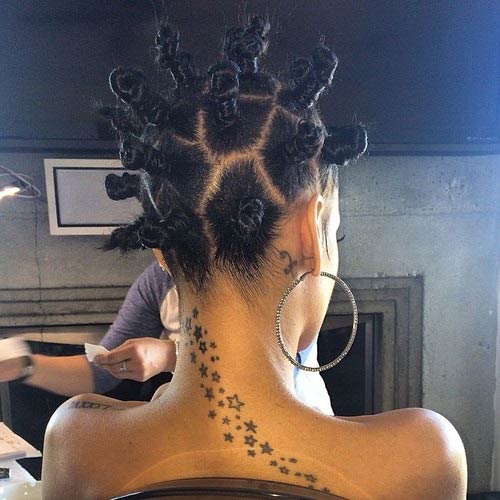
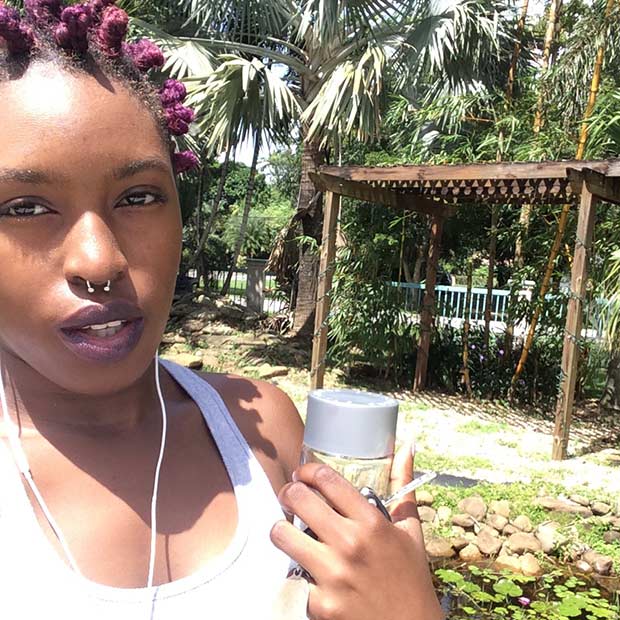
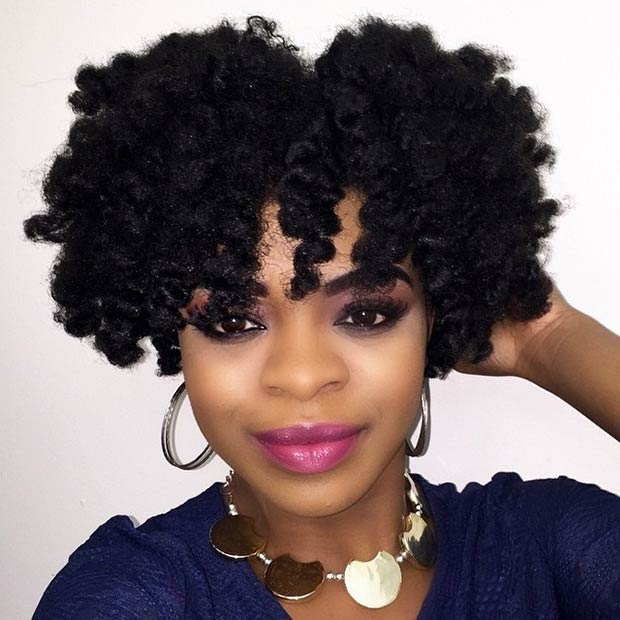
If you follow fashion and beauty news, you know the 1990s are back, and so are the bantu knots. The style was a popular 90s look that can be worn on any hair length and any hair type. Whether your hair is natural or relaxed, you can rock this style in two ways – as is or unraveled into bouncy, full curls (bantu knot out).
25 Bantu Knot Styles
Bantu knots are styled by separating hair into sections, then twisting those individual sections into tiny knots. You can section and twist your hair into small bantu knots for a super curly afro, or opt for the big knots for a huge, fluffy hair.
The best part? Bantu knots are a great protective style since they keep the ends tucked away. In case you need more reasons to try this style – it is super easy to do and costs very little or nothing at all. Here are 25 gorgeous looks that will make you mad for bantu knots. Enjoy!
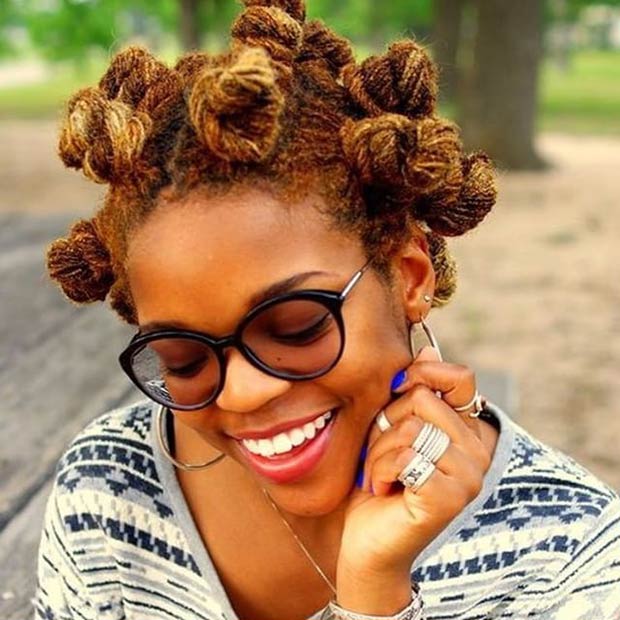
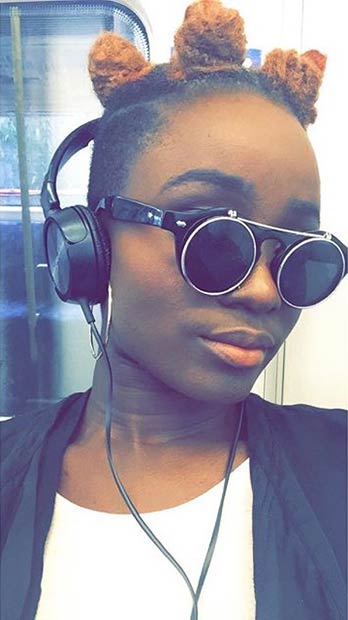
1. Bantu Knots On Natural Hair
Source: @4adaniels
Here is a stunning protective look for all natural-haired ladies. The style will add an instant dose of chic to your everyday look. Make sure to give it a go!
2. Perfect Festival Style
Source: @ashia4de
Heading to a music festival? Festivals and concerts are a great time to ditch your go-to looks and experiment with new styles. Bantu knots will make you stand out, especially if you complete the look with a bold and colorful makeup.
3. Braided Bantu Knots

Source: pinterest.com
Try something totally new and turn your braids into medium-sized bantu knots! Elevate your look with hair accessories like sparkly gold chains or cute headbands. Life is too short for boring hair, right?
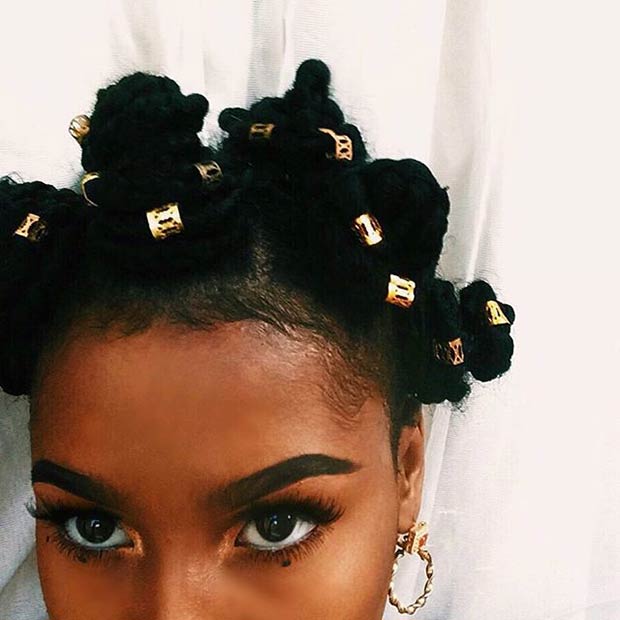
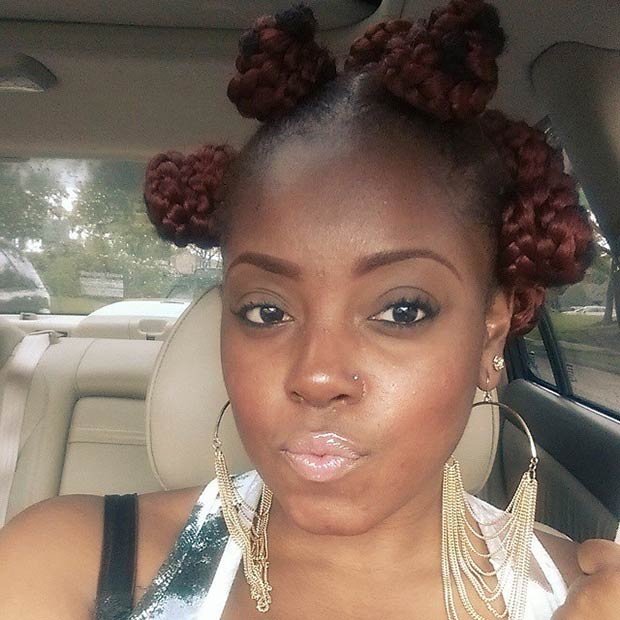
4. Large Bantu Knots Using Marley Hair
Source: @vadiahub
To achieve this look, you need to twist the hair loosely. Use pins to secure the knots and keep them lasting longer. Get creative and put your own twist on this style – make the knots bigger or smaller, twist them, braid them, or add a pop of color… possibilities are endless.
5. Half Up, Half Down Style

Source: @olayinkanoel
Not all women love headbands – they can be too big and colorful or they can damage your hair and cause a headache. The next time you’re craving a headband style, simply section your hair from ear to ear and create 4-5 bantu knots. The knots will keep your hair out of your face in a stylish way.
6. Sisterlocks into Bantu Knots
Source: @doyennehair
Sisterlocks can be super fun to style, too. If you’re looking for a cute way to keep your sisterlocks away from your face, or just want to change your look, try bantu knots. They can make you feel like a new woman!
7. Adorned Bantu Knots
Source: @finestcameroonians
Give your bantu knots a glamorous touch with gold hair cuffs – hair jewelry that can completely transform your look. They will give your knots that extra boost they need.
8. Braids + Bantu Knots Style

Source: @beautifulaprill
Why choose just one protective style when you can combine them? Combine your bantu knots with other protective styles like braids and twists for a funky updo.
9. Glam Bantu Knots
Source: @abenaakuaba
If you’re heading to a formal event, this is the perfect hairstyle to show everyone that you’re bold, different and ready to have some fun. With the right outfit and accessories, bantu knots can be suitable for any special occasion.
10. Micro Bantu Knots

Source: @iam_deville
Who said bantu knots are only for long-haired women? Short hair shouldn’t be a reason not to style your hair and experiment with knots and braids, even if they are micro size.
11. Bantu Knots + Shaved Sides
Source: @caro_ohemaa
This colorful and stylish look will definitely turn heads! Bantu knots are an easy way to update your current mohawk, and make it even more edgy. Don’t be afraid of being different!
12. Red Braided Bantu Knots
Source: @luvurmane_
How amazing is this braided style? Start by parting your hair into sections. Detangle the first section, apply moisture butter and coconut oil, then braid it. Twist the braid into a knot and secure with a hair elastic. Yes, it’s that simple!
13. Bantu Knots on Short Hair
Source: tumblr.com
Here’s another gorgeous lady showing us how amazing bantu knots look on a short hair. The best part about the look? Once you unravel them, you will have a head of beautiful, small curls.
14. Box Braids into Bantu Knots
Source: tumblr.com
Box braids can be styled in a number of ways, and bantu knots are one of them. This look s definitely one to try! The downside of big bantu knots: painful and restless sleep.
15. Simple Style
Source: @brileelovely
This look will get people talking, that’s for sure! Bantu knots are an easy way to style (and protect) your natural hair without using any heat.
16. Cute Braided Style
Source: @fvartistry
Bantu knot style is a must-try for all African American women. The look can be worn to work, party, or even out on a date.
17. Perfect Summer Style
Source: @knotty.knots
Big bantu knots, like these pictured above, become possible with the help of hair extensions. Since face jewelry is now a thing, make sure to finish the look with a septum ring or glue-on decorations. The jewelry goes pretty well with the bantu knots, right?
18. Braids Into Bantu Knots
Source: @tadoumakemeover
We’re obsessed with this look! To recreate it, separate the braids into smaller sections. Then take the first section, twist the braids together and form a knot. Secure with a hair elastic or bobby pins.
19. Colorful Style
Source: @krishtun
Wild hair colors are having a moment right now, so we had to include this bright look. After a few days, these knots will transform her locks into the most beautiful, bouncy curls.
20. Sisterlocks + Bantu Knots
Source: @getqueteeyebrows
Style your sisterlocks into a cute updo using the bantu knot method. Perfect look to show off your new earrings.
21. Easy Protective Style
Source: @nenonatural
“If you can’t handle me at my Bantu knot, then you don’t deserve me at my twist out.”
22. Twists into Bantu Knots
Source: tumblr.com
Step 1: Start by sectioning off your natural hair.
Step 2: Grab one section, detangle and apply a coconut oil to moisture.
Step 3: Divide the section into two and start the two-strand twist. Once you can’t go down any further, twist the strand until it forms a mini knot.
Step 4: Repeat the steps on other sections.
23. Braided Style
Source: tumblr.com
Step 1: Start by sectioning off your natural hair.
Step 2: Grab one section, detangle and apply a coconut oil to moisture.
Step 3: Divide the section into three and braid a French braid. Once you can’t go down any further, twist the braid until it forms a mini knot.
Step 4: Repeat the steps on other sections.
24. Rihanna’s Bantu Knots
Source: weheartit.com
Rihanna is known for her unique style, so we weren’t too surprised when she rocked the bantu knot look at the iHeart Radio Music Awards. The singer paired her cool updo with dark green lipstick and sparkly hoop earrings.
25. Small Purple Bantu Knots
Source: tumblr.com
Match your hair with your lipstick to stand out from the crowd.
Bantu Knot Out Styles
Another reason to love the method? Bantu knot out. Your painful and restless sleep will pay off once you unravel your knots into the most gorgeous, bouncy curls. The method lets you achieve the perfect curly look without the use of heat. Plus, the curls will last you a few days. Amazing!
Remember, the ultimate tip for a perfect bantu knot out is to allow your hair to air dry completely.
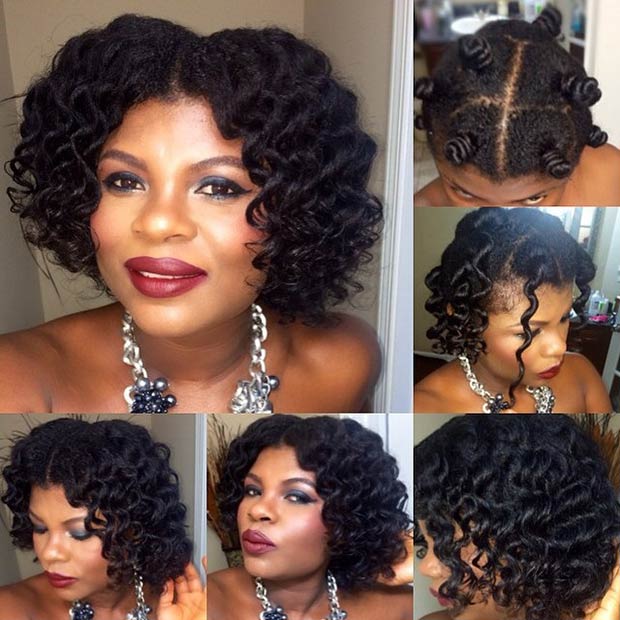
1. Bantu Knot Out Curls
Source: @nellzlioness
These stunning curls left us speechless.
2. Tutorial for Natural Hair
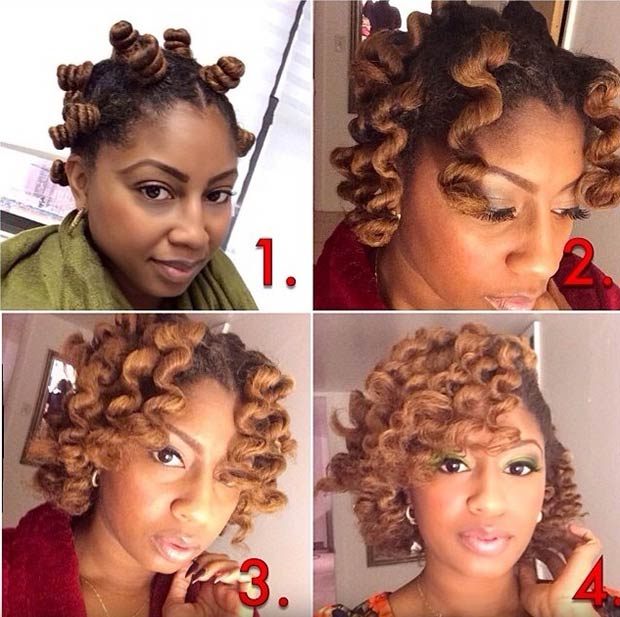
Source: @curlsandcouture
Women who share their beauty secrets with other women, are the best!
Step 1: Create the knots on a dry, stretched hair at night before bedtime.
Step 2: Set them with a curl defining jelly and wear them for a whole day.
Step 3: Take them out using a coconut oil.
Step 4: Separate the curls and enjoy your flawless style!
3. Tutorial for Long Natural Hair
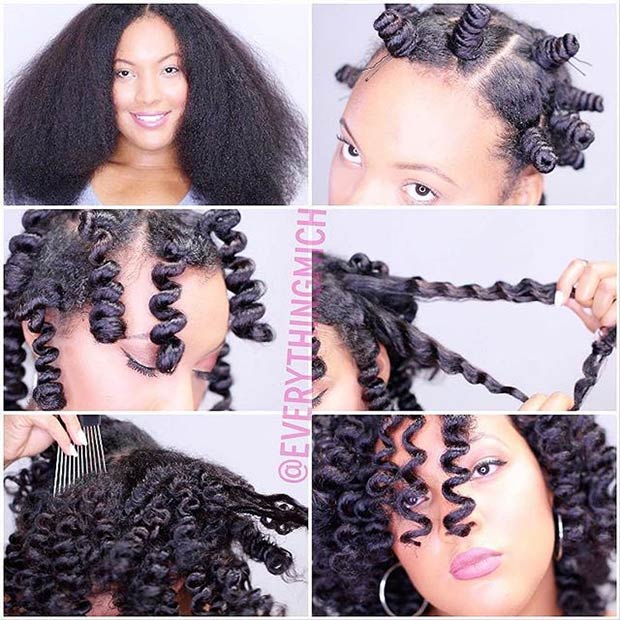
Source: @everythingmich
Step 1: Apply a coconut water and styling smoother to your hair then blow dry it. Take a small to medium section of your hair and brush it out to get rid of knots. Next, apply a curly butter to set the style and brush it out again.
Step 2: Start the twisting process, leaving a little bit of the space at the top to avoid the pain. Secure the knot with a bobby pin.
Step 3: Take them out the next morning using an avocado oil.
Step 4: Gently separate the twists with your fingers.
Step 5: Separate your hair even more using a pick comb for that extra volume.
4. Flat Twists + Bantu Knots

Source: @bantubytasha
Flat twists with bantu knots on the ends will transform your locks into amazing, full curls.
5. Bantu Knot Out Tutorial
Source: @flawlessbeauty4u2
As you can see, your curls will be popping!
6. Voluminous Curls
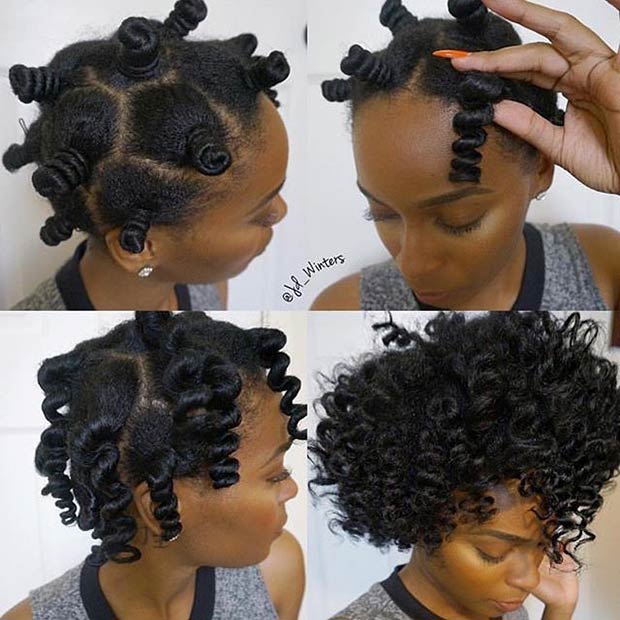
Source: @jd_winters
Tips for this look:
- start off with a clean hair
- lightly mist your hair with water and use leave-in conditioner
- use pick comb through the curls to achieve the volume
7. Easy Bantu Knot Curls
Source: @leylarhcadne
Do the method on a dry, freshly washed and moisturized hair for the best results.
8. Small Bantu Knots into Curls
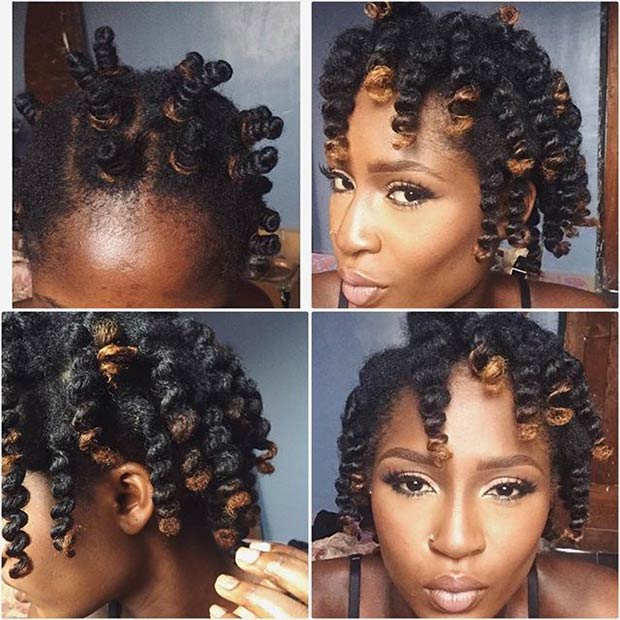
Source: @leylarhcadne
Remember, the smaller the knot, the more defined the curl will be.
9. Curls on Medium Length Hair
Source: @kissmyspikez
To recreate this look, do a two-strand twist on a wet hair. Leave the knots in for 3 days or until they dry completely. Products used: Eden’s coconut shea + coconut oil.
10. Bantu knot Out on Blow-Dried Hair
Source: @casual_allure
For curls like these, just blow-dry your hair before creating the Bantu knots.
11. Bantu Knot Out on a Pixie Cut

Source: tumblr.com
Small bantu knots on a pixie cut will give you a super curly afro.
12. Easy Bantu Knot Tutorial
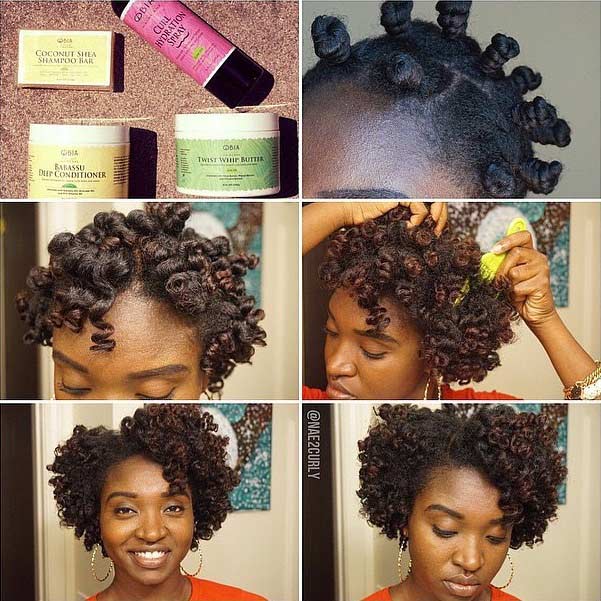
Source: @nae2curly
Yes, your bantu knot out CAN turn out this good!
Step 1: Wash and condition your hair, then blow dry it (optional: use a comb attachment). Use the tension method to smooth out the hair.
Step 2: Take a section of hair and do a two-strand twist. Form a knot and secure with a bobby pin. Air dry your hair until it completely dries or sleep in over night.
Step 3: Carefully take down your bantu knots and separate the curls with a pick comb.
13. Perfect Bantu Knot Out

Source: @_hernameisme
Now that’s a perfect bantu knot out! Agree?
Fall is here, and you know what that means – matte nails are making their comeback! Nail art lovers will be glad to know that the trend is still around for the coming season. It’s all about matte finish right now. A glossy painted nails are so last year.
So, have to achieve the matte finish? You have two options: The first is to buy a matte top coat. The product will instantly transform any glossy shade in your collection to a matte finish. Your other option is to buy an already matte nail polish.
No fall outfit is complete without a matte manicure, so make sure to copy at least some of these amazing 25 nail designs!
1. Chevron Accent Nail
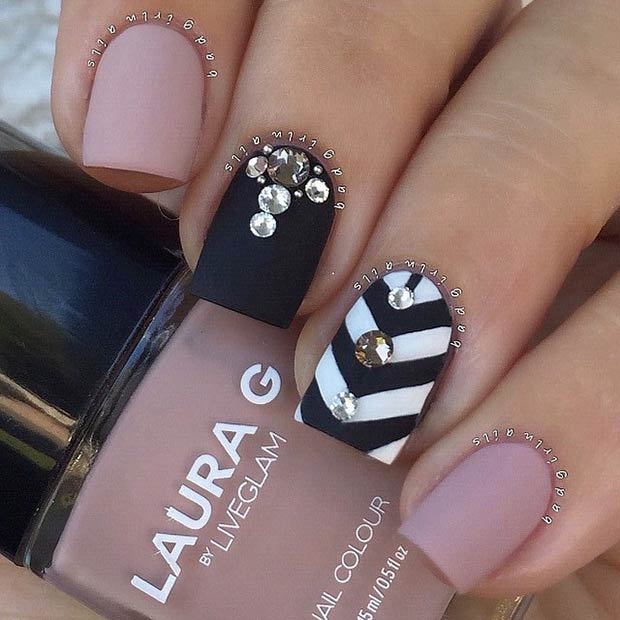
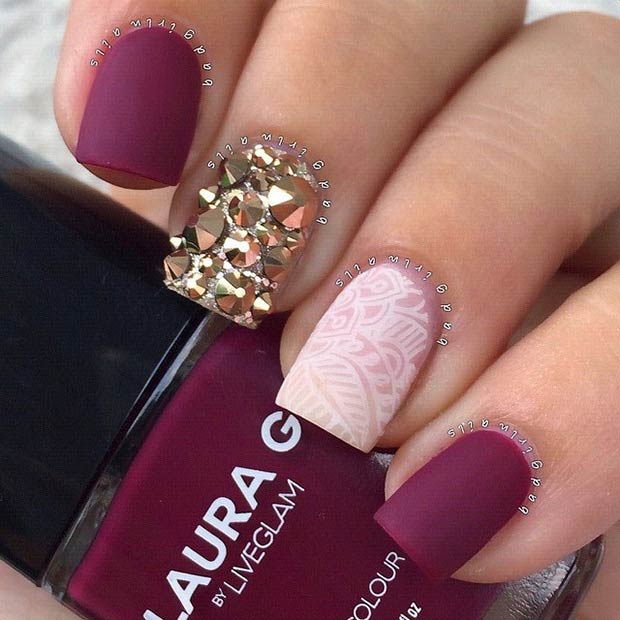
Source: @badgirlnails
This look is bold, easy to do and looks absolutely stunning. The nude nail polish is Laura G’s “Fifth Avenue”. Cheat your way to a neat chevron accent nail with a pre-made vinyl stickers. This trick will save you time and nerves.
2. Long, Burgundy Matte Nails
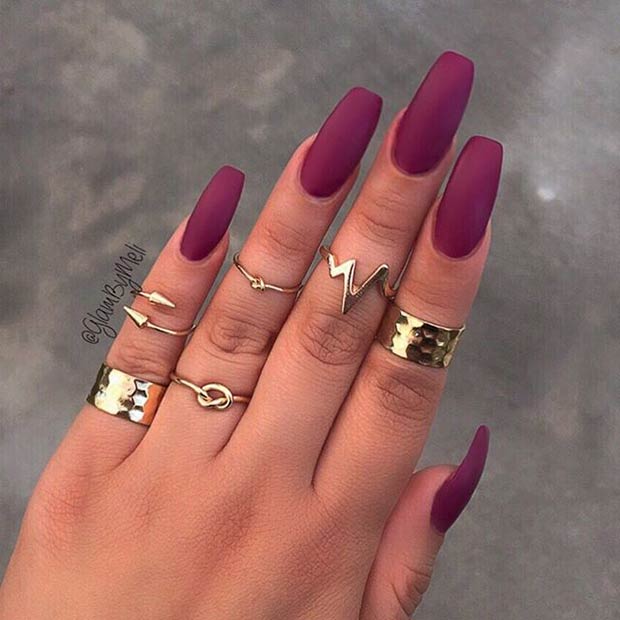
Source: @GlamByMeli
Nothing says “fall” quite like dark matte nails. As you can see, you don’t always need to apply rhinestones, studs or other nail embellishments for an amazing manicure. Simple is better sometimes.
Products used: Sally Hansen’s xtreme wear nail polish in shade “Pep-Plum” & matte top coat.
3. Army Green Matte + Rhinestones
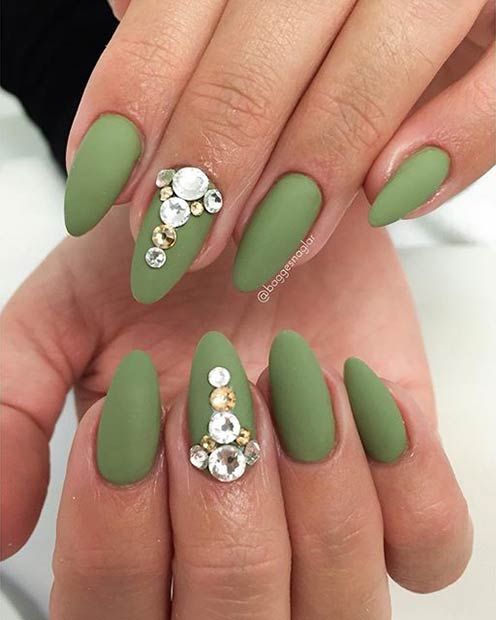
Source: @baggesnaglar
This simple yet eye-catching nail design will have everyone asking where you got your nails done. The army green shade looks stunning when coupled with sparkly silver and gold rhinestones.
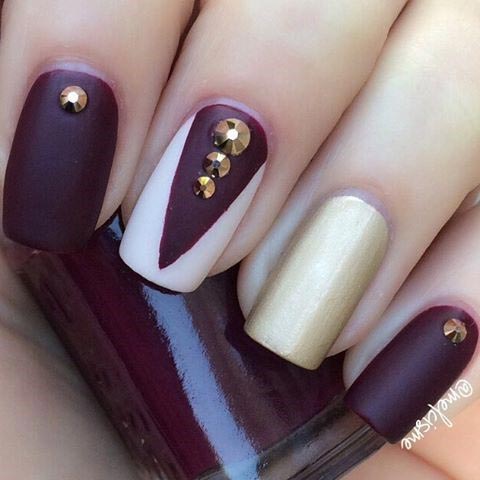
4. Dark Purple Matte
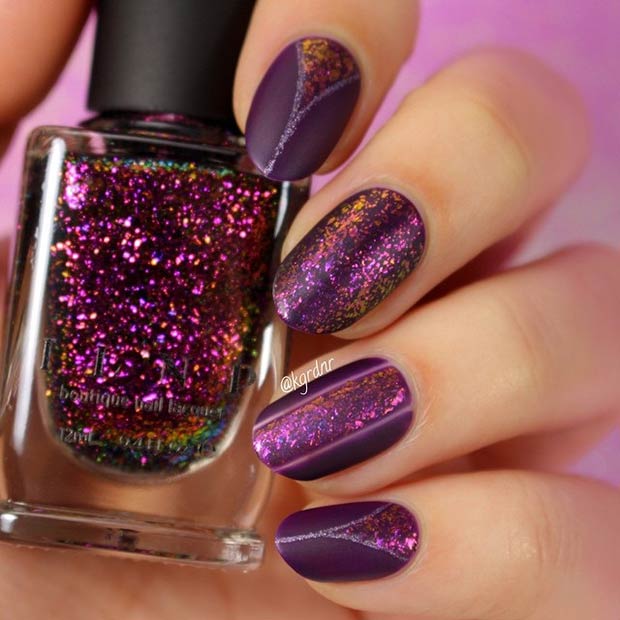
Source: @kgrdnr
One of the best ways to accent your fall outfit is with a bold but feminine manicure. Matte finish gives such a unique and glamorous look to the nails.
5. Black & Red Design
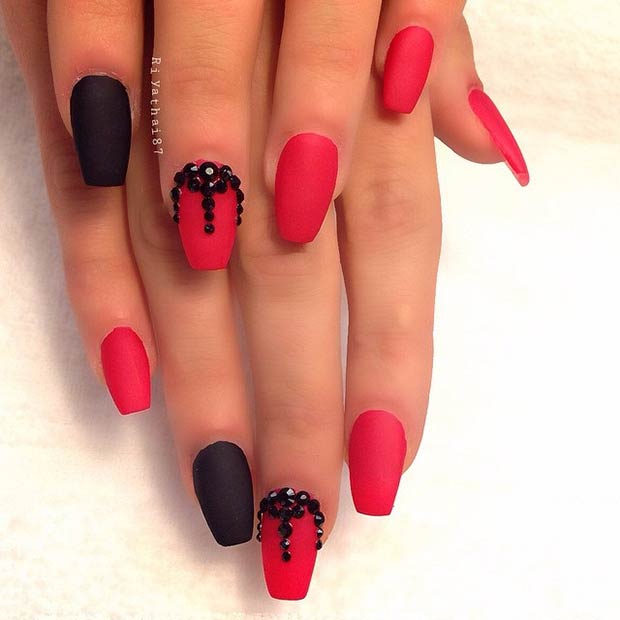
Source: @riyathai87
Feeling sexy and fierce? Give this look a try! Keep things simple and classic with a few tastefully placed rhinestones. The best part? You don’t have to go to a nail salon to get this stunning look.
6. Leopard Print Accent Nail
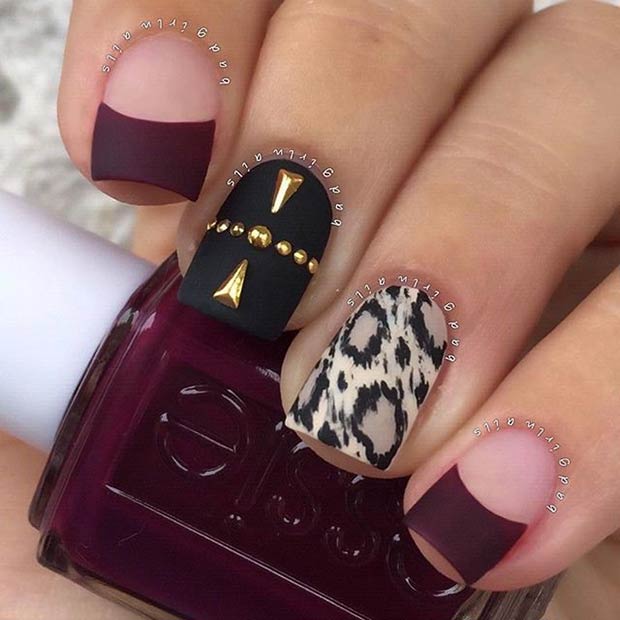
Source: @badgirlnails
Leopard print is a fun way to accent a single nail. The plum nail polish used in this look is absolutely stunning and complements the leopard print very well, right? We love everything about this look!
Products used: Essie “In the Lobby”, OPI “My Vampire is Buff”, Floss Gloss “Black Holy” and OPI “Matte Top Coat”.
7. Cut-Out Triangle Nails
Source: @riyathai87
If you’re looking for a new and totally “unboring” way to wear your favorite black nail polish, this look might be for you! Start off with a base coat, and let it dry. Using a black nail striper, draw a triangle. Fill the shape in with a black nail polish. Let it dry and finish with a matte top coat.
Don’t have steady hands? Rip off a piece of scotch tape, cut out a little triangle, and carefully place it at the base of your nail. Repeat on the other nails. Then apply a coat of a black nail polish and peel away the tape. Finish with a matte top coat.
8. Gold Sequin Gradient
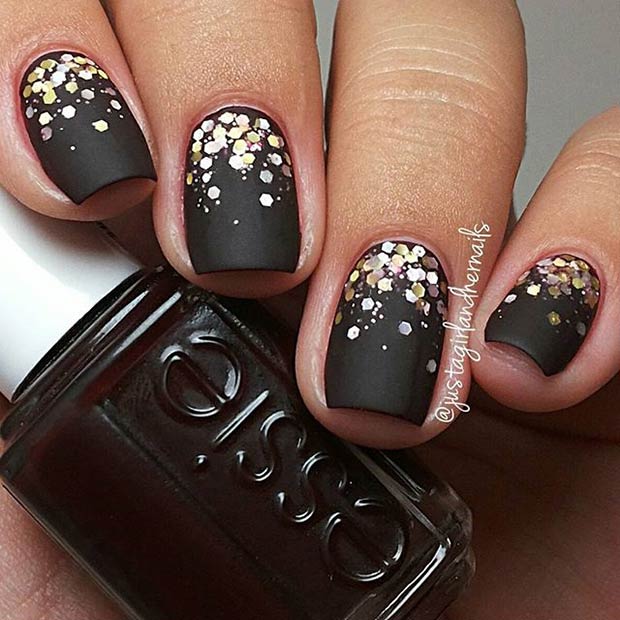
Source: @justagirlandhernails
Sparkles + matte finish = instant glam. This would be perfect for holidays! Products used: Essie “Wicked”,Nicole by OPI “Lips are Dripping Honey” and OPI “Matte Top Coat”.
9. Grey Matte Nails
Source: @riyathai87
This look is so easy to do and looks amazing. Start by applying two coats of your favorite grey nail polish. We recommend OPI in shade “Embrace the Gray”. While the grey nail polish dries, accent a single nail with some gold studs. Finish with a matte top coat. Voilà! A simple yet eye-catching nail design.
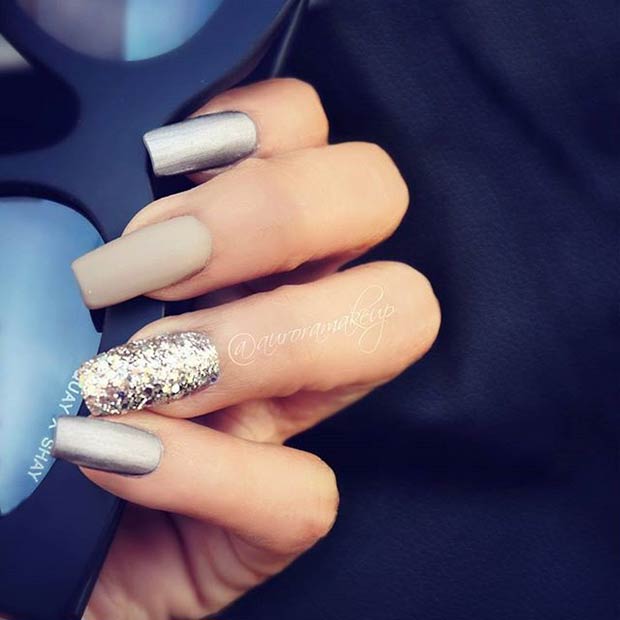
10. Dark Blue Matte Nails + Glitter Accent Nail
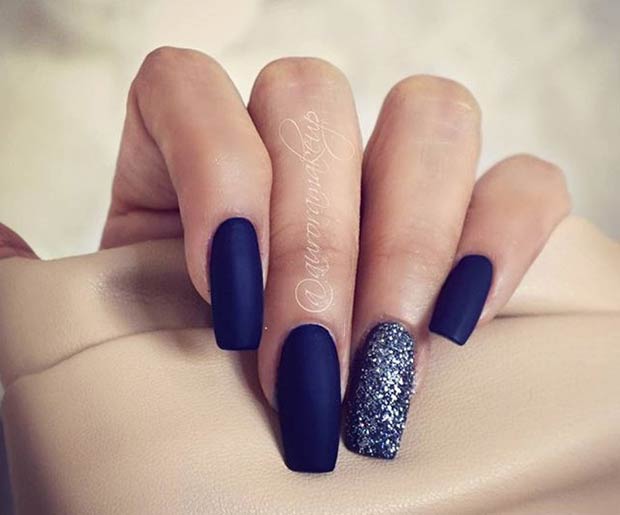
Source: @auroramakeup
Minimal yet stylish nail art is our favorite. The look is super easy to DIY. Products used: China Glaze “Calypso Blue” + Sally Hansen “Big Matte Top Coat”.
11. Black Matte Nails with Glossy Tips

Source: tumblr.com
We don’t know about you, but we are over that traditional French tip manicure with a harsh white line and flesh-toned base. We want something edgy and cool. Luckily, recently we stumbled across this simple but definitely badass twist on a classic French tip. The look is super easy to recreate and looks great on short nails, too!
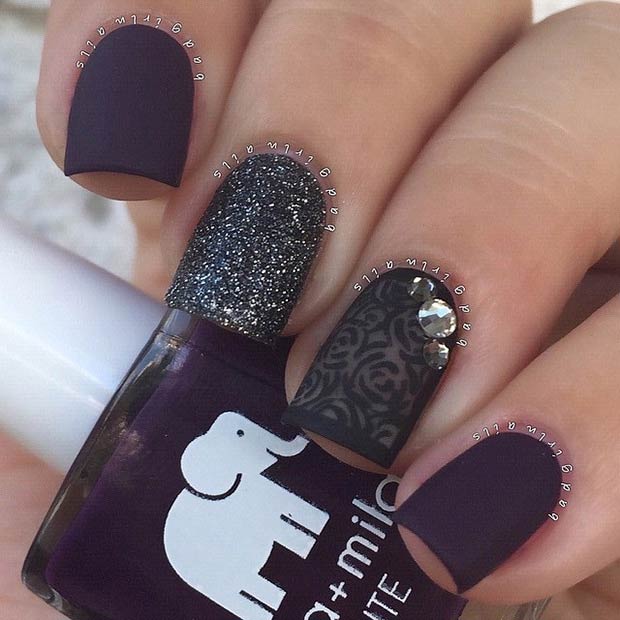
12. Burgundy Matte Coffin Nails
Source: @riyathai87
Make a burgundy mani pop with a touch of black. Matte finish gives coffin nails a modern and elegant look. This look is definitely on our list of looks to copy this fall.
13. Matte + Gold Design
Source: @badgirlnails
One of the hottest accessories for fall 2015 are: cool, well-kept and eye-catching nails. Give your nails an injection of ‘va va voom’ by adorning a single nail with some gold rhinestones. The lace effect was created using a nail stamping technique. Products used: Laura G “Madrid” + matte top coat.
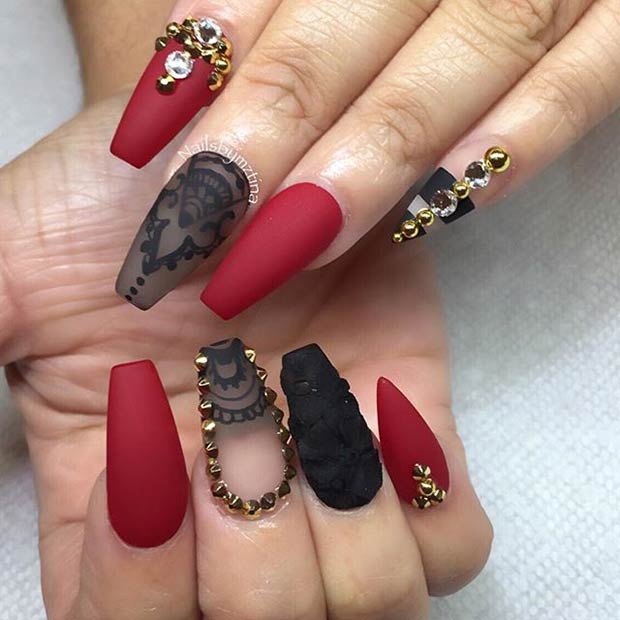
14. Black & Burgundy Ombre
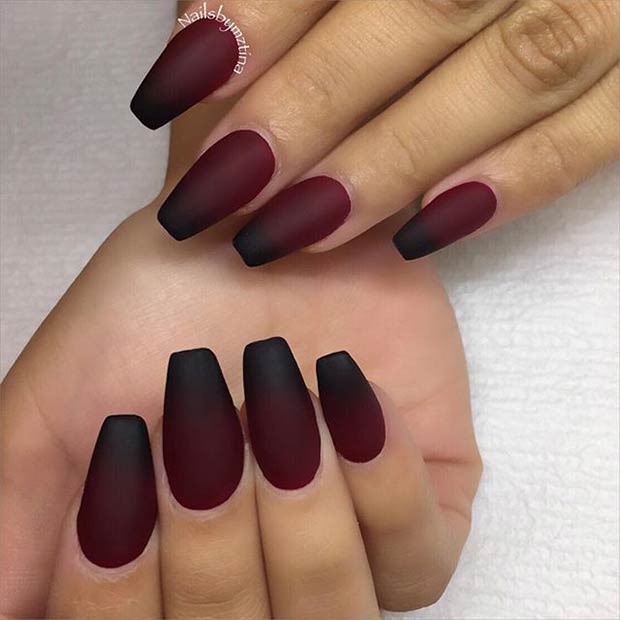
Source: @NailsByMztina
Pair two big nail trends together – ombre effect and matte finish – to get this jaw-dropping look. You will need: a base coat, black polish, burgundy polish, makeup sponge and a matte top coat. Apply a generous amount of burgundy nail polish onto the sponge. Apply the black nail polish in the same way, but make sure it slightly overlaps the burgundy shade. Press the sponge on the nail. Repeat the step for each nail. Finish the look with a matte top coat.
15. Black Matte Nails + Gold Studs
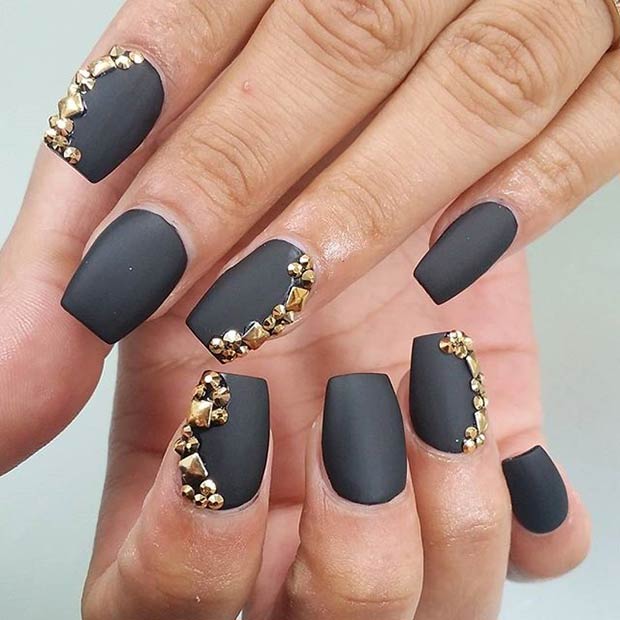
Source: @lettys_nails
These black and gold nails are super-chic and easy to do. Tip: a manicure looks better when nail embellishments are applied to a couple of nails instead of all five. Too many nail embellishments can shift the effect from cool to tacky.
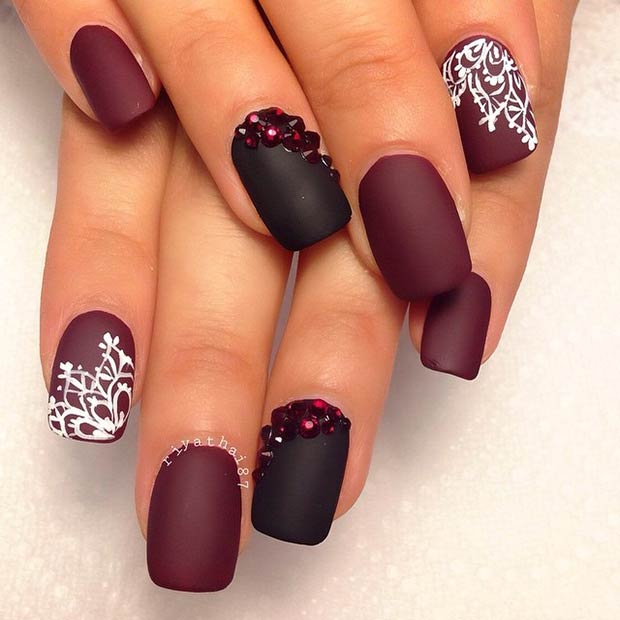
16. Matte Mauve Nails
Source: @riyathai87
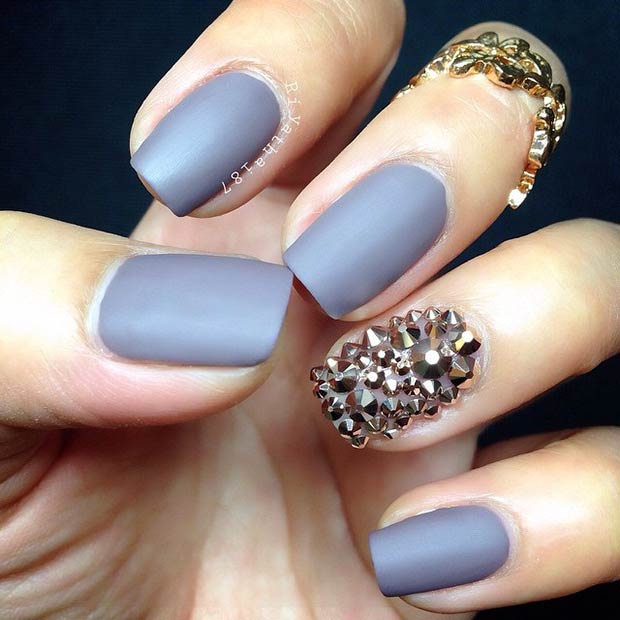
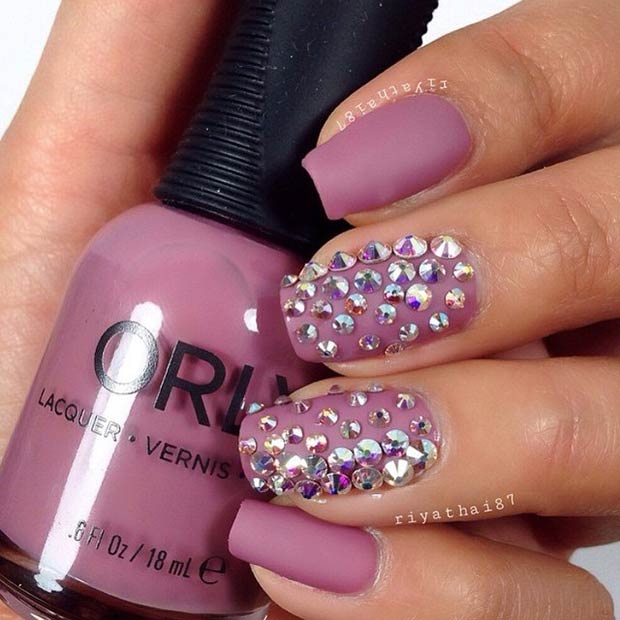
Dress up your nails with some bling! If you would like to have nails like these, all you have to do is apply two coats of a mauve nail polish, let it dry and top it with a matte top coat. Then carefully and tastefully place Swarovski rhinestones on your nails. Why Swarovski? Trust us, no rhinestone can replace the sparkle of a Swarovski crystal.
Products used: Orly “Mauve Crème”, matte top coat, and Swarovski rhinestones.
17. Grey + Nude Nails
Source: @auroramakeup
Who knew grey and nude would go so well together? This design works well on any shape of nail, plus it’s super simple to do. Products used: Nina Ultra Pro in shades “Smoke ‘n’ Mirrors” and “Beige a Vu” + Sally Hansen “Big Matte Top Coat”
18. Black & Dark Purple Matte Nails
Source: @badgirlnails
This design will add an instant edginess to your fall look. Products used: Zoya “Dahlia”, ella+mila “Little Plum Dress” & “Matte Topcoat”.
19. Rhinestone Accent Nail
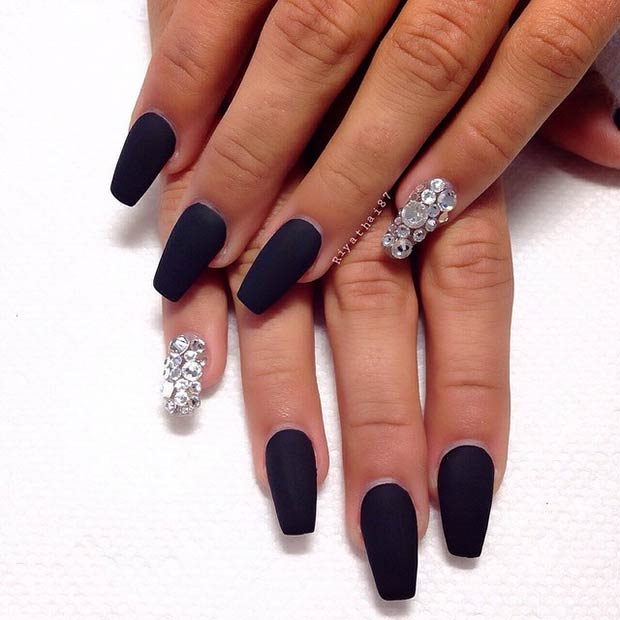
Source: @riyathai87
Transform your simple matte nails to a jaw-dropping manicure with a few rhinestones on your pinkie nail. The look is bold and strong with a sparkly touch of elegance.
20. Black Matte Stiletto Nails
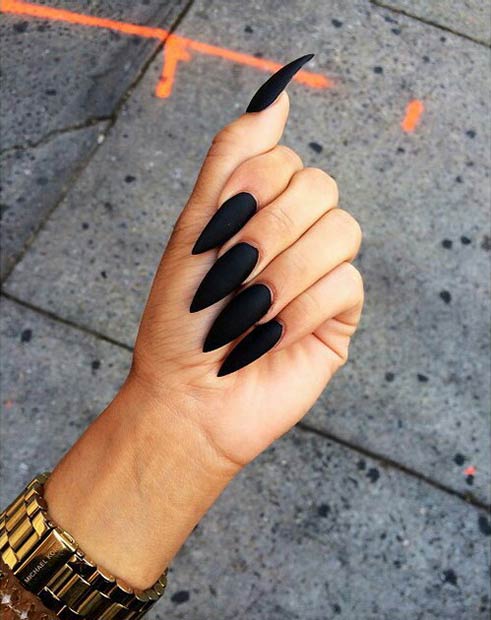
Source: tumblr.com
Unleash your inner witch with these super-long, and super-black stiletto nails. A matte top coat can add a more interesting look to a ‘boring’ black nail polish.
21. Black & Red + Gold Details
Source: @NailsByMztina
Give each nail a different look, and go wild with colors and decorations for a perfect statement mani.
22. Dark Red Matte Nails
Source: @riyathai87
Create a stunning at-home manicure with a black and burgundy nail polishes, white acrylic paint and some deep red rhinestones.
23. Dark Red + Nude Nails
Source: @melcisme
Fall nail art is all about dark shades, matte finish and simple designs, which is why this manicure makes for a perfect go-to look in the cooler months. Products used: Essie “Urban Jungle”, “Good as Gold”, “Meet Me in the Lobby”, and “Matte About You”.
24. Black Matte + Gold Glitter Nails
Source: weheartit.com
A stripe of gold glitter adds an instant touch of glam without overpowering. The sparkly gold makes the matte black stand out even more. The look is perfect for holiday season.
25. Black Matte Coffin Nails
Source: tumblr.com
These simple but eye-catching coffin nails go with any outfit no matter the occasion. Black nail polish with a matte finish is a must-have for nail art lovers.
It is finally October and you know what that means – lots and lots of Halloween decorations and costumes. But what better way to celebrate Halloween than with a stylish nail design, right? Nothing says “Halloween” quite like cute Jack-o’-lanterns, scary ghosts or tasty candy corns on your nails.
Our list of 35 cute and spooky designs will inspire you to transform your nails into mini costumes. Happy painting!
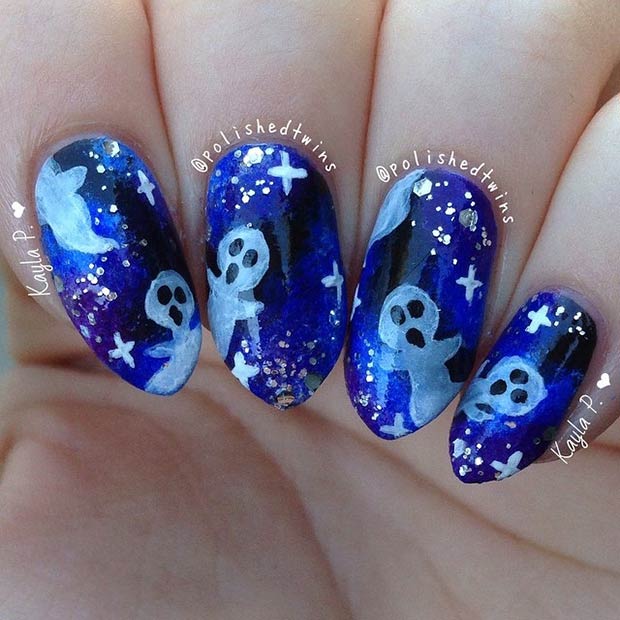
1. Black Bats
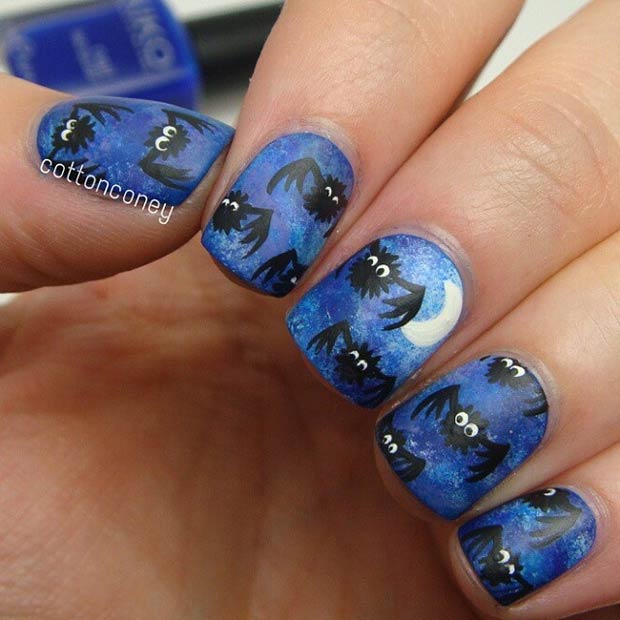
Source: @cottonconey
Products used: Kiko Cosmetics in Ink Blue (shade 335), black and white acrylic paint and random shades of dark blue, white and purple.
Step 1: Start with a base color. Use a shade of your choice.
Step 2: Next, lightly sponge on some random darker and lighter blues, purples and white to create the look of a cloudy night sky.
Step 3: Add the moon using white acrylic paint.
Step 4: With black acrylic paint, add a round circle. This is the body of the bat. Keep in mind that we’re adding the fluffy shape in the next step so it’ll get a little bigger.
Step 5: Create a fluffy effect by doing small brush strokes all around the circle.
Step 6: Then create the wings and the eyes.
Step 7: Let it dry and finish with a matte top coat.
2. Cute Ghosts Design
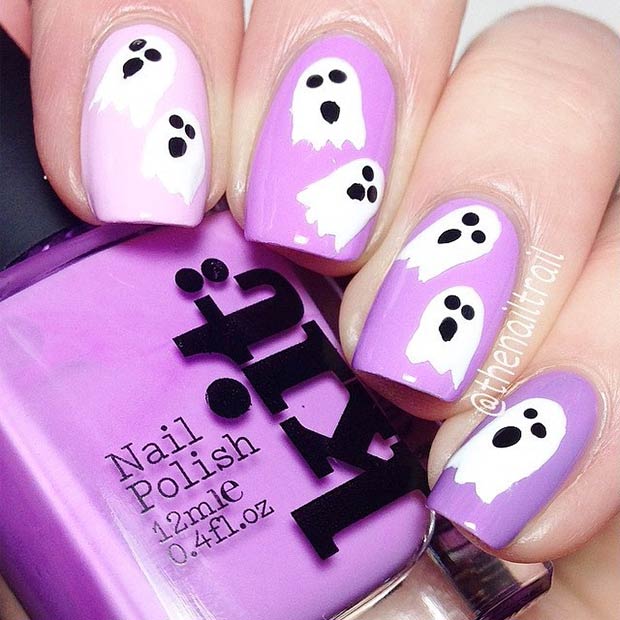
Source: @thenailtrail
The bright background makes this nail design look absolutely adorable and not scary at all!
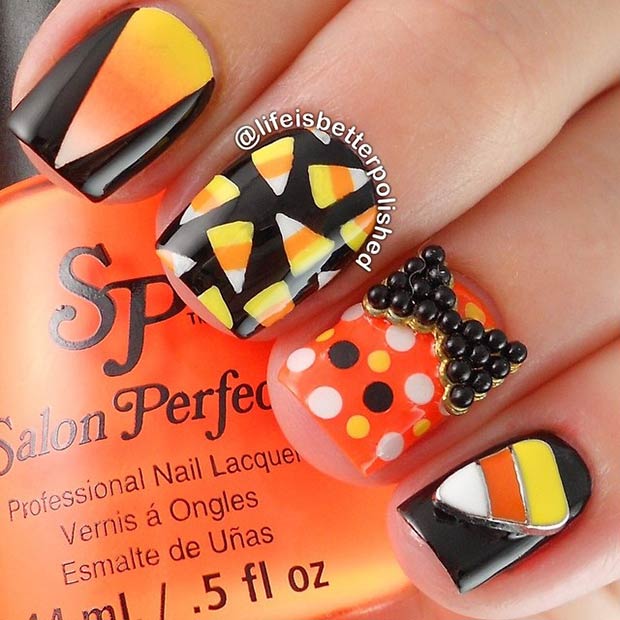
3. Candy Corn Nails
Source: @lifeisbetterpolished
Blacks, whites and oranges are classic and popular choices for Halloween. Products used for the design: Salon Perfect “Sugar Cube”, “Traffic Cone” and “Oil Slick”.
4. Blood Splatter Nails

Source: @sinney
Get into the Halloween spirit with these blood-splatter nails. The design looks awesome, plus it’s super easy to do. Apply two coats of white nail polish and let it dry completely. Next, take a plastic plate and put a few drops of a red polish onto the plate. Take a coffee straw and dip it into the red polish on one end. Blow through the straw very quickly to get that desired splatter effect. Repeat the process on the other nails. Finish with a top coat.
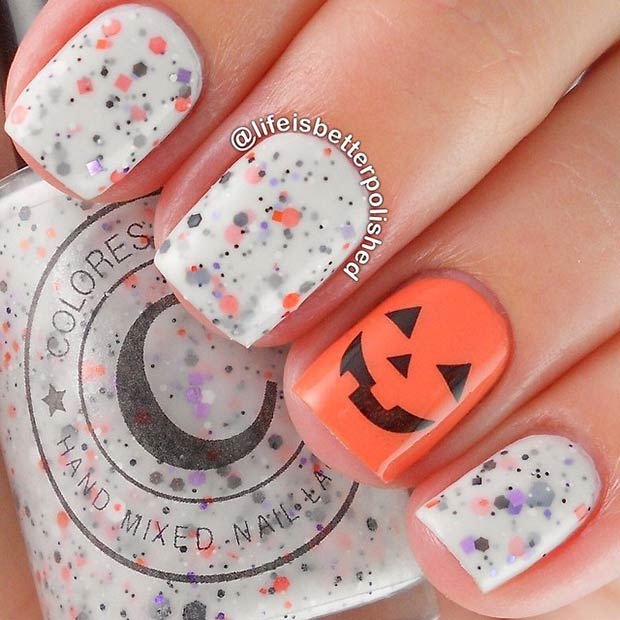
5. Pumpkin Accent Nail
Source: @lifeisbetterpolished
Keep it simple and accent a single nail with a Jack-o’-lantern decal. Products used: Colores de Carol “Sweet&Spooky” + nail decal.
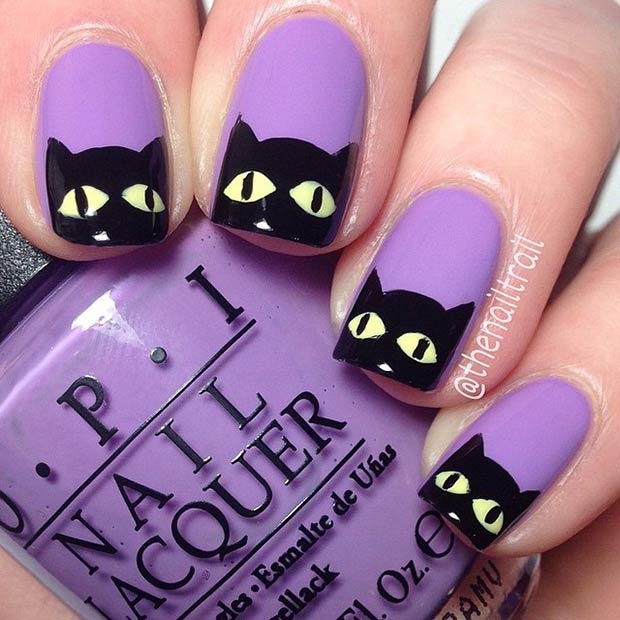
6. Black Cats
Source: @thenailtrail
Is it bad luck to wear this nail art? We don’t think so!
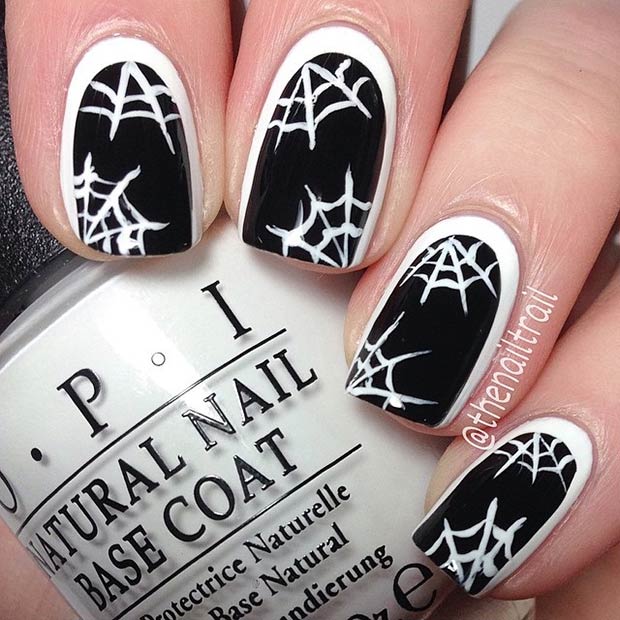
7. Spider Web Nails
Source: @thenailtrail
Transform your nails into silky spider web using OPI’s Alpine Snow and Black Onyx.
8. Ghosts + Fingerprint Accent Nail
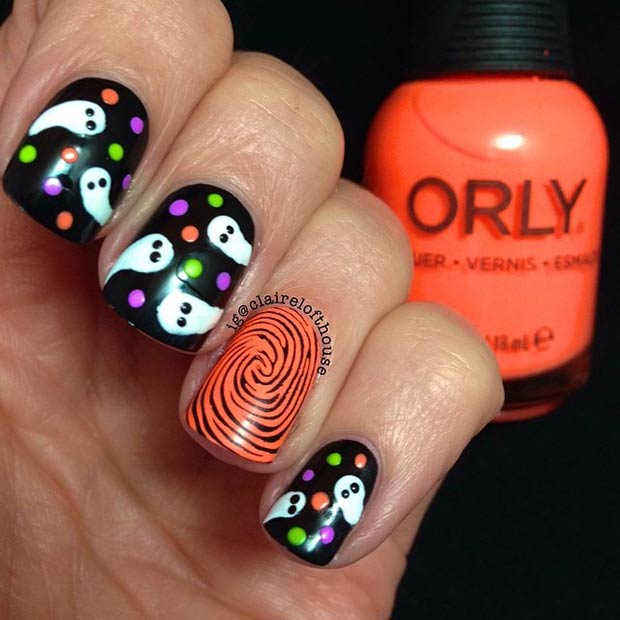
Source: @clairelofthouse
The fingerprint accent nail was created using a nail stamping plate. The base orange polish is Orly “Melt your Popsicle”.
9. Bloodshot Eyes Design
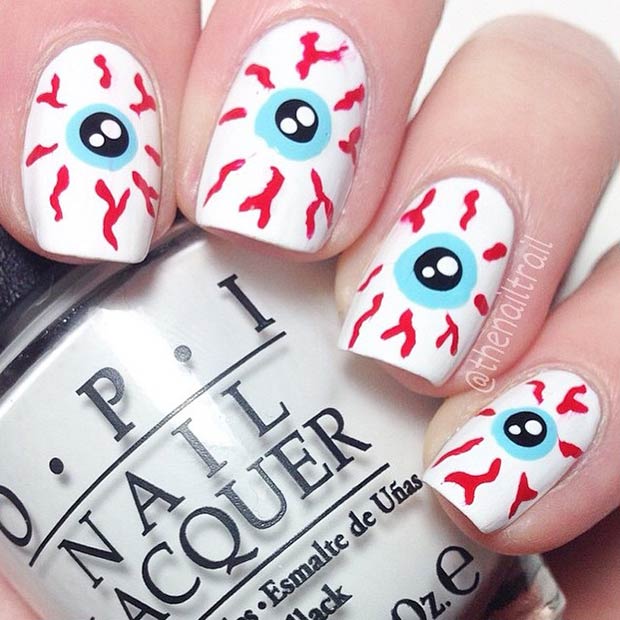
Source: @thenailtrail
This ‘bloodshot eyes’ design will compliment any costume! It’s so darn cute (and scary) that we had to include it on our list.
10. Pumpkin Nail Design
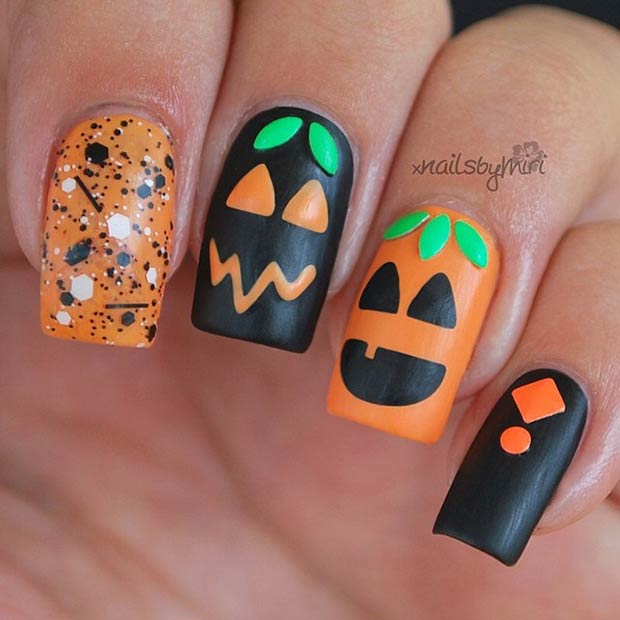
Source: @xnailsbymiri
This lovely nail design screams Halloween! A matte finish is a great way to spice up your manicure.
11. Ghosts – Boo!
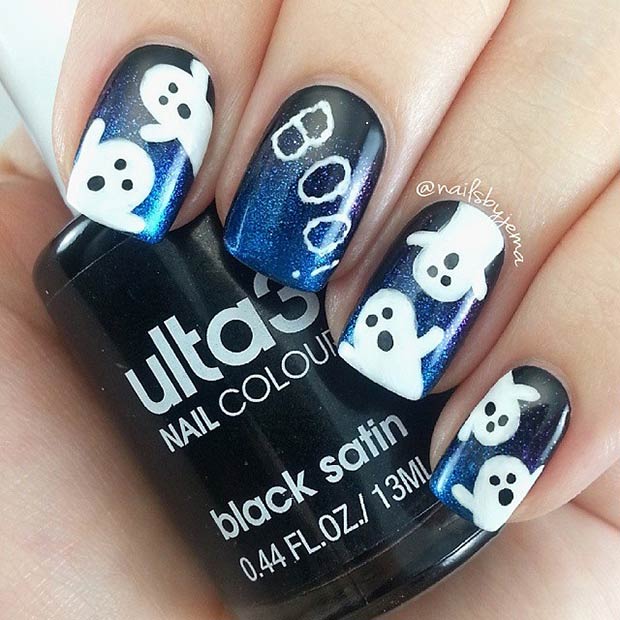
Source: @nailsbyjema
Update your dark glitter nails with a few white ghosts. Boo! Products used: OPI “Swimsuit…Nailed It”, L.A. Girl Rockstar “Groupie” and Ulta3 “Black Satin”. Ghosts were done with acrylic paint.
12. Jack & Sally Nails
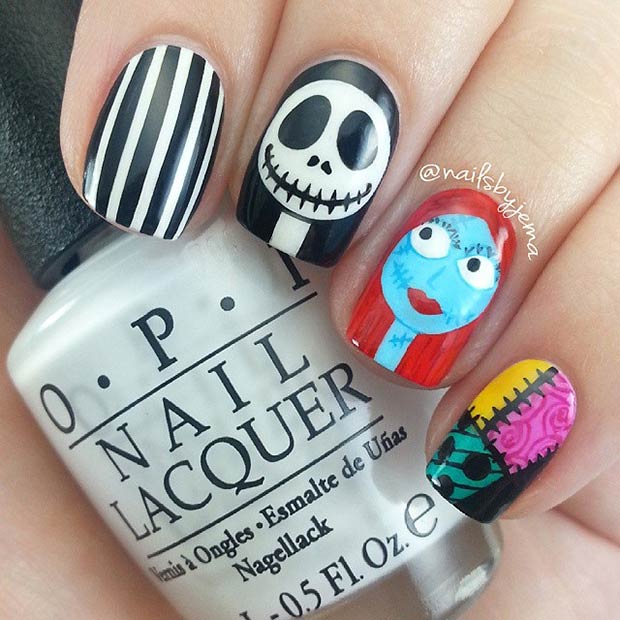
Source: @nailsbyjema
Not all Halloween nail designs have to be all about ghosts, spiders and pumpkins.
13. Cute Pumpkins
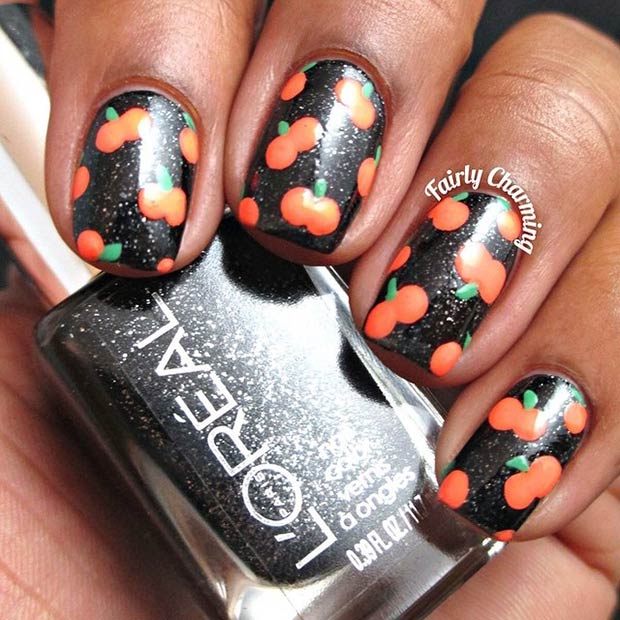
Source: @fairlycharming
Products used: Revlon “Lime Basil”, Orly “Mayhem Mentality”, and L’Oreal “The Queen’s Ambition”. Start by applying a black glitter base coat. Next, add pumpkins using a medium sized dotting tool and let them dry. Apply stems with a detail brush and finish with a top coat.
14. Jason Voorhees + Blood Splatter
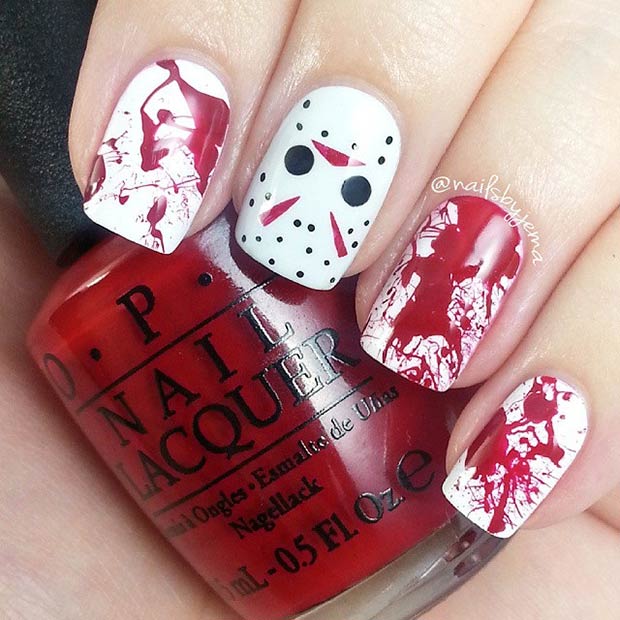
Source: @nailsbyjema
Halloween isn’t Halloween without ‘Friday the 13th’ movie. Give your blood-splatter nails a creepy upgrade with a Jason Voorhees mask. Products used: OPI “Cinnamon Sweet”, “My Boyfriend Scales Walls” and “Alpine Snow”.
15. Bleeding Eyes
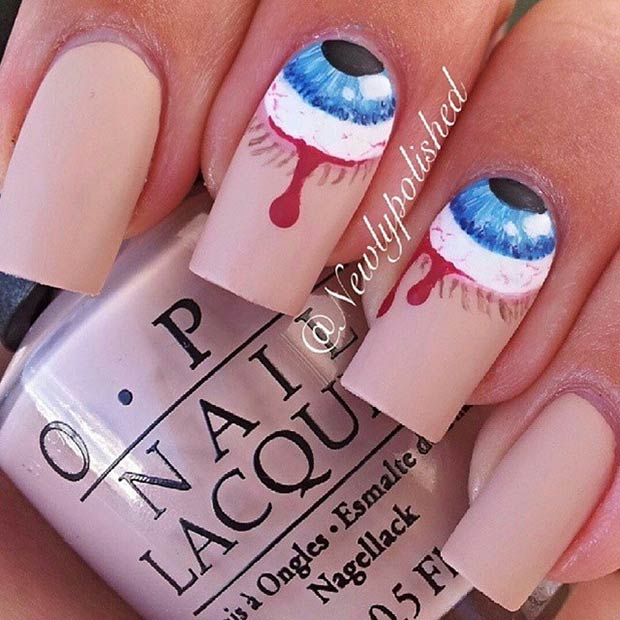
Source: @newlypolished
Long, matte, and oh-so-spooky – this manicure has it all! The base color is OPI “Don’t Pretzel My Buttons”. Tutorial for this look is here.
16. RIP Matte Nails
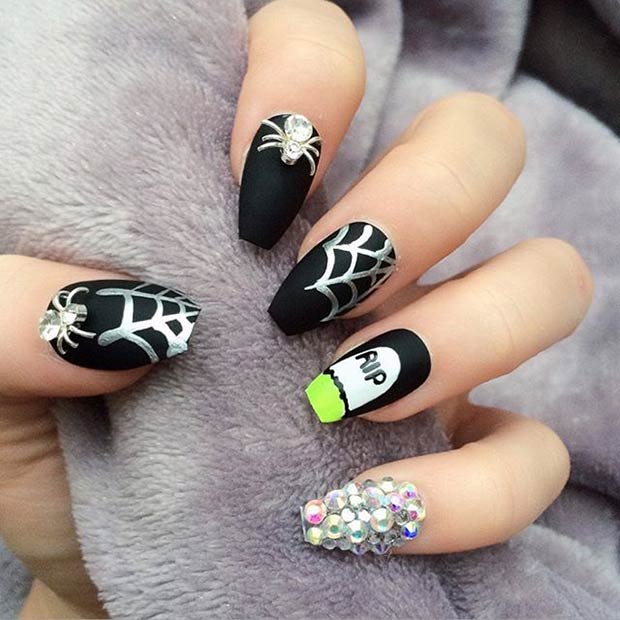
Source: @doobysnails
We like to think that Morticia Addams would definitely rock this manicure.
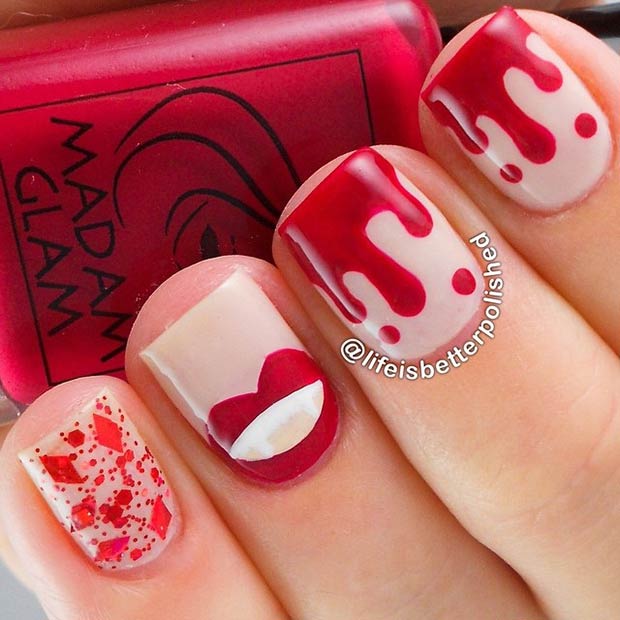
17. ‘Crime Scene’ Nails

Source: @polishedtwins
This Halloween, turn your nails into a crime scene!
18. Vampire Nail Design
Source: @lifeisbetterpolished
Products used: Madam Glam “Red Dress”, Loaded Lacquer “No Shirt” and Loaded Lacquer “Cuts Like a Knife”.
19. Textured Candy Corn Nails
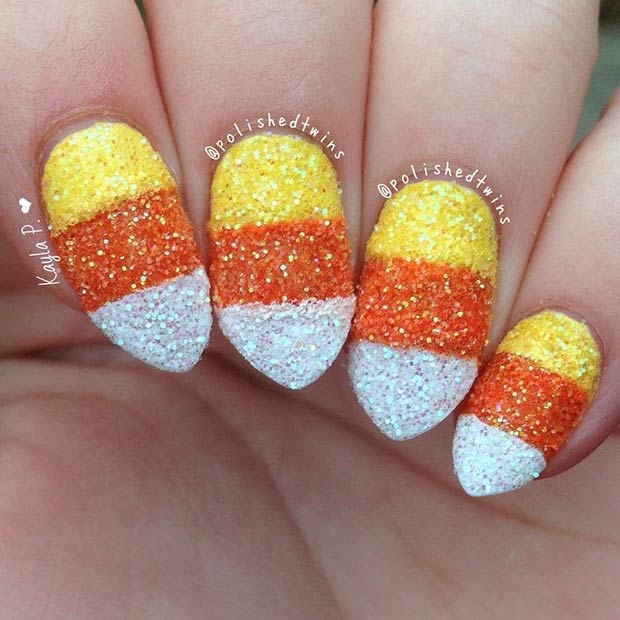
Source: @polishedtwins
If candy corn is your favorite Halloween treat, make sure to give this nail design a try! It looks so real, we almost want to eat it.
20. Black & White Matte Design
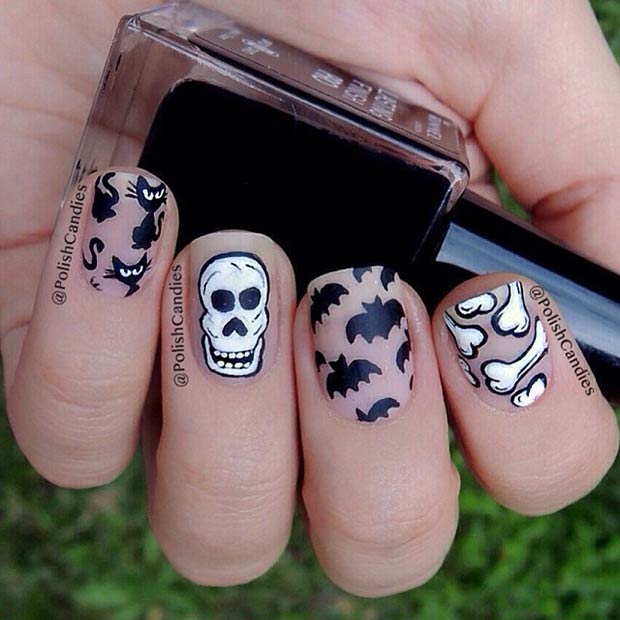
Source: @PolishCandies
Paint each nail a different Halloween staple: one spooky skull, one black cats, one bones, and one bats. Top it off with a matte top coat for a cool, shine-free finish.
21. Simple Blood Dripping Nails
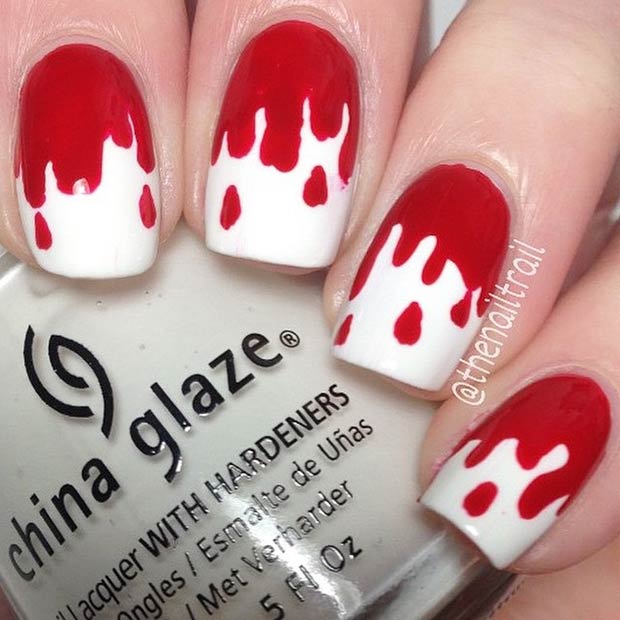
Source: @thenailtrail
To recreate this nail design, you will need: a white nail polish, a red nail polish and a handful of wooden toothpicks.
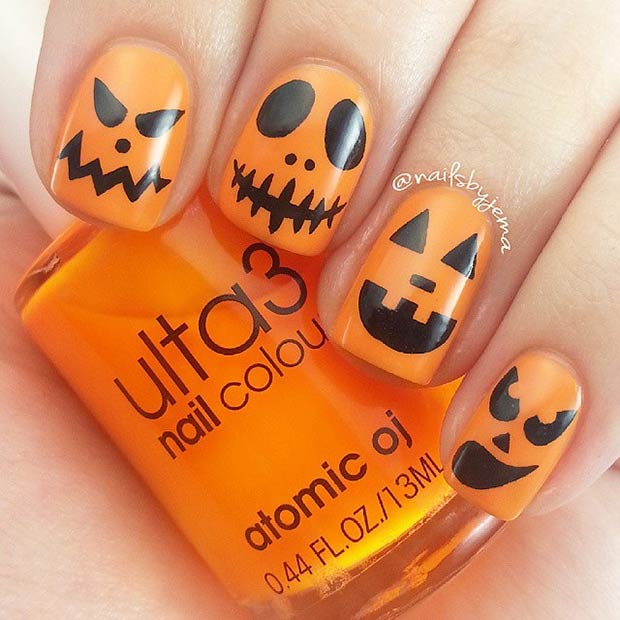
22. Scary Pumpkins
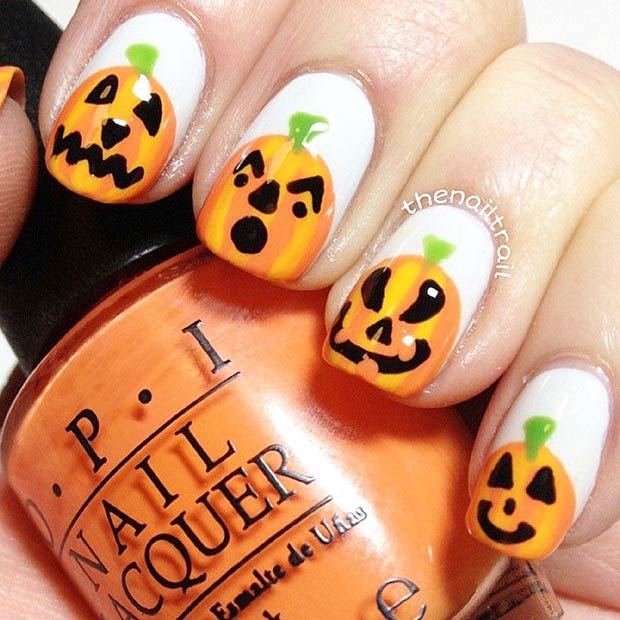
Source: @thenailtrail
Spook up your nails with these scary pumpkins! We love the expressions.
23. Cute Design
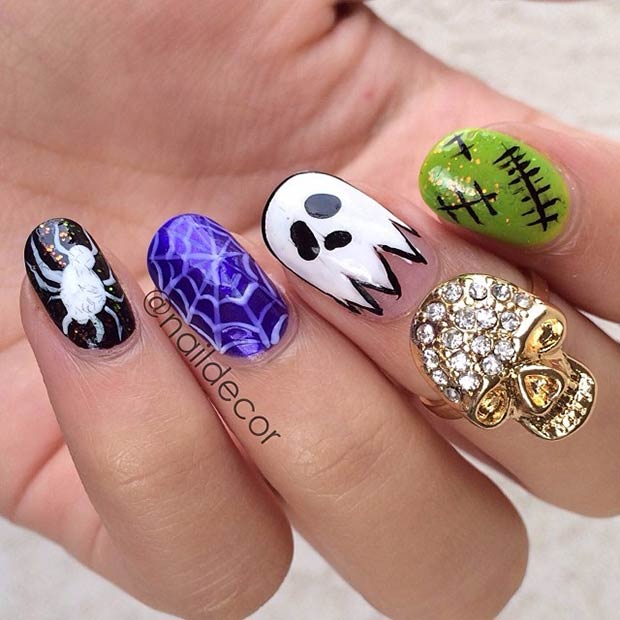
Source: @naildecor
This nail design is a great choice for those who can’t choose between spiders and ghosts.
24. Black & Purple Spider Design
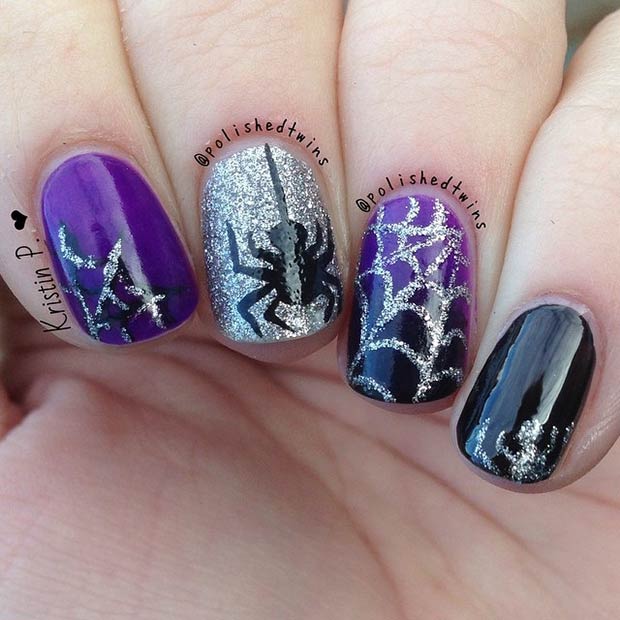
Source: @polishedtwins
If you’re looking for a manicure that’s cute and easy to do, then this one is for you!
25. Brain Nail Design
Source: @just1nail
This design might look gross to most people, but we think it’s pretty cool and fun.
26. Cool Black & Orange Design
Source: @naildecor
Who says Halloween nails can’t be bright and playful, too?
27. Ombre Candy Corn Nails

Source: @thenailtrail
Fun and subtle way to show off your Halloween spirit without being too over the top!
28. Gory Blood Nails
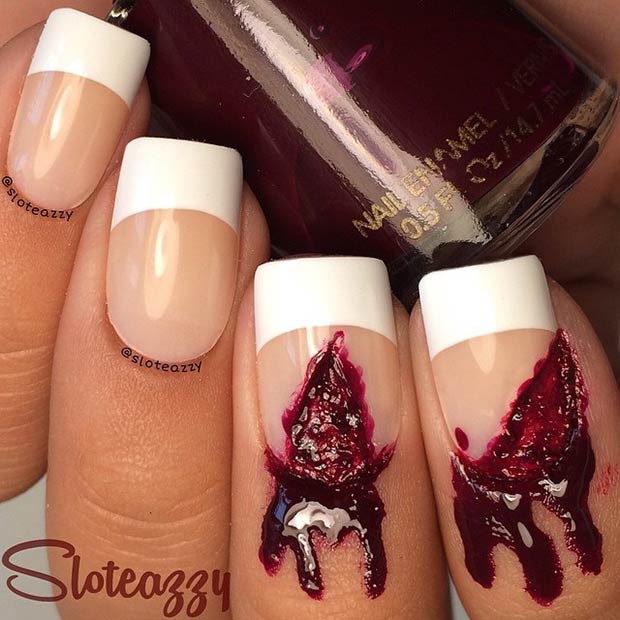
Source: @sloteazzy
Want to creep out your friends and family? Update a basic french manicure with fake blood.
29. Black & Orange Jack O’lantern Design

Source: @clairelofthouse
A black and orange manicure is the best way to get in the spooky spirit for Halloween, right?
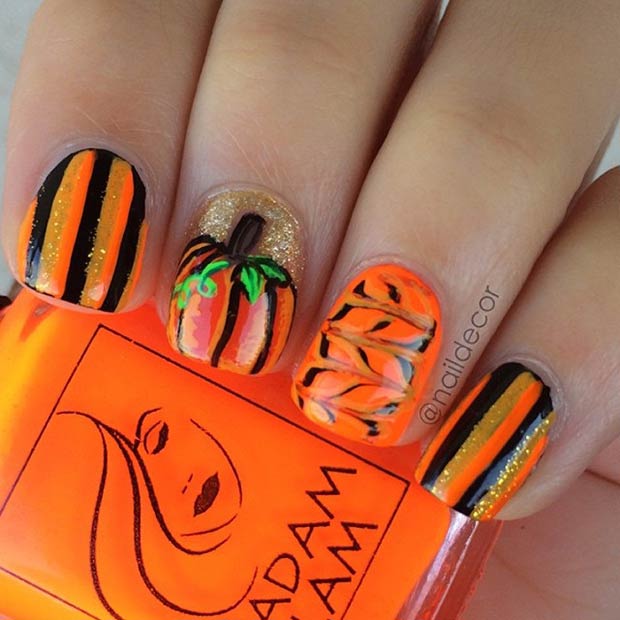
30. Orange Jack O’lantern Nails
Source: @nailsbyjema
Transform your nails into cheeky Jack-o’-lanterns using only two products – an orange nail polish and black acrylic paint. The base nail polish is Ulta3 “Atomic OJ”.
31. Ghosts in the Night
Source: @polishedtwins
This nail design is absolutely spooktacular!
32. Stripes + Dripping Blood Nails
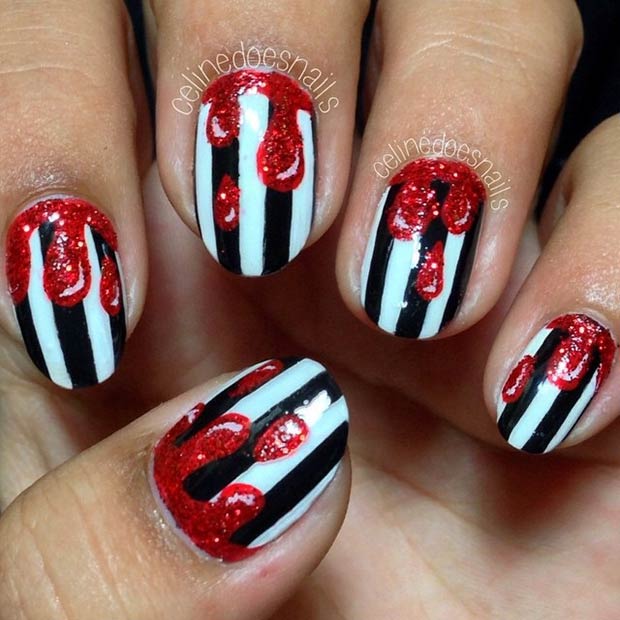
Source: @celinedoesnails
Try your hand at these striped, Beetlejuice nails!
33. Jack O’Lantern Accent Nail
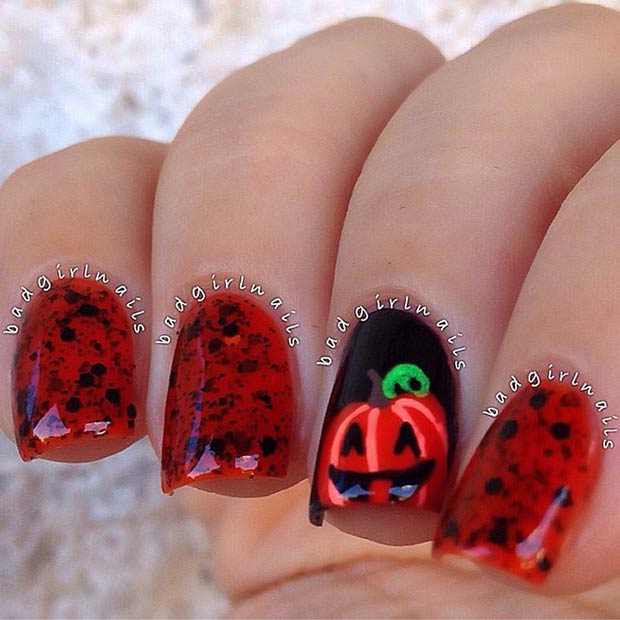
Source: @badgirlnails
Take your classic manicure to a whole new level with a cute Jack-o’-lantern accent nail.
34. Easy Spider Web Nails
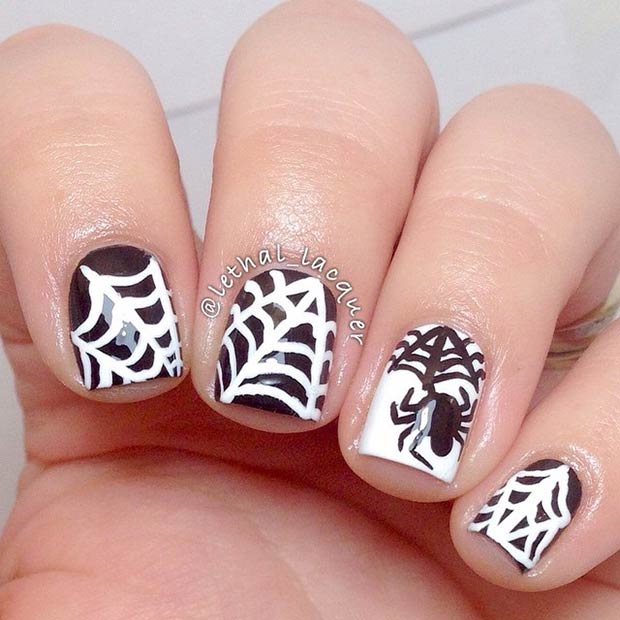
Source: @lethal_lacquer
Even a nail art newbie can re-create this simple look!
35. Candy Corn Design
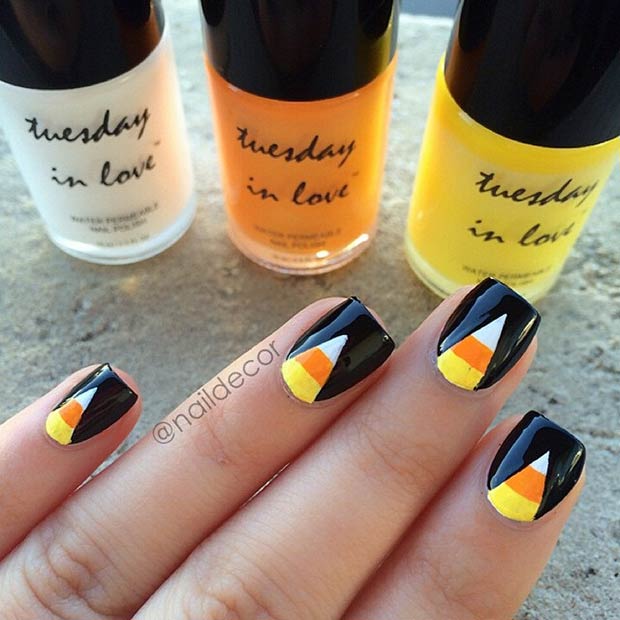
Source: @naildecor
Another cute design for all candy corn addicts!